Epoxy Fix For A Combusted PCB

When the Magic Smoke is released, chances are pretty good that you’ve got some component-level diagnosis to do. It’s usually not that hard to find the faulty part, charred and crusty as it likely appears. In that case, some snips, a new non-crusty part, and a little solder are usually enough to get you back in business.

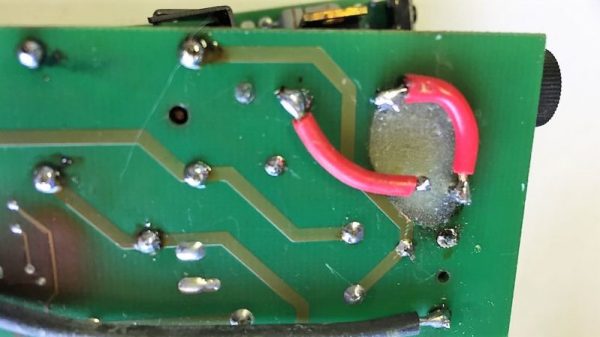
But what if the smoke came not from a component but from the PCB itself? [Happymacer] chanced upon this sorry situation in a power supply for an electric gate opener. Basking in the Australian sunshine for a few years, the opener started acting fussy at first, then not acting at all. Inspection of its innards revealed that some unlucky ants had shorted across line and neutral on the power supply board, which burned not only the traces but the FR4 of the board as well. Rather than replace the entire board, [Happymacer] carefully removed the carbonized (and therefore conductive) fiberglass and resin, leaving a gaping hole in the board. He fastened a patch for the hole from some epoxy glue; Araldite is the brand he used, but any two-part epoxy, like JB Weld, should work. One side of the hole was covered with tape and the epoxy was smeared into the hole, and after a week of curing and a little cleanup, it was ready for duty. The components were placed into freshly drilled holes, missing traces were replaced with wire, and it seems to be working fine.

This seems like a great tip to keep in mind for when catastrophe strikes your boards. There are more extreme ways to do it, of course, but perhaps none so flexible. After all, epoxy is versatile stuff.

Learn Verilog In Your Browser

We are big fans of tools in the browser for education. You have a consistent environment maintained by someone else, you don’t have to install anything, and you can work from any computer you happen to find yourself. The HDLBits site has a great set of Verilog “exams” that would be a big help to anyone trying to learn or brush up on their Verilog skills.

The site offers a range of topics that go from the silly (output a constant 1 or 0) to full-blown state machines and testbenches. The site isn’t tutorial in nature, instead it offers a problem, an optional hint, and an editing window with some code already in place. You add your code and hit submit. Behind the scenes, the site runs Intel Quartus and Modelsim to test your work. It will either show you the results or tell you that you failed.

Continue reading “Learn Verilog In Your Browser”

Apple’s Best Computer Gets WiFi

The greatest computer Apple will ever make isn’t the Apple II, it isn’t the Bondi Blue iMac, it isn’t the trash can, and it certainly isn’t whatever overheating mess they’re pushing out now. The best computer Apple will ever make is the SE/30, at its time a server in a tiny portable shell, and capable of supporting 128 Megabytes of RAM thirty years ago.

Over the years, people have extended and expanded the SE/30 to absolutely ludicrous degrees, but now we have a simple way of adding WiFi to this classic computer. Over on the 68kmla forums, [ants] discovered a tiny cheap card that could easily serve as an Ethernet to WiFi bridge. After attaching this card to a Danaport Ethernet card and bending some aluminum for a bracket, they had a WiFi antenna sticking out of the back of a 30-year-old computer.

But adding a WiFi card to an old computer is nothing new — this could have been done with a Pi, or if you’re a hacker, a TP-Link router flashed with OpenWRT. To really do this right, you’ll need integration with the operating system, and that’s where this build goes off the rails. [ants] wrote a WiFi extension for System 7 (with the relevant GitHub)

The problem with the Vonets WiFi card is that configuration has to be done through a browser. Since there are no modern browsers for classic macs, this meant either pulling out a PowerBook or doing the configuration through your daily driver desktop PC. The WiFi extension gets around that by giving a classic mac the ability to configure the Vonets card almost automatically. This extension also looks like how you would configure the WiFi on a modern mac, complete with the WiFi icon in the toolbar. It’s beautiful, and one of the rare examples of modern 68k mac programming.

As for what you can do by adding WiFi to a 30-year-old computer with a 16MHz processor, the answer is a resounding, ‘not much’. Your choice of browsers is limited (iCab seems to be the best), but you can load the Google homepage slowly. HTTPS isn’t going to work, and the Internet right now is full of megabytes of Javascript cruft. If you find a nice, lightweight web page — such as the Hackaday Retro Edition, for example — you’re looking at a capable web browsing machine. Of course, the real use case for giving the SE/30 WiFi is file transfer around the home network, but still: it’s WiFi for the best computer Apple ever made.

Bask In The Warm Glow Of DIY Incandescent Bulbs

With most of the apparatus and instruments we now take for granted yet to be developed, the early pioneers of the Electric Age had to bring a lot to the lab besides electrical skills. Machining, chemistry, and metallurgy were all basic skills that the inventor either had to have or hire in. Most of these skills still have currency of course, but one that was once crucial – glassblowing – has sadly fallen into relative obscurity.

There are still practitioners of course, like [2SC1815] who is learning how to make homemade incandescent light bulbs. The Instructable is in both English and Japanese, and the process is explained in some detail. Basic supplies include soda-lime glass tubing and pre-coiled tungsten filaments. Support wires are made from Dumet, an alloy of iron, nickel, and cobalt with an oxidized copper cladding which forms a vacuum-tight seal with molten glass. The filament is crimped to the Dumet leads and pinched into a stem of glass tubing. A bulb is blown in another piece of tubing and the two are welded together, evacuated with a vacuum pump, and sealed. The bulbs are baked after sealing to drive off any remaining water vapor. The resulting bulbs have a cheery glow and a rustic look that we really like.

Of course, it’s not a huge leap from DIY light bulbs to making your own vacuum tubes. That’s how [Dalibor Farny] got started on his handmade Nixie business, after all.

Electronic hub barrette diagram

Hair Is Good Electronic Hub Real Estate

When it comes to wearables, there are a few places you can mount rechargeable batteries and largish circuit boards. Certainly, badges hanging from a lanyard are a favorite here on Hackaday. A belt is another option. [deshipu] has come up with a good location on your head, provided you have long hair that is. That’s the hair clasp or barrette. It can support a hefty mass, be relatively large, and doesn’t touch your skin.

Plusing LEDs barretteHis plan gets even better, namely to use it as a hub for other electronics on your head, giving as examples: mechatronic ears and LEDs on eyelashes, earrings, and neck collars. We’d include some sort of heads-up display on glasses too or perhaps some playful glasses windshield wipers.

Being able to solder the clasp to the circuit board was his first success and he’s since made a test barrette with pulsing LEDs which he’s distributed to others for evaluation. We really like his electronic hub idea and look forward to seeing where he takes it. For now, he’s done enough to have become a finalist in the Hackaday Human Computer Interface Challenge.

Building A Hardware Store Faraday Cage

Most Hackaday readers are no doubt familiar with the Faraday cage, at least in name, and nearly everyone owns one: if you’ve ever stood watching a bag of popcorn slowly revolve inside of a microwave, you’be seen Michael Faraday’s 1836 invention in action. Yet despite being such a well known device, the average hacker still doesn’t have one in their arsenal. But why?

It could be that there’s a certain mystique about Faraday cages, an assumption that their construction requires techniques or materials outside the realm of the home hacker. While it’s true that building a perfect Faraday cage for a given frequency involves math and careful attention to detail, putting together a simple model for general purpose use and experimentation turns out to be quick and easy.

As an exercise in minimalist hacking I recently built a basic Faraday cage out of materials sourced from Home Depot, and thought it would be interesting to not only describe its construction but give some ideas as to how one can put it to practical use in the home lab. While it’s hardly a perfect specimen, it clearly works, and it didn’t take anything that can’t be sourced locally pretty much anywhere in the world.

Continue reading “Building A Hardware Store Faraday Cage”

Bring Your Own Controller Kits Just Add Bluetooth

Known for their build quality and low latency, the [8bitdo] line of Bluetooth controllers are generally well liked among classic videogame devotees. They match modern conveniences like rechargeable batteries and Bluetooth connectivity with old school color schemes and the tried-and-true feel of a D-pad. All of their current offerings are modeled to invoke the same feel of console controllers of the past, however, for some there is no substitute for the original. For that type of hobbyist, the company created DIY Bluetooth mod kits in the form of drop-in replacement PCBs.

The featured mod kits are for the original NES controller, SNES controller, and 6-button Genesis Controller. They feature a 180 mAh Li-ion battery for an estimated 7.5 hours of gameplay, and a unique barrel plug type USB charging cable. The charging port fills the void left by the controller’s connection cable and also doubles a the LED status indicator. Though for the Sega Genesis mod kit, the charge port changes to a standard micro USB.

The [8bitdo] website boasts compatibility across Android, Linux, Mac, and Windows (drivers permitting) and even Nintendo Switch. With the addition of one of the company’s Retro Receivers, you are able to use the controllers on the original NES or SNES alongside their contemporary NES/SNES classic console counterparts.

Continue reading “Bring Your Own Controller Kits Just Add Bluetooth”