We know it’s hard to hear it, but the days of you being a hotshot at the local Hackerspace because you’ve got a 3D printer at home are long gone. While they’re still one of the most persnickety pieces of gear on the hacker’s bench, they’re certainly not the rarest anymore. Some of these printers are so cheap now they’re almost impulse buys. Like it or not, few people outside of your grandmother are going to be impressed when you tell them you’ve got a personal 3D printer anymore; and we wouldn’t be surprised if even granny picked up a Monoprice Mini during the last open box sale.
 But while 3D printer ownership isn’t the pinnacle of geek cred it once was, at least there’s a silver lining: cheap motion platforms we can hack on. [squix] writes in to tell us about how he added a laser to his $200 USD Tevo Tarantula 3D printer, greatly expanding the machine’s capabilities without breaking the bank. The information in his write-up is pretty broadly applicable to most common 3D printer designs, so even if you don’t have a Tarantula it shouldn’t be too hard to adapt the concept.
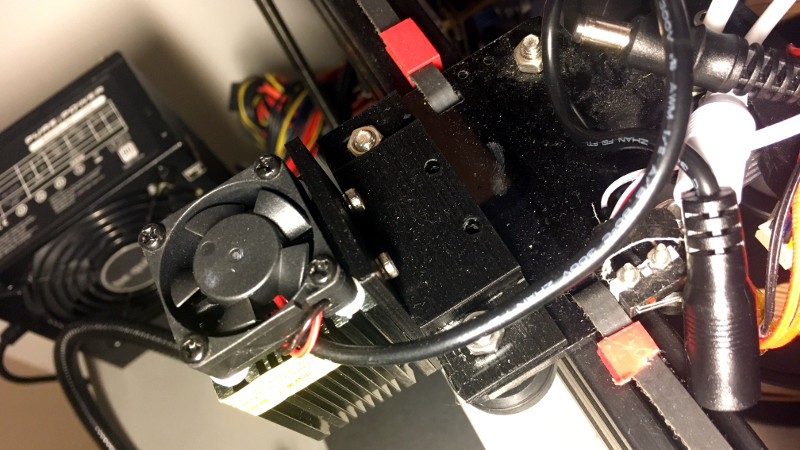
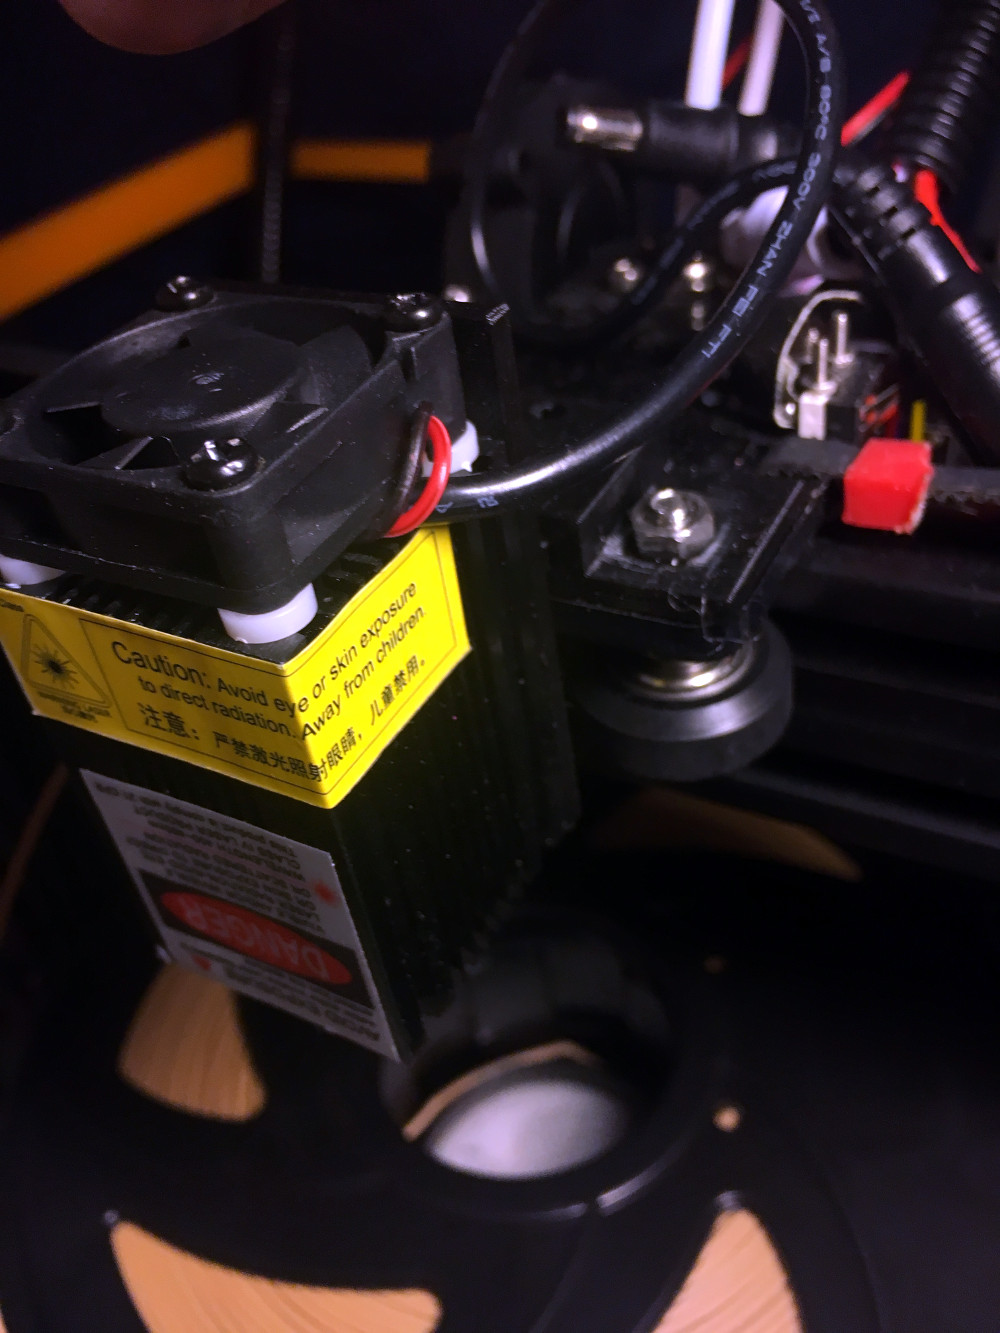
The laser is a 2.5 W 445 nm module which is very popular with low-cost laser cutter setups. It’s a fully self-contained air cooled unit that just needs a source of 12 V to fire up. That makes it particularly well suited to retrofitting, as you don’t need to shoehorn in any extra support electronics. [squix] simply connected it to the existing power wires for the part cooling fan he added to the Tarantula previously.
You may want to check the specs for your 3D printer’s control board before attaching such a high current device to the fan connector. Best case it just overloads the board’s regulator and shuts down, worst case the magic smoke might escape. A wise precaution here might be to put a MOSFET between the board’s fan output the and the laser, but we won’t tell you how to live your life. As far as laser safety, this device should probably work inside an opaque box, or behind closed doors.
Once the laser is hanging off the fan port of your printer’s controller, you can turn it on with the normal GCode commands for fan control, M106 and M107 (to turn it on and off, respectively). You can even control the laser’s power level by adding an argument to the “on” command like: M106 S30.
Then you just need to mount the laser, and it’s more or less business as usual. Controlling a laser engraver/cutter isn’t really that different from controlling a 3D printer, so [squix] is still using OctoPrint to command the machine; the trick is giving it a “3D model” that’s just a 2D image with no Z changes to worry about. We’ve seen the process for doing that in Inkscape previously.
With this laser module going for as little as $60 USD (assuming you’ve got a 3D printer or two laying around to do the conversion on), this is a pretty cheap way to get into the subtractive manufacturing game. Next stop from there is getting one of those K40’s everyone’s talking about.


> Like it or not, few people outside of your grandmother are going to be impressed […]
What about the people inside my grandmother?
Why do you have such big eyes, granny?
Brilliant! After reading your first sentence but not the second, I was thinking about the people inside grandmother’s head
That 2.5W laser (Bluray laser diode …) is not really much of a cutter – perhaps for balsa and thin cardboard, it won’t cut anything else.
And buying laser safety glasses from Banggood? That’s pretty insane, IMO. Your eyeballs are not replaceable, buy the stupid glasses from a reputable vendor! Yes, they will not cost $4 but this is a very stupid place where to pinch pennies.
> As far as laser safety, this device should probably work inside an opaque box, or behind closed doors
Not sure where the $4 Banggood bit came from, but neither the article nor common sense says to do so. The article shys away entirely, though I’ve seen a few tinted enclosures that seem like a better way to do it. Safety first, never assume people nearby are wearing their safety goggles. Let the laser cutter be the one to wear the goggles.
Another method is to build a completely blacked-out enclosure and use a webcam to keep an eye on things. No risk of stray reflections or anything else, and you don’t have to find out the hard way that your googles don’t work.
Good idea too, MotionEyeOS with a PiCam would make that dead easy.
“Let the laser cutter be the one to wear the goggles.”
This. As our laser safety guy said “Do you really trust the only eyes you’ll ever have to uncertified glasses that cost a couple of bucks?”. It may be they’re fine, but I’ll spend the difference on mine, thanks.
The only thing more cringeworthy are the kids on youtube running microwave oven magnetrons as latter-day ray guns. You don’t want to know what those will do to your eyes.
I recently bought a desktop CNC/Laser cutter from one of the CN discount sites. Same idea as here, a 2.5W laser unit that drops into the same housing as the CNC spindle motor. It came with some green tinted “safety glasses” They’re fine for flying chips but pointless with the laser.
I picked up a pair of ACTUAL laser safety glasses for $75, delivered: http://www.phillips-safety.com/laser-safety/laser-safety-glasses/shop-by-laser-filters/polycarbonate-filters/argon-ktp/argon-ktp-model-33-bk.html. May be overkill for this application but, per the old Bell Helmet advert ‘If you’ve only got a $10 head – the buy a $10 helmet ‘.
2.5 watt (W) laser dude is significant. Blu-ray dudes are in the milliwatt (mW) range. 500mW is enough to burn things
I have one of the Banggood kit laser engravers (initially 500mW, just recently ordered a 3.5w laser to upgrade). None of these little diode lasers are great cutters, but they are decent engravers, and have other uses like PC board resist removing prior to etching. So, adding that additional capability to your 3D printer for $60 is not bad.
I bought a slightly better and darker set of glasses from BG. They’re better protection than the supplied set, but I wouldn’t want to experience a direct hit through them. Of course, the best protection is a complete enclosure, which will also allow you to add an exhaust fan. I’m kind of surprised the unenclosed engraver kits are still allowed to be sold… I think we’re going to hear more stories of permanent vision damage from accidents or carelessness, or even from extended “correct” use with just the cheesy glasses.
Did you see the articles that were posted about using a 3d printer to remove etch-resist by replacing the hotend with a nail? It just scratched the resist of mechanically. I want to try that!
I suppose if you are the kind who likes to run with scissors you might poke an eye out with that nail but I still think your odds are much better with this method than with franken-grafting a laser to your printer.
“than with franken-grafting a laser to your printer.”
Or than by using one of those open-framed Banggood jobs. Sorry, momentarily forgot what I was replying to I guess!
Wasn’t it a thing that the lasers also pump out other wavelengths, besides the one on the sticker?
$200 for a “2.5W”? Spring the extra 100 and get a K40. Leave the 3d printer doing 3d printing.
Oops, can’t read. Even so, it’s not going to do much useful even if it’s only 60.
Would it work for DIY PCBs with a “etch off paint, then chemical etch the copper” process?
In principle this works, with some nuanced process. Aggressively clean the PCB as normal, and use flat black spray paint, then bake in an oven for an hour to ensure the paint is completely dry and sealed. (Baking is pretty-much a requirement for the process.)
The problem is the laser spot size of about 20 thou, or about half a millimeter, draws traces too wide to do much useful PCB’ing. For example, a DIP with connections 0.1″ apart (the standard), the system *might* be able to draw a pad and one trace running between, but anything smaller would be beyond the capability of the system.
Rather than making PCBs, this process is good for making brass nameplates and other non-PCB etching tasks.
As for example in these HAD articles:
https://hackaday.com/2018/01/25/three-ways-to-etch-snazzy-brass-nameplates/
https://hackaday.com/2018/02/17/the-fine-art-of-acid-etching-brass/
You must not be an Alton Brown fan. :) He’s always going off against “unitaskers”. If you’ve already got all the motors, switches, and controls set up for one task, why not extend its capabilities for another task? Seems a waste of money to get a whole separate set of motors, switches, and controls that move in the same way just to move a different tool.
Depends on your workflow, needs, and machine setup. You can’t use multiple heads at a time, but you can use multiple machines. If I’m working on a project, I’m using my laser and mill while my printer is running.
Also, if you want a half decent laser you’re not going to be using a 2.5W attachment. In that case you’re going to likely be water cooling and to swap all that out, swap to a printer head, hook up the stepper for the filament feed and setup a spool just to start a print. Not to mention the headache of properly indexing your heads. The K40s are plenty cheap and are very good machines with a little tuning and upgrading. It seems the article was aimed at people with old printers they could repurpose.
In some cases, I agree. But a K40 is drastically different to a 3d printer in so many ways.
Having said that, I have toyed with the idea of repurposing a spare 3d printer into a laser (for PCB making) and solder-placement device via interchangeable heads. But that’s a very constrained set of limited requirements. If I then thought I’d add drilling, then it’s be too dissimilar to justify.
I picked up a 5 watt module for $100… the money would have been spent better on a $340 k40. 5 watts requires multiple (4) passes to cut cereal box material. It does nice picture burnings tho. The smell of smoke is a bit annoying and the un shielded laser is not ideal with the family around.
Easy program to convert JPEG to GCODE , very usefull …
http://turmandreams.es/index.php?e=s&n=150
The other thing to consider is room, it’s all well and good buying a K40 if you have the money and room to put it in but living in the UK where space is costly means I can only dream of owning a nice large K40 laser cutter. I’ve barely enough room to finish building and using my CNC alongside my 3d printer let alone more equipment. So I think Dan’s upgrade is something worth considering. Me personally, I’m going to add the laser head to my CNC machine rather than the printer but the same principles apply. Nicely done Daniel Eichhorn!!
I have lived in apartments but I’ve never lived in the UK. I really can’t imagine having a space so small that owning a K40 is an impossibility. Is it really THAT bad? I can imagine it requiring some creativity but not anything one couldn’t overcome if they wanted it badly enough.
Do you have any kind of end table in your apartment? What if you replaced it with a home-made one. It could have exactly the necessary height and width to hold the K40. The tabletop could be removable. You could have a shelf under the table top that is exactly the right height below the tabletop to just fit the laser cutter. A second shelf below that would be just far enough down to leave room for the water tub. Use a submersible pump that can just remain in the water tub so that it requires no extra space. The water tub shelf should be just high enough off the ground to leave room to coil up the air exhaust hose underneath it when not in use.
Do the windows open? Forget the air filter. Just cut a piece of plywood to shut in the window. Match it’s width to the window opening, Make it just tall enough that you can cut a hole to fit a piece of dryer pipe to it without it falling into two pieces. That drier pipe by the way is the air exhaust pipe I was talking about coiling beneath the shelf. Shut that in the window with your dryer pipe connecting it to the cutter when it is in operation. Don’t leave it there when not in use, your landlord might not approve. If that isn’t good enough then just limit your use of the printer to night time so no-one notices the board in the window.
If the window idea just isn’t going to work.. put castors on the whole thing. Wheel it over to by your bathroom and hang the exhaust pipe outlet to your bathroom’s fan vent. Turn the fan on.
I find this a worrying trend, 3d printers aren’t designed to be laser engravers. Sure they have all the right hardware but they lack the safety features of a proper laser machine. Goggles are not enough to mitigate the risks in my opinion, you need a full enclosure to prevent stray beams, whether reflected or direct. You might be safe but what about your pets or children who can’t understand the risk?
The other important difference are the materials used to make a 3d printer over a laser machine, I have a K40 and a Tevo Tarantula, and the differences in the materials used are stark. My K40 has almost no flammable materials in the work area, whereas my printer. and many others, have plastic sheets on the heat bead I’d be willing to bet is flammable, and a stock TT has acrylic brackets that would burn nicely too. Not a good idea to be firing an ignition source at a flammable material unless you want to set it a flame.
I built my 3d printer. I wanted one that was homebrew so that I would be able to easily modify it.
I downloaded printed an attachment that lets me replace the extruder and hotend with a pen or marker and use the printer as a plotter. It’s not ideal as it depends on the Z axis to move the pen up and down which is slow but it works well.
I designed and printed another attachment so that I can fit my Dremel and use it as a lightweight CNC mill. I’m waiting to test that one until I have a full set of replacement parts printed just in case using it this way results in too much mechanical stress and breaks something.
My wife wanted a Cricut machine so I downloaded and printed a drag-knife attachment so that she could cut paper into shapes using my printer. I didn’t like the way this one fits together though so I intend to design my own drag knife instead.
Our local hackerspace has a kiln for pottery. I’ve been daydreaming about building a paste extruder so that I can extrude clay shapes.
But…
Laser?
Maybe some day medical technology will progress and we can get new eyeballs grown from our own cells and inserted in an quick, inexpensive and painless outpatient procedure.
Until then…
No, No and Hell No!
These 3d-printer to laser engraver retrofits scare me! As do any of those cheap laser engraver kits that have no enclosure. I’ll take my laser in a metal box with the only view being through a window that is designed, by a brand that I trust to block the specific wavelength of the laser with thank you very much!!!