An ultrasonic knife is a blade that vibrates a tiny amount at a high frequency, giving the knife edge minor superpowers. It gets used much like any other blade, but it becomes far easier to cut through troublesome materials like rubber or hard plastics. I was always curious about them, and recently made my own by modifying another tool. It turns out that an ultrasonic scaling tool intended for dental use can fairly easily be turned into a nimble little ultrasonic cutter for fine detail work.
I originally started thinking about an ultrasonic knife to make removing supports from SLA 3D prints easier. SLA resin prints are made from a smooth, hard plastic and can sometimes require a veritable forest of supports. These supports are normally removed with flush cutters, or torn off if one doesn’t care about appearances, but sometimes the density of supports makes this process awkward, especially on small objects.
I imagined that an ultrasonic blade would make short work of these pesky supports, and for the most part, I was right! It won’t effortlessly cut through a forest of support bases like a hot knife through butter, but it certainly makes it easier to remove tricky supports from the model itself. Specifically, it excels at slicing through fine areas while preserving delicate features.
See It In Action
The usual go-to method for removing supports is a good quality pair of flush cutters, but on very small models and in dense support areas they are neither maneuverable nor do they make it easy to see what one is doing.
Also, when cutting supports with normal tools there is always some amount of stress put on the piece that’s being cut. A knife forces its way through an object, and clippers shove anything between the blades apart which can crack or shatter small pieces. A fragile part can break from the force of these tools, no matter how careful one is.
The advantage of cutting with an ultrasonic knife is that very little force is transferred to the part being cut. Additionally, the small tool tip means it is highly maneuverable and easy to see what one is doing.
How It Was Made
We once featured an attempt to make an ultrasonic knife by harvesting parts from an ultrasonic cleaner. That project connected both a custom attachment and x-acto knife blade to the transducer. Results were mixed, and it appears that a critical aspect of an ultrasonic tool is to match the shape and mass of the head to the transducer itself so that they work in harmony. By using an existing ultrasonic tool as my starting point, I hoped to avoid problems in this area.
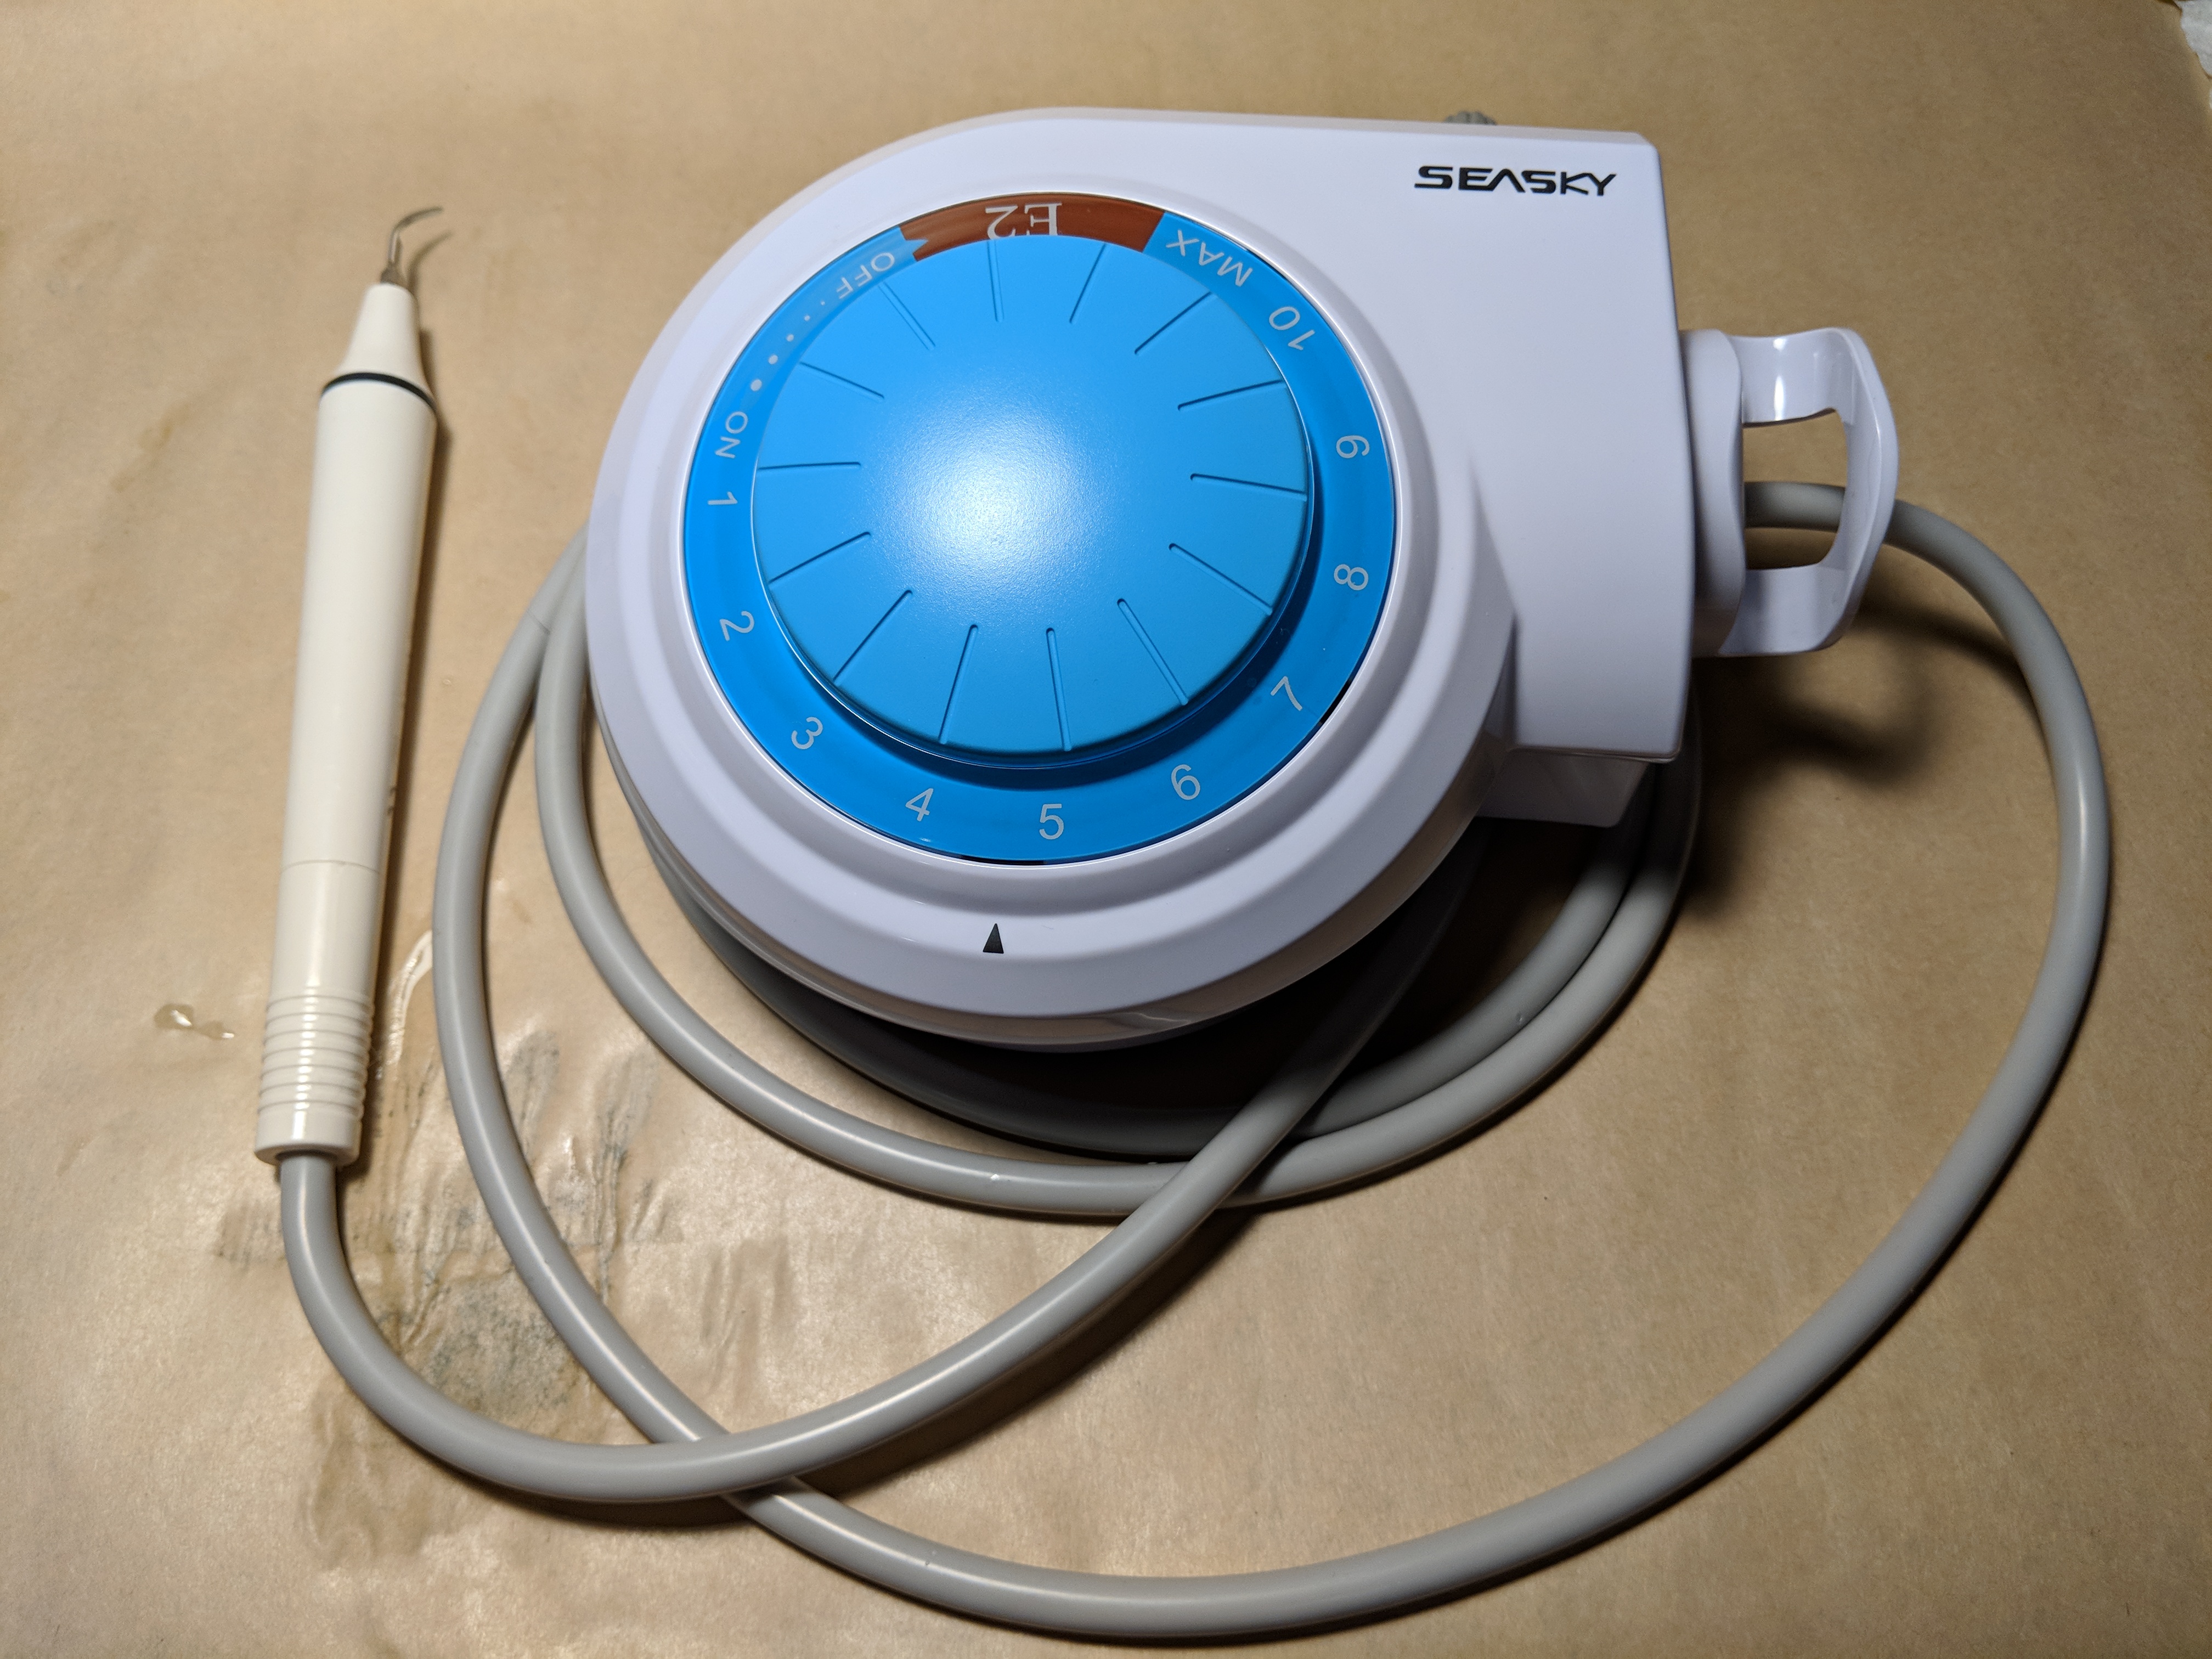
I modified an ultrasonic dental scaler I bought for $125 from China off eBay, plus $10 for a set of steel tips which are blunt by design. Scalers are normally used to break up hard tartar deposits on teeth without damaging the teeth themselves. They are not designed for cutting, but I figured it could at least be used to test the concept. The unit has a screw attachment system, is handheld, and has adjustable power.
The first thing I did was ignore the water system. Normally, water flows through the cord and out a hole in the tool to help cool the tip during extended use and flush away particles, but I didn’t want the mess and instead made do with a small spray bottle.
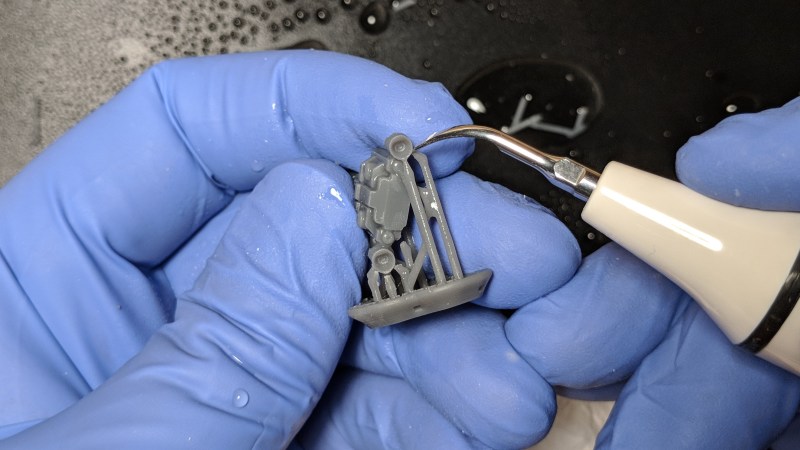
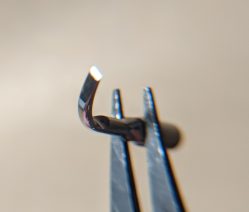
To turn the tool into a cutter, I selected a few tips and sharpened them carefully on a very fine grinding wheel to make a knife edge. The one that worked the best was the one shown here: the heaviest one with the widest tip, which I sharpened like a chisel.
Removing Delicate Supports From a 3D Print
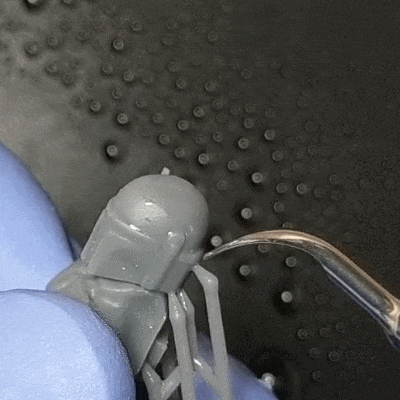
The 3D model I used has small and intricate pieces, with several delicate areas from which supports would be a challenge to remove with other tools. The thin tip of my ultrasonic cutter can easily reach these awkward areas at odd angles, and the small cutting edge makes it easy to see exactly what one is doing.
There was one particular spot that I aimed to use to decide whether the tool was a success or not: the antenna-like rangefinder on the helmet. It’s a blocky assembly attached to the side of the helmet by a long stalk. The original model by [Printed Obsession] has it as a separate piece, but I connected it to the rest of the helmet as a test. I knew that it would require supports in order to print correctly, and I also knew that it would be fragile and unlikely to survive the stress of removing those supports by other methods.
Could my new ultrasonic cutter be used to slice through these anchor points without putting significant stress on the delicate part itself? The answer was yes! Embedded below is a video that begins with successfully removing the supports mentioned, and continues with removing supports from the rest of the piece.
[wpvideo b7HEfWKi]
What Did Not Work Out?
There were a few dead ends in the process of creating this DIY ultrasonic cutter. Sharpening the dull factory tool ends was not my first idea; I originally tried to attach a small blade to one of the tool heads. An attempt to braze them together failed, and a later and much less confident attempt to join them with epoxy failed shortly after it even began.
I then decided to sharpen the tool ends instead of adding a blade, but it still took a few tries before I hit paydirt. Here are some of the attempts:
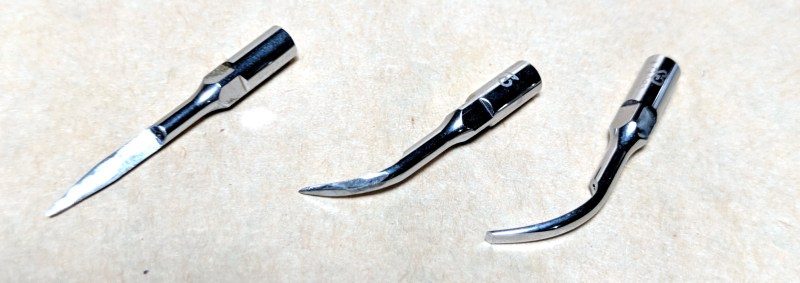
Of these three, the chisel tip (rightmost) was the clear winner. I suspect it is no coincidence that it also best preserves the original orientation and design of the tool. The others were sharpened on their sides, like knives. The middle one is in the original shape, and the leftmost one has been straightened. All will cut, but it was clear during testing that the tip is the “business end” of the tool. The sides cut very poorly in comparison, even at full power.
How Well Did It Succeed?
With the right modifications, an inexpensive tool was successfully turned into a precision DIY ultrasonic cutter. It handled removing the tricky supports on my test model beautifully.
Early on, I had fantasized that it might allow me to slice through wads of plastic like they weren’t even there. Sadly it doesn’t work that way, but it is outstanding for detail work.
While it performs wonderfully at the niche application I tested it for, are there other tasks a tool like this could be useful for? Would anything perhaps improve its performance? Let us know your ideas in the comments.


Nice!
Shades of Anne McCafrey and her Crystal singer series. where ultrasoic runed bades were used to cut through exotic crystals.
Love it!
Nice. I’m wondering if a blade could be made to work even if one had to start from scratch. My use would be to make precision cuts in thin film plastics. From looking at it, the movement of the tool may be rotational. If so, that may not work.
It could probably be made to work, but the toolhead in an ultrasonic cutter is carefully designed to form an oscillator that optimally conducts the vibrations of the transducer. In other words, it’s pretty hard and likely requires a decent chunk of time from an engineer to design an effective tool, which will only work properly in that exact model of cutter.
This page has a lot of interesting info, in addition to This Old Tony’s video referenced in the article: https://www.sonotec.com/en/column/Mechanism003.html
If you really want one, there is a Japanese company named Honda Cutters that makes some semi-affordable (~$300-400) dedicated ultrasonic cutters. I dunno of any more affordable purpose-made ultrasonic cutters, I guess they are a little too niche which is a shame because they’d be really useful for a lot of hobbies if you could get a decent one for $100.
The Honda Cutter Ultrasonic Tool is great, but pricey. Awesome for cutting open thermoplastic enclosures. Comes with what looks like a custom razor/xacto attachment.
Typically these things work by exciting a piezo-electric stack ~50Khz, and shaking a tuned piece of metal. The tips are essentially a tuning fork, designed to resonate around the frequency of the piezo stack.
A dental scaler likely isn’t running open loop, it probably is looking at the current draw on the piezo stack. Too much current = stall. Too little current = no attachment on the tip. The important bit is keeping the material & and the mass of the attachment substantially equivalent.
Bringing back our old friend:
https://www.youtube.com/watch?v=pFeek0a8s7Q
Interesting post. However, please stop using animated gif’s. They may be slightly more modern than the blink tag but they’re no less annoying.
i like the gifs. no need to change settings to view content type/source and fulfills my need for moving pictures . however, its possible im missing your point entirely .
I expect I’m not the only one who finds them extremely distracting. My analogy would be, trying to read something with someone in your field of vision waving in your direction the entire time.
My current solution to the glut of animated gifs everywhere has been the “animation Policy” chrome extension. You can quickly switch between “Never animate”, Animate ONCE”, and “Allow animations”.
However, There seems to have been a shift away from animated gifs in the last year or so. I’m finding most sites are embedding mp4s now in place of gifs. Which is even MORE obnoxious.
I mean, embedded WebM video would be ideal (though maybe bringing it’s own problems), but short of that what would you suggest when there’s something like this that obviously needs to be shown in motion?
A lot of sites have a static image with (GIF) overlayed on it. Clicking on the image loads the GIF.
Out of curiousity why don’t you just turn the feature (in your browser) off? It’s displaying client side after all.
Does anyone ever print anything besides Star Wars characters?
please stop propagating Nerd stereotypes with the Star Wars stuff
Please stop propagating Internet Commenter stereotypes by completely failing to comment on the meat of the article at hand (a great hack!) and focusing on some tiny little pet peeve of your own.
“Great nuclear powerplant, but I would have painted it green.”
Elliot, nil spurius corborundum…
Depositatum de latrina pro bono publico quia ego sic dico. :grin:
I shoulda put in a smiley.
But you’re probably right.
And here i am 3d printing a girl driend,
“what am i doing with my life…”
Where do you get the silicone filament?
(asking for a friend)
girlfriend aside, it would be cool to see more work on printing food-safe silicone
Now, if you just modify the design with a larger flat blade, we might get the first practical sonic screwdriver.
HaD has covered a lockpick using a SonicCrafter toothbrush…
For cutting thicker material you should try bone cutting tips, these are by design most effective in this application. On the other hand, grinding 0.5mm from standard tip for calculus removal will lead to attenuation of oscillations as author has observed – working as an service engineer, I saw “sharpened” used tips on a grinder which besides hurting a patient does not do nothing at all.
Two thoughts:
1. The tips really do have to maintain their self resonant frequency to work. To make arbitrary tips would require building an ultrasonic testbed to “tune” them on. This could maybe be done with a 40khz transducer and frequency generator.
2. You asked about other uses. I wonder if your chisel tip would work for room temperature de-soldering of SMT components.
Oh, I like the solder removal idea. Perhaps experiments like this will lead to an increase in knowledge of the subject.
If an ultrasonic cutter could cut through solder while leaving the component and board in decent shape, I wonder about being able to make something that can cut BGA parts with underfill off a PCB.
Neat build and gets me wondering about trimming PCB components for higher frequency work when tuning a circuit. Then again… I’m still trying to get my mind comprehending the complexity of implementing, cost effectively on a low budget, higher frequency test equipment to test the sections of the traces and circuits to tune in to desired characteristics.
Debatable. The important bits are keeping the attachment substantially equivalent in material, design, and mass.
Look at a catalog with these tips. What changes from design to design, and what stays the same? I would bet money that tips with a range of resonant frequencies will work on these scalers.
Personally I have a hard time seeing what doesn’t change. Mass, angles of the active parts, length, diameter, …
BTW I made a close copy of a standard scaler tip (tested working) with the big difference being the type of steel (didn’t have stainless steel at hand), didn’t work. It’s completely illogical.
A stiffer steel would resonate at a higher frequency for any gjven shape. You need to match the frequency of the transducer; changing the mass, shape, and stiffness all affect it.
Huh, cutting through solder is an interesting idea I hadn’t considered at all. I’ll consider giving that a shot to see what happens.
In my (admittedly limited) experience in using these ultrasonic tools, I was astonished at how much power they actually deposit in the work. They don’t really vibrate or cut, as much as they pulverize the material on the mircometer scale. In soft materials like wax, oil, or water the local shear rate is enough to promptly boil and vaporize the material. I’m guessing the same thing is happening here. It’s not “cutting” so much as “melting and evaporating”, like a laser cutter.
The net effect is a quick, clean parting of the material, which is all that really matters I guess. But you don’t need to go through great pains to make a sharp edge to do it: a butter knife edge will work just as well.
I had tried the (default) blunt edge of the tools originally, but the results were not as clean as the sharpened chisel edge. For this application at least (slicing through a support of thin hard plastic and leaving a “presentation side” on the model), the sharpened edge gave better results.
Did you do anything other to it than sharpen the tips? Or am I correct in understanding that it basically worked as is if you sharpened the tip? Because this looks pretty amazing
You’ve got it: the most effective results came from changing as little as possible. In the end, an unmodified tool with the widest and flattest tip sharpened like a chisel was best.
In my first attempts, I did try other more serious modifications but in the end it turned out that less was more. Choosing the right shape of tool tip to modify and deciding which side to sharpen was far more important that anything else I fussed with.
Well executed hack!
Nice! BoBa Fett sharp too. Rebuttals -Yes he should be green in spots. I stop printing Star Wars only to print Star Trek and then only if Dr. Who or Battlestar Galactica figures arent needed. Always carry your towel and DoNt PaNIc!
Instead of taking away some material from the tip, to form the knife, why not forge / reforge the tip to the desired shape. It won‘t loose much mass, but resonant frequency would change anyway, I guess.
That’s lovely. Could you post a link to the scaler you bought ?
These scalers are one of those items that are sold under a variety of names from a variety of vendors; they all look the same. The one I bought is a “Seasky”, you can click the thumbnail in the article for a closer look. The specific one I bought isn’t listed any more but there are many more out there.
Search on eBay for “dental scaler” and find one that looks the same, there will be many and they’re all basically identical. Choose one with a vendor that has a decent shipping rate or availability for you. Make sure it has the right plug and voltage for your country, and that should do it. The extra tips are sold separately but seem interchangeable and are cheap.
Not every tip is interchangable. There are few standards in which they differ mainly in thread pitch – screwing the wrong tip will damage thread on handpiece (which will make it unusable). Chinese knockoffs mainly base on EMS or Satelec. The main difference between these two are the number of flat sides near the base of tip (first has four sides flat and latter only two).
Seasky is a cheaper knockoff of Woodpecker brand. Try also looking for “UDS” model. They are the same (at least for tinkerer).
Thanks for sharing those added details! “EMS Woodpecker” was definitely in the description for both the scaler and the tip assortment for what I bought.
Thanks! Will go shopping.
how about a couple notches in the tip? micro-saw?
https://ae01.alicdn.com/kf/HTB1Qe4Feval9eJjSZFzq6yITVXa0/3PCS-WOODPECKER-US6-AND-mectron-micro-saw-OT7S-OT7-OT7A-OF-BONE-CUTTING-TIP-FOR-the.jpg
There are surgical tips for cutting jaw bone. Makes me want to “borrow” device from my company ;)
You guys have got to think of the tips like a tuning fork.
Anything you do that changes the material/alloy or dimensions or location of the mass (shape changes), and there goes the resonance out the window as far as the driver is concerned.
Think about the various tricks used to deaden many wires or linkages or panels in order to quieten them.
Now look at everything you do to the scaler tips and ask yourself why it stops humming!
Flick a new tip with your fingernail and compare the tone and decay of sound.
now try it after every modification.
Just might lead ya closer to the sweet spots.
If you’re looking at new materials, try dropping a small piece on a glass or steel plate and listen to the sounds of the factory tips vs whatever you’re trying to use.
hopefuly this sparks a bit of progress for someone.
As an audio geek, that’s probably not a bad way to go about roughing a new tool. The hardest part would be consistent (repeatable) mounting and striking forces.
The human ear might not be very good at figuring out an exact frequency, but we’re surprisingly good at noticing relative difference. That said, nobody is going to be able to hear the fundamental tone for an ultrasonic tool, but the undertones would probably get you within striking distance of being able to calibrate it completely by examining power usage by the driver.
Seems can drop the tip in a consistent way on maybe a better resonating or really amplifying surface of an object to get some combination information and more harmonics to help determine the fundamental frequency or at least a harmonic better? Seems this can be recorded with a cellphone even and analyzed. For some reason a steel drum is coming to mind… especially if the area dropped on frequency is known. I’m sure there is an improvised hackable way to measure mechanically and with some audio equipment… I just don’t know thinking at the moment.
Also, remember a taper will tend to be more ridged than a straight shaft or flat stock.
The triangle/taper will be less likely to flex develop an undesirable (parasitic loss?) node. Again, Try looking at what engineers have done to kill vibration and noise, sometimes we just try to move the resonance outside of the energy source to dampen the motion.
Always Ask yourself IF you’ve done something that has the same result and ….why.
Nice….but the noise it generates gave me a horrible flashback of my last visit to the dentist.
Possible budget option? Would this be underpowered, relative to the more costly version in the article?
https://www.ebay.com/itm/Dental-Sonic-Ultrasonic-Scaler-Handpiece-Cleaning-Tooth-Whitening-Teeth-Scaling/251431402899?epid=14021350451&hash=item3a8a7abd93:rk:1:pf:0&autorefresh=true
No idea, but one way to find out!
I bought one of those to try it out and see what was what. Well, the short answer is “nope”.
Those handheld rechargeable scalers are advertised on eBay as being ultrasonic scalers but they are just handheld vibe motors with a scaling tip on them. It vibrates like an electric toothbrush. A cheap one. Totally useless for this purpose.
Well done!
Hi,
This may be the solution I’m lookning for. I need to cut precisely into duroid material for RF circuit boards. I’ll have to look into getting/ making of of these.
Great job!!!
Hi,
Great project. I was wondering what tip number/letter? you ended up using. Trying to find what additional tips to get in case the first attempt at sharpening doesn’t work out.
Thanks!
i bought a scaler to do this, im struggling to understand why when i touch some objects, like steel, it vibrated nicely, but with plastic, nothing is happening :-( , am i missing something, do i have to disable gum protects as the surface is not as hard or something ?