People often get the impression that home built hardware is destined to have a certain amateurish look or feel to it. It’s as though just because you didn’t buy it in a store, it will look cheap or thrown together. While it’s true a hacked together device could look like it was built from the parts bin (and to be fair, sometimes it is), there are plenty of examples of DIY hardware that could give commercial offerings a run for their money.
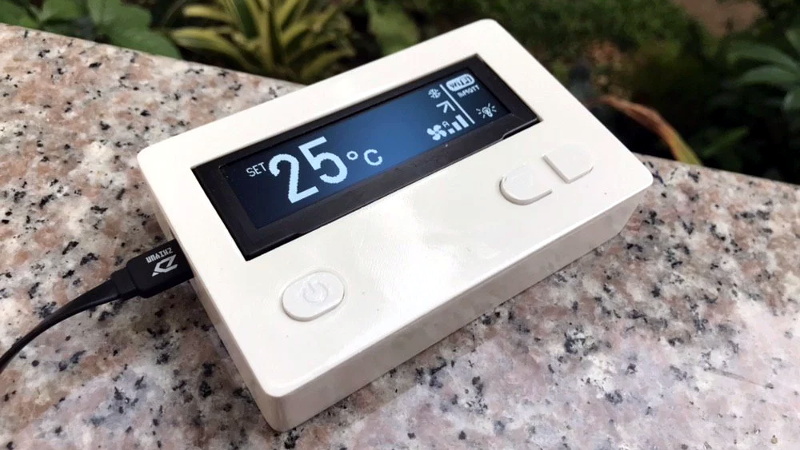
 A case in point is this fantastic ESP8266 air conditioner controller created by [Sitinut Waisara] (Google Translate). Between the simple yet elegant 3D printed enclosure to the very slick user interface on its OLED screen, this project could easily pass as a commercial device. In fact, we’ve seen commercial offerings that didn’t look half this good, let alone offer the same features for what this cost in components and printer filament. It’s a perfect example of what the modern hacker or maker is capable of with the wide array of tools and components currently available to us.
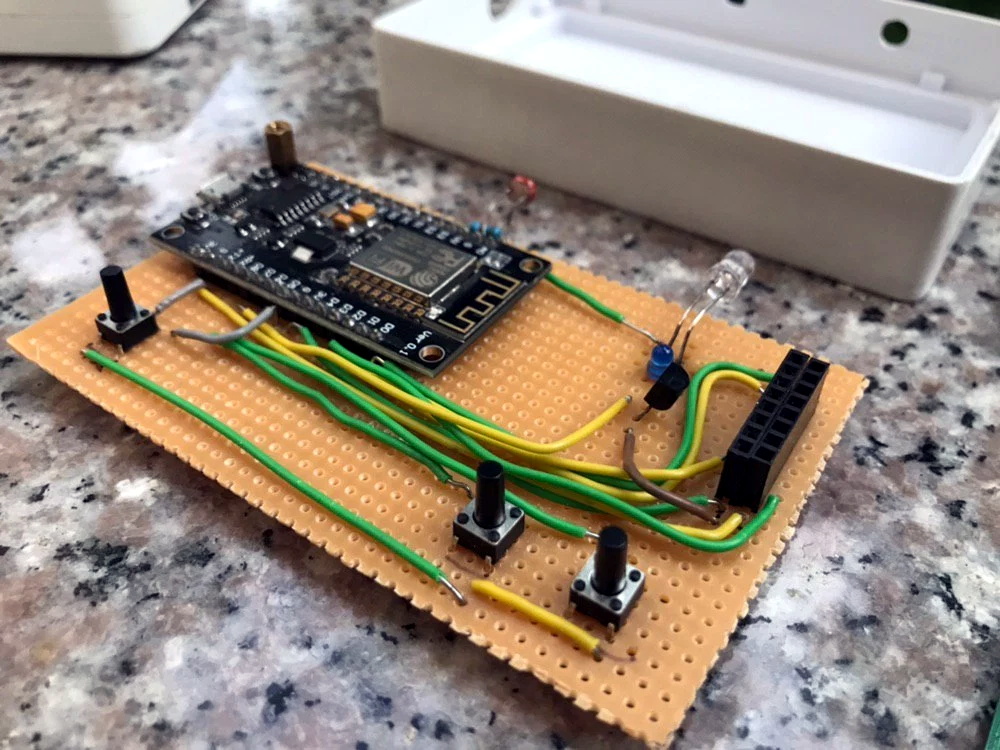
What’s perhaps the most impressive about this project, especially given how good it looks on the outside, is how little there really is on the inside. Beyond the NodeMCU board and SSD1332 OLED display, the only components inside the device are the three tactile buttons, a photoresistor so it can dim the display’s brightness based on ambient light level, an IR LED so it can send commands to the AC unit, and a handful of passives. The hardware side of this design is so simple that [Sitinut] was able to put the whole thing together on a scrap of perfboard. Not that you’d be able to tell when it gets installed into the 3D printed wall-mount enclosure, complete with printed button caps.
While the hardware side of the project might be rather light, the software is anything but. [Sitinut] really went all-in writing his code for the ESP, adding in the little features like the automatic screen dimming and pulling the current time from NTP that often get overlooked in our rush to get a project out the door. He even included a whole collection of icons to display on the OLED screen, which goes a long way towards selling that professional look. But his effort wasn’t limited to cosmetics or clever features, there was also plenty of work put into decoding the IR signals used to control the AC unit and getting all the features and functions plugged into MQTT.
We’ve seen a number of projects that aimed at dragging an existing HVAC system kicking and screaming onto the “Internet of Things”, some considerably less complex than others. But few have had the level of polish that [Sitinut] has put into his controller, so we take our hats off to him.
https://www.youtube.com/watch?v=mG0bxod0GRU
[Thanks to BaldPower for the tip.]


It often starts as home built but as time, experience and contacts go by it ends up very professional.
“People often get the impression that home built hardware is destined to have a certain amateurish look or feel to it. It’s as though just because you didn’t buy it in a store, it will look cheap or thrown together. While it’s true a hacked together device could look like it was built from the parts bin (and to be fair, sometimes it is), there are plenty of examples of DIY hardware that could give commercial offerings a run for their money.“
I find it’s the opposite. Home brew with Lots of marketing and polish on the outside and no thought of ESD or Transient or over current or reverse polarity connections or over temp countermeasures or proper isolation between circuits / no binding segregating of high and low voltage wiring internally. Like stopping at a minimum viable product and shipping it.
If you want to make an appliance to sell do an FMEA on its design. I wouldn’t bother without 60335 / 60730
If you want to comment, dont do it on your own posts?
maybe by 2030 we’ll have editable posts too
If you want to make a declarative statement, don’t end it with a question mark?
I’ve gone through the whole path from homebrew to professionally built products. PCB, panel, drawings, planning, all from manufacturers.
I’m sick of idiots telling people what they can an cannot do.
Do whatever your guts tells you to and dont give a shit about what posters on HAD thinks about it.
I don’t see any temperature sensor… is this thing just acting as a remote for the AC unit?
Anyway, a beautiful build, and I hope to learn some new tricks from the firmware.
Right, the ESP is telling the AC what temperature to shoot over over IR. The AC will maintain that temperature, you just need to tell it what the target temp is.
Most mini splits have a return air temperature sensor that they use for control. LG has two, one in the return on top and one in the controller/thermostat, and an interesting option to average the two…
Why is the Oled so slow ?
It wouldn’t surprise me if he were using HomeAccessoryKid’s code to make it Homekit accessible. That could very well mean that it’s somewhat memory constrained. The OLED he uses is a 256×64 panel which makes for a rather large buffer if you wanted to update it all in one go. Looks like he’s using multiple writes and a smaller buffer to work around the memory limitation.
This is fantastic!, and here I was proud of my own! (which had no display and could only be controlled via an app)
Inspiring work!