
The last few years have seen a huge rise in the prominence of electric scooters. Brushless motors, lithium batteries, and scooter sharing companies have brought them to the mainstream. However, electric scooters of a variety of designs have been around for a long time, spawning a dedicated subculture of hackers intent on getting the best out of them.
One such hacker is yours truly, having started by modifying basic kick scooters with a variety of propulsion systems way back in 2009. After growing frustrated with the limitations of creating high-speed rotating assemblies without machine tools, I turned my eye to what was commercially available. With my first engineering paycheck under my belt, I bought myself a Razor E300, and was promptly disappointed by the performance. Naturally, hacking ensued as the lead-acid batteries were jettisoned for lithium replacements.
Over the years, batteries, controllers and even the big old heavy brushed motor were replaced. The basic mechanical layout was sound, making it easy to make changes with simple hand tools. As acceleration became violent and top speeds inched closer to 40 km/h, I began to grow increasingly frustrated with the scooter’s one glaring major flaw. It was time to fix the brakes.
Stop Me If You’ve Heard This One Before
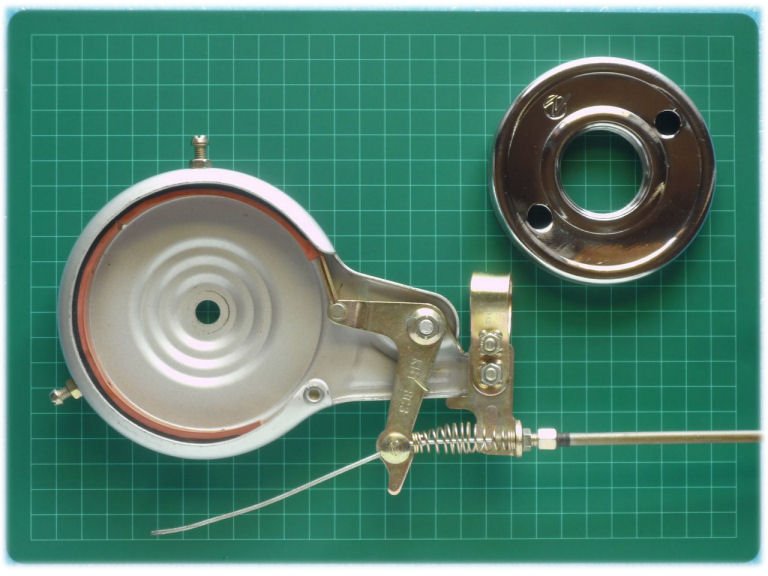
The Razor E300 comes stock with a band-brake, akin to an inside out drum brake. When the brake lever is pulled, the brake cable pulls on a lever which tightens the band around a drum attached to the driven wheel at the rear of the scooter.
Band brakes are cheap to make and can be effective in some applications. Unfortunately, the cheap stamped metal shell used on the E300’s brake is prone to deformation, causing misalignment between the band and drum. Simply riding carelessly up and down bumpy footpaths is enough to cause problems. Typically the brake ends up either scraping continuously on the drum, wasting power, or is unable to effect enough friction to slow the scooter down. Either way, it usually can’t lock the rear wheel for doing awesome skids and that’s a shame. With electric scooters having a somewhat uncool vibe akin to the Segway, the impact of not being able to do the aforementioned awesome skids cannot be understated.
Stepping Up to Disc Brakes
Like all variants of drum-type brakes, the band brake pales in comparison to the superior disc technology. For automotive and large-scale applications, this is primarily due to improved heat dissipation and easier maintenance. In our case, other factors are more important — bicycle disc brakes are cheap and readily available on eBay, and with the right installation, shouldn’t suffer the same issues with rubbing or lack of stopping power. A series of discs in various sizes, along with calipers and mounting brackets were sourced for under $50 AUD. The calipers can be mounted out of the way of obstacles, and the right sized disc should also be safe from impacts.
Despite going through years of formal engineering training, I’ve never been one to enjoy drawing up a design before getting down to work. Instead, after letting the parts marinate in their shipping boxes for 18 months, I finally took them out on a sunny winter’s day and began staring at the back of the scooter until a plan came together.
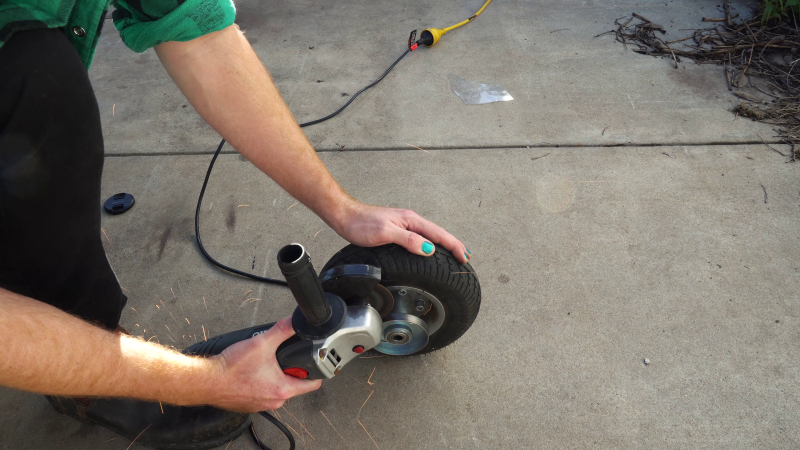
Rather elegantly, the drum for the band brake serves nicely as a mounting surface for the brake disc. By removing the friction surface with an angle grinder, I was left with a nice flat plate attached to the axle, to which I would bolt on the brake disc. With a slight modification to the disc’s mounting lugs to clear the centre of the axle, it slid on to the hub and was attached with three M4 bolts.
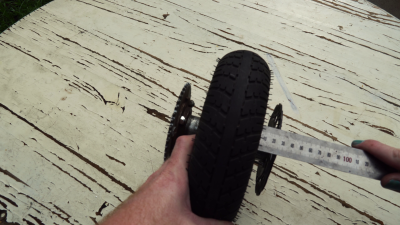
A ruler was used to check that the disc was perpendicular to the axle and aligned properly. Spacers were required to be added to the rear assembly to make up for the missing width of the original band brake assembly; in this case, a series of three half-inch washers did the trick.
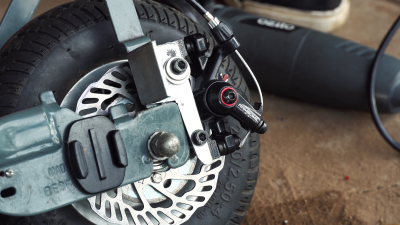
The caliper was more difficult, requiring the fabrication of a custom bracket to marry the caliper mounting hardware with the frame of the E300. A piece of steel L-angle was massaged into the right shape to bolt to the rear frame upright. Plate steel would probably have sufficed, but a hacker often uses what falls first to hand. Getting the mount right was crucial to ensure the brakes worked effectively, as misaligning the caliper to the disc would cause the pads to wear prematurely and slow the scooter down. Thankfully, the mounting hardware that ships with the calipers allows some adjustment of the final position, meaning the bracket doesn’t have to be made to a particularly high level of accuracy.
With everything bolted up, all that was left to do was replace the original brake cable with one long enough to reach the rear caliper, which was mounted further aft than the original band brake. The original brake lever was also of cheap construction and was replaced with a nicer all-metal unit also sourced from eBay.
How Does It Perform?

After some initial headaches with the original plastic brake lever falling to pieces, the new disc brake setup performed brilliantly. Thick, fat, high speed skids are now easy to perform even on grippy asphalt surfaces. There is little to no noise from the brake when not in use, which is a huge improvement over the continually screeching band brake. This has the side effect of greatly improving the scooter’s stealth capabilities. Dynamically, it’s a much better experience, though the lack of a front brake is still felt when descending slippery muddy hills.
The scooter is now a joy to ride, and it’s an upgrade I wish I’d completed much sooner. Anyone handy with a power drill and grinder should be able to complete the switch in a weekend. Hopefully this hack inspires you to mod your own vehicles for ever greater performance, and to those that get stuck in, I look forward to seeing you on the trails!


Nice work. The brake on my (non-electric) scooter is also the worst part. Worrying that there’s a trend there!
But slightly worried about the photo of you using a grinder single-handed, holding the wheel you’re grinding with the other hand… that’s not the safest way to use a grinder. you must have had some kind of clamp to use instead?
The way he’s using it, IF it kicks, the grinder kicks away from him and the wheel (which is presumably relatively soft and bouncy) towards him. Not really that big a deal. As long as the grinder has a functioning deadman switch (IE, it turns off if you drop it) then I don’t really see the problem. I use small grinders one handed all the time. In light gauge metals I’ve never had a problem.
The only grinder incident I had was with a large 2.5kW 230mm grinder, which kicked violently enough that even with 2 hands it I couldn’t quite control it. Took a nice divot out of the nose of my steel capped work boot. (Then later that same day I spent 3 hours at my GP and at the hospitals eye specialist after a spark managed to bounce off my cheek, under the safety glasses and into my eye. NOT a fun way to spend an afternoon. Turned out the particle made a small crater but mercifully it didn’t penetrate all the way and fell out again.)
3x m4 bolts? Thats not going to last long. Suggest either double the amount of m4’s or go up to at least m6 for 3 bolts. More bolts is probably better because warping issues likely with only 3 points of attachment.
Check out Rad2go scooters they are built strong, can carry 350 lbs! I got one years ago at yard sale for $5. Finally got around to working on it, running 36 volts on a 24 volt 500W motor with 36V 800W controller. It has traditional drum brake on rear, but its still sketchy slowing at full speed. There is a front drum I’m looking to add, if scooter has 9″ 3 bolt front wheel you can add it. I got a 4led headlight that can run on 80V from wish and it had enough room inside housing to add a volt meter to it, it’s super bright too!
Now I can Chase my toddler around in his power wheels.
I myself modified an Ezip scooter from 24 V (2 lead acid batteries) to 36V (3 batteries). This also required a drop in replacement of the controller box. This gave me an immediate kick up in speed from about 15mph to about 24mph. However the degradation of the batteries took a toll and soon my overall range and speed suffered. Lithium batteries are the way to go, but did cost about 10x more, so I did not make that change.
Also, IMHO, the wheelbase is the main limiting factor of any 2 wheel scooter. Even at 10 or 11 inches, the tire size is a bit small to seriously handle any road debris. I remember measuring out that any 1 cm bump in the road cause seriously handling instability, especially around 20mph.
I had several of those old Ezip scooters , from way down in the 500 range all the way up to 850 or so. Relatively easy to repair, but generally had to charge after every use.
Nowadays I am into the EUC scene (electric unicycles). Now on my 3rd one, I can hit 31mph and get more than 40 mile range on a charge with an 18″ tire.
I cringed when he started hammering the rotor down. I baby the rotors on my bike. I would have gone hydraulic on the brake. They don’t cost much more and you won’t have to worry about cable stretch (just replace the fluid once in a while).
Thank you for your this post. I replaced the lead acid batteries in my Razor E300 Scooter with two spare 18V giant Milwaukee power tool batteries and almost had problems because of the horrible stock brakes. Needless to say, this article encouraged me to upgrade to disk brakes. I over ordered adapters, brackets, and kits and only needed to grind a tiny bit and drill one hole. Now it makes totally epic skid marks! I just needed to get an 80 inch brake cable so I could put the handlebars up all the way again ;)
If anyone wonders, the only other thing I replaced was the twist throttle because my kid smashed the original. I got a voltage readout and a key switch that doesn’t do anything yet.