I admit that I’m late to the 3D printing game. While I just picked up my first printer in 2018, the rest of us have been oozing out beautiful prints for over a decade. And in that time we’ve seen many people reimagine the hardware for mischief besides just printing plastic. That decade of hacks got me thinking: what if the killer-app of 3D printing isn’t the printing? What if it’s programmable motion? With that, I wondered: what if we had a machine that just offered us motion capabilities? What if extending those motion capabilities was a first class feature? What if we had a machine that was meant to be hacked?
One year later, I am thrilled to release an open-source multitool motion platform I call Jubilee. For a world that’s hungry for toolchanging 3D printers, Jubilee might be the best toolchanging 3D printer you can build yourself–with nothing more than a set of hand tools and some patience. But it doesn’t stop there. With a standardized tool pattern established by E3D and a kinematically coupled hot-swappable bed, Jubilee is rigged to be extended by anyone looking to harness its programmable motion capabilities for some ad hoc automation.
Jubilee is my homage to you, the 3D printer hacker; but it’s meant to serve the open-source community at large. Around the world, scientists, artists, and hackers alike use the precision of automated machines for their own personal exploration and expression. But the tools we use now are either expensive or cumbersome–often coupled with a hefty learning curve but no up-front promise that they’ll meet our needs. To that end, Jubilee is meant to shortcut the knowledge needed to get things moving, literally. Jubilee wants to be an API for motion.
When it comes to precisely moving tools around in three-space, I’ve got you covered. As for defining what Jubilee can do, that’s up to you.
An API in Hardware
Playing with 3D printers can happen at all levels of the stack. Some folks build their own hardware from scratch. Others play with the software to generate a specific physical output. I’d loosely bin the hardware design as infrastructure as everything else as application. These days, creating a custom application often requires a bit of expertise in both domains. In designing Jubilee, I wanted to encapsulate the motion infrastructure into one platform so that others could readily build applications.
In object-oriented programming, there’s a design pattern called separation of concerns. The idea is that software should be written in modular form in such a way that one part doesn’t need to know the dirty details of another in order to invoke it. This principle is how software libraries are built. Libraries hide the complexity of the work that their doing and instead expose a clean application programming interface, or API, from which they can be invoked. Don’t get me wrong. The idea of modular hardware has existed for generations in engineering, but object-oriented programming does an excellent job of making these ideas explicit.

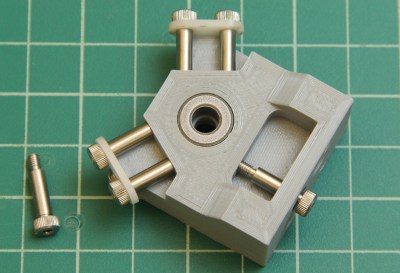
To apply separation of concerns to Jubilee, I needed to a way to decouple infrastructure from application. To do that I put kinematic couplings on both the machine carriage and the Z axis. Doing this makes both the bed platform and the tools removable. What’s more, since they are kinematically coupled, they can be removed and replaced over-and-over again without losing registration to the machine. The notion of an extremely repeatable system is what makes tool changing possible.
Toolchanging
On Jubilee, tools are laid out in a rack on the front of the machine. When a task using one tool completes, Jubilee parks its current tool into the respective parking post and the picks up the tool for the next task automatically. All software logic for changing tools is handled by a script at the firmware level, making the slicer command as easy as invoking the number of the next tool you want to use, like T0, T1, etc. Like the separation of concerns pattern above, I did this to ensure that Jubilee’s hardware was as slicer-agnostic as possible.
My first toolchanging setup was inspired by this tweet from E3D back in 2018. In the months that followed, E3D kindly released the CAD files to their coupling system, and I modified the dimensions of my original design to be compatible with their tool plates. I’ll touch on how my setup differs in another post. But for now, what’s important to know is that the API is the same. In other words, an E3D plate and a printed Jubilee tool plate will both work.
Fabricatability
Here on Hackaday, we’ll catch ourselves describing hardware as “mostly-printed” and “self-replicating.” These words stem from the early days of RepRap, where the idea behind the RepRap 3D printer was that it could self-replicate. I personally love this narrative, but it has limits. Some machines, like lathes, have limited degrees of freedom, which limits the geometric features they can produce. Other machines, like 3D printers and laser cutters, can only produce parts from a limited range of materials. But what resonates so deeply with me is an underlying idea of bootstrapping our own personal fabrication capabilities from scratch. And through this narrative comes the notion of empowerment and self-reliance when individuals can transform raw materials into finished goods.
To take this narrative and turn it into something actionable, we needed a new word, a new design criteria. So our lab made one up. We call it fabricatability. Fabricatability is a qualitative word to describes a design’s ability to be fabricated by a single person without specialized tools and expert knowledge. Fabricatability is like manufacturability. But the difference is while manufacturability presupposes an understanding of the available manufacturing resources, fabricatability presupposes an understanding of the person, their access to tools, and their knowledge of how to use them. Similarly, design-for-fabricatability is like design for manufacturing where the manufacturer is one person with limited resources and minimal training.
The big idea is that, if we really understand the person, we can give anyone the capability to bootstrap their own infrastructure if we do a few extra things in our design that puts the person first. With Jubilee, I did my best to lay out the prerequisite knowledge up-front in the wiki. Jubilee’s off-the-shelf parts can all be purchased in low volumes without a pricey minimum-order quantity. Most of Jubilee’s fabricated parts use a 3D printer to avoid requiring skilled machine operation knowledge. Similarly, the design is intended for hand assembly by someone without expert hand crafting skills
Nothing’s perfect, though! While I tried to design Jubilee to eliminate machined parts, three parts must be machined. But to fill the gaps, some community machinists have kindly stepped up to make these parts for us in single quantities.
Instructions that hat-tip our brick-building heydays
I grew up with a healthy dose of LEGOs. At the time, I took for granted the instructions; they were just a means-to-a-spaceship. Looking back, though, I’m blown away by how cleanly they make the assembly process of a 500+ piece kit. Their style is both succinct and explicit. All required parts are called out up-front per page. Heck, if you’re building with a friend or loved one, you can even parallelize the process where one person does the brick-laying while the other scoops out parts for the next step. (Anyone else have a fond LEGO date night in their past?) The style translates to many languages–because there are no words! Heck, I’m pretty sure I could read LEGO manuals before I could read books! And it’s consistent. Once you’ve built your first set, you’ve got a pretty clear idea of how the format of the instructions go for the next one.
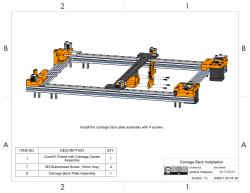
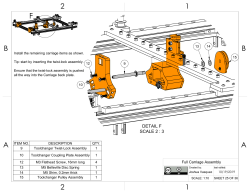
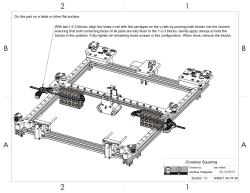
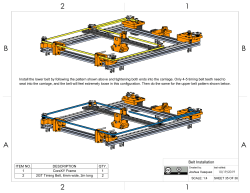
Jubilee’s instructions are inspired by my brick-building heydays. First off, in the design, parts need to have fully-constrained attachment points as much as possible. What that means is that parts need to seat together in only one way. They can’t slide back-and-forth in a range of movements, or different people will assembly Jubilee in different ways, some of which wont work! That’s where the instructions come in. Steps are called out visually in step-by-step fashion to minimize words. Tuning instructions that use special tools are also detailed visually. My hope is that anyone, not just a seasoned machine builder, can build Jubilee following the assembly process in the docs. Finally, to help folks along the way, I made a Discord channel for folks to ask assembly questions and joing the community discussion at large. Feedback on Discord is also most welcome! I’m doing my best to channel it into improvements in the instructions and wiki docs.
Pushing the Limits
While a one-machine-fits-all CNC-machine-for-everything sounds cool, it’s not Jubilee. Rather, Jubilee is intended for non-loadbearing applications only. These days, I’ve put the most effort into transforming Jubilee into a rock-solid multitool printer–but even then I’m still twiddling print settings to find a middle-ground that I like.

So even though Jubilee can’t juggle heavy cutting tools, it turns out that the space of what Jubilee can do is still quite rich. Apart from 3D printing, my labmates and I have played with multitool liquid handling with syringes, mulitcolor pen plotting, an image-stitching with a USB microscope.
Finally, I have too many things to say in one post, but I promise I’ll cover some of my favorite hardware details soon.
Research Findings for All
A year ago, I packed up my garage machine shop and took the leap into grad school. For me, a PhD has been the final major roadblock to becoming a teacher. Like it or not, I would need to face it. Bur rather than make grad school a 5-year holding pattern for a future in teaching, I wanted to find some way to make the experience meaningful others, not just myself, now, not after I graduated. One year into this misadventure, I am thrilled to say that Jubilee is both for and inspired by you, fellow hackers. It’s a piece of me out there in the world that I hope is meaningul to you. It’s not perfect, but it’s functional, something we can all build on.
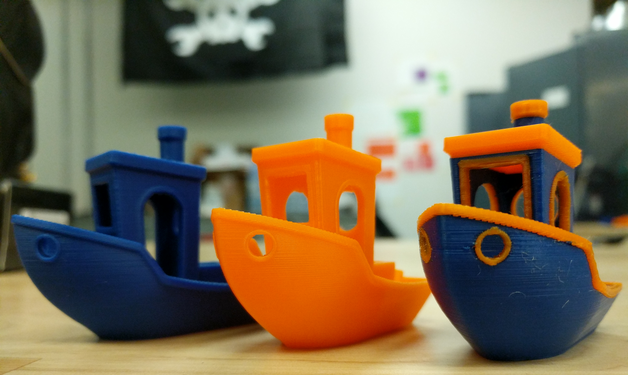
When I started this project nearly a year ago, I’d occasionally post a progress video to document the good-and-bad. It’s crazy to think that a year ago we went from this:
to this:
Admittedly, as far as grad school labs go, I lucked out. I met a professor, Nadya Peek (at a Supercon!), who helped establish the first FabLabs in the early days of the open source hardware movement. It’s through her efforts that my hands are free to tackle projects like Jubilee. And it’s through her shrewd negotiating that our lab is able to release all of our designs as open source for you, fellow hacker–no strings attached!
And with an open design, we can start riffing off of each other’s ideas and expanding the toolchanging ecosystem for everyone. In the last month, a few folk have already kicked off their own Jubilee build. Some are already changing tools!

But why let us have all the fun? Jubilee’s docs, BOM, and CAD files are in the wild for you to enjoy. Now has never been a better time to jump into a world of ad hoc automation. So go forth and create your own personal adventure into toolchanging. Share your whoops and woes on the Discord. And, of course, write to us on Hackaday if you get Jubilee to do something awesome.
(Finally, if you think grad school is cool, why not come hang out with us?)


Great write up and thank you for such an awesome contribution. Would love to get this working on my many 3d printers at home :)
Such a shame that a fundamentally decent idea is hidden behind marketing speak. For pity’s sake – a standard hardware interface, whilst great, is not an API. Please don’t bastardise these terms unnecessarily. My take away is: an easy-to-construct multi-headed X-Y-Z plotter with a quasi-standard hardware interface for the tools heads (which can’t be load bearing). I’m in no way belittling the project, but it could do with a bit more hubris and bit less marketing speak.
Come off it.
Writing for a wide and deep audience will often come off sounding like marketing. I think he did a fine job.
I had a similar idea with the three points as screw heads along the vertical axis, but I never sorted the positive locking part as nicely as he has. Got me excited about it again… Mission accomplished.
As I understand it, the mention of API is not about the tool change functionality or the standard hardware interface, but the abstraction layer provided by the machine. It’s like you give the physical tool as the “resource” to the API (like you would give a memory buffer for instance) and ask it to perform some task with it (move it here and there), without having to know how it does it. But it might be a little bit far-fetched, especially because by this logic you can already see the gcode instruction set of any current printer as being also an API.
Great ideas always seem so obvious in retrospect. Reading this, I started nodding and then I only got more excited as I read the rest of this post. I’m immediately thinking of a CNC toolhead, a spray-painting toolhead, drilling, polishing…add a generic tool head to take dremel bits. The clips of it swapping tools has me drooling.
But he explicitly says the tool head cannot take a load. Fix that, and it is game changer. But he hasn’t tackled that, and I know from my own experience it’s a very hard problem to solve.
Seems like there might be confusion between API and hardware prototype. An API should work with multiple hardware designs. The prototype shown is not load-bearing, but that doesn’t mean other designs can’t be. The same API would work either way, because the details are hidden in the firmware of each machine.
The tool change design concept looks like it could handle quite large loads if made from the right materials. And stiffer x-y-z machines are also a trivial exercise.
It would not be easy to make the tool changing head in better materials, taking away from the ‘fabricatability’ but being open you can start working from this kinimatic and find a way to make it in tougher materials.
I do think however that the CNC mill tool post auto changers I’ve seen are a better mechanism for higher loads. Creating a 3d printer head that can be attached in that fashion wouldn’t be hard either.
If you want to do high load milling you are better off starting with the opensource/DIY mill projects as they have the requisite stiffness. They might well be rather slow 3D printers though as mills don’t need or want huge travel speeds (that said lots of filament don’t print well when printed as fast the printers can go now and many 3d prints take long enough that adding 20% more say hardly makes any odds.. If you have to let it run overnight anyway it doesn’t really make any odds to you, and shorter prints being nearer 2 hours than 1 its still a considerable wait..).
Maybe if you have nothing positive to say, you should say nothing. Outstanding work Joshua
In the zero to low load category there is still a lot this can do. I’m thinking..
Pick and place head
Laser for cutting solder paste stencils
Solder paste jet dispenser
Pcb drilling, maybe pcb milling
3D printing, of course
I would add heat set inserts probably
Zurad’s ECM
Check out the MPCNC if you haven’t seen it yet. It doesn’t have toolchanging, but it can take a load and is designed to be a universal motion CNC similar to what OP designed. People use it for everything from Zen sand tables to plasma cutters to 3d printers to aluminum Mills/routers.
Saw the MPCNC at the Machinekit meetup in Madison about a year back now. Provided you can source some nice smooth conduit, that is a great project for medium accuracy needs. I think this with the addition of the linear rails may do a tad better for accuracy with a little less effort.
The licensing on MPCNC is all kinds of messed up. Cancelled project in my book.
Since you ask, here’s an MPCNC tool changer: https://youtu.be/OTaon2fveP4
This one also draws inspiration in part from the E3D tool change system.
Since you asked, a toolchanger for MPCNC does exist. Google “MPCNC automatic tool changer”.
That tool changer is also partly inspired by the E3D tool change system and is similar in spirit to Jubilee in that it changes out the whole spindle to an arbitrary tool instead of changing just the cutting bit.
Since you asked, an automated tool changer does exist for MPCNC, similar in spirit to Jubilee in that it swaps out the entire spindle instead of just the cutting bit. Google MPCNC automatic tool changer.
Agreed that MPCNC is a good starting point for a universal motion platform. It is easily hackable and can handle medium cutting loads right from the get-go.
Sorry for the duplicates. Ugh I feel dumb.
There are some existing 3D printers that can do this, though with less elegant toolchanging. For example, the Snapmaker has a 3D print module, a spindle module, and a laser module. ‘Toolchanging’ is performed via 4 bolts in a standard pattern. Of course rigidity is nowhere close to a ‘real’ CNC, though it’s comparable to one of the many cheap pocket router tables, and it’s surprisingly useful the have that basic capability available. For example: 3D print a case, laser-etch a PCB mask, then CNC drill through-holes in the PCB.
Having a standardised and automated toolchanger interface would make this even faster and easier, and aid performing multi-tool operations.
There’s the other direction in 3D printing. Going smaller and smaller.
https://www.callaghaninnovation.govt.nz/MicroMaker3D-ENVI-Award
Wondering on the toolhead if you added rare earth magnets if it would help with stability between the parts
Kinematic coupling provides stability, that interlock system provides much more force to keep the stability than magnets. E3D experimented with magnets and found them lacking. With this setup you need less force to engage and disengage and you have more holding force.
Multi-tools usually make some sacrifices for convenience. The dedicated tools, will always perform better for the tasks they were design for. For somethings, and many people, the results of a multi-purpose tool is just fine, gets the job done well enough, in a reasonable amount of time and effort. It’s a great idea, maybe something that might take off. Lot of people want and need the functions, and can’t afford, or have room for a lot of dedicated tools. There is definitely a niche, but how much of one, will be left to be seen. Like most niche based tools, usually more of a novelty, and don’t really get much traction.
Being able to use multiple tools on the same item is the point here. If you had to move the item between multiple machines, you might have alignment issues.
I think the future of this would be a framework with a full 6 degrees of freedom, and the ability to mount any tool and to use any media which can be handled by that tool — just like the human hand.
Toolchanging is awesome. I can’t wait till my 3d printer is also my pick n place!
API = Application Programming Interface. Application is from Application Software, which was a buzzword term invented for programs running on (or in or under, pick one) an operating system. Program got pushed aside because people associated it with writing programs (specifically in BASIC).
The progression from program to software to application software to application to app (along with terms like ‘sketch’ and others for Arduino and other single board computers) has been a marketing driven path to put forth the image of computers being easy to use and simple to understand. But no matter the words used, they’re all programs, they’re all the software that makes the hardware do things.
Using the term API for a hardware connection for swappable toolheads is not a proper use of the term. How about HPI for Hardware Platform Interface?
In robotics there’s EOAT for End Of Arm Tooling. Many industrial robots have a separable EOAT connection so one robot can complete two or more tasks on work at a single station, especially when maintaining precise alignments between operations is critical. Sacrificing some speed can be preferable and cost less than moving the work from one single function robot to another and having to go to greater effort to precisely lock the work down identically at each station and/or equip the robots with the ability to identify and correct for minor positioning differences.
I suggest HMI – Hardware Module Interface. HPI is okay too and much better than EOAT.
Absolutely fantastic work mate! Thank you very much for your time, effort, ideas, as well as your outstanding new approach at creating an open source multi media capable motion system. Especially, thank you for sharing this with all of us out there learning & working towards a similar goal!
For me personally, I have been working hard at reinventing myself in order to chase my dreams. Your first iteration was very helpful to me in showing me what is possible in hardware hacking and like you, the e3d system also inspired me to want to try building & expanding on a tool changing 3d printer. I too want to make a motion system that is capable of doing 3d printing & more; together in one platform.
Jubilee is a fantastic example and will be a huge asset to me in helping me get closer to my future goal of trying to do so & provides me with an amazing reference device to show me how to do so as well. Your post here also resonates with me deeply as we share many similar interests from our brick building upbringings too!
From one passionate open source guy to another: thank you very much for creating Jubilee :-)
I’m new to printing and cutting, so I apologize in advance for misused terminology. If I’m understanding correctly, Jubilee isn’t the tool swap connector or the machine itself, it the software that facilitates the tool swapping and “glues” together the different gcode for additive (like printing) vs subtractive (machining) instructions.
Thinking on it more, maybe it’s a new “language” that replaces the gcode that describes the movement and tool swaps. To me, it seems like the connector system was just chosen to keep from reinventing the wheel.
I look forward to see what people do with this.
Every time I see these articles pop up it makes me a bit sad as I read and come to the same conclusion. I’ve had a hardware solution for a fast load bearing tool changer since 2014 but have struggled to find someone that can make a software solution that can actually utilize it. There is no good application that will generate code to let you print an object, then cnc a finish, then place inserts, then uv inject or laser etch all from one utility. That is the biggest hurdle in my book! Fusion 360 has come close but is still an incomplete solution. If any one here has the skill set to build something like that or would like to collaborate then let me know because that’s what I’ve been trying to solve for a while with no success.
Hey, Patrick! Could you send me an email at: haakon89@gmail.com I’m currently working on building and developing a modular smart CNC platform. Looking to make it user friendly, ‘smarter’ and more affordable. It would be great to have a chat 🙂
HMI is usually Human Machine Interface
It looks, but the time it takes to chance the tool would make printing take forever. Instead of something that might take 8 hours to print will now take 2 days.
I agree it looks really good, but if you are trying to print in multiple types of filament, then, especially for a hobbyist, the time may not be that big of a deal.
This could be very useful for printing objects with filaments that can conduct electricity.
For example, if I want to print a sealed enclosure for my electronics, I can print it with regular filament for most of the enclosure, and with electrical traces for signals right through the side of the enclosure while the PCB inside it stays sealed from the outside elements. I can print a mounting tab on the outside of the enclosure with traces that go inside to to tie the mounting screw to the relay or PCB ground inside, such as for an automotive application.
By stopping the print partway through, then installing the PCB or relay, then finishing the print, it can be completely sealed.
Taking this tool changer idea even further with this sealed enclosure application in mind:
one tool could test the printed electrical traces, while it’s still on the print bed
one tool could be a PCB installer,
one tool could reheat the top layer of the existing print, after the traces are tested and the PCB is installed to ensure the next printed layer has good adhesion.
Will the above take a while for each part? yes
could the end result be completely sealed? after some testing and adjustments, the probability is pretty good.
Could this reduce the time I have to touch or personally interact with this part? yes, possibly drastically, after the bugs are worked out.
Combine the above tool changer with a 3D printer with infinite build volume and you have possibly most of a production line in a single machine, pumping out widgets until the filament runs out.
https://hackaday.com/2017/05/12/another-printer-with-an-infinite-build-volume/
Additional tools could be attached to extruders connected to new rolls of filament, so even running out of filament is no longer an issue for a machine running 24 hours a day.
I like the way it’s not slicer dependent also.
The possibilities are very exciting. The multi-colors in a single print thing is neat, but I don’t have enough use for that. Multi-material with the above mentioned tools is a game changer.
This could be a very big deal for those who sell widgets on etsy, possibly saving them a lot of time.