The border between consumer electronics and DIY projects is getting harder and harder to define. First it was PCBs, which quickly went from homemade to professional with quick-turn services. Then low-cost CAD/CAM packages and high-end fabrication services gave us access to enclosures that were more than black plastic boxes with aluminum covers. Where will it end?
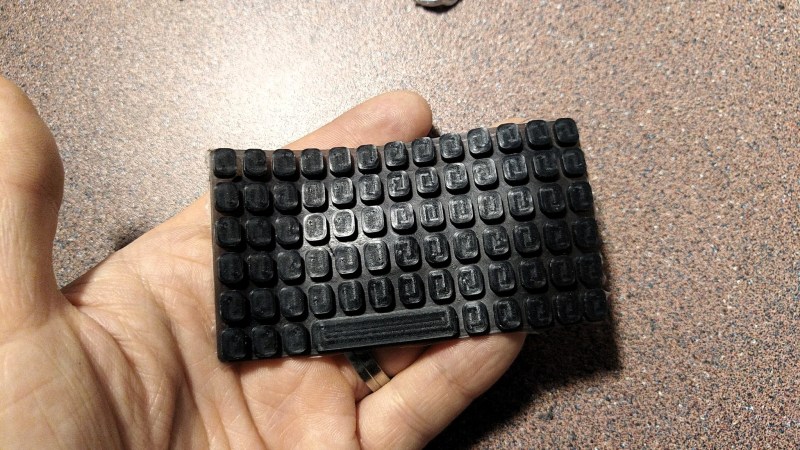
That’s a question [arturo182] begins to answer with this custom-molded silicone keyboard for a handheld device. There’s no formal writeup, but the Twitter thread goes into some detail about the process he used to make the tiny qwerty keypad. The build started by milling a two-part mold from acrylic. Silicone rubber was tinted and degassed before injecting into the mold with a baster. The keys are connected by a thin membrane of silicone, and each has a small nub on the back for actuating a switch.
There’s clearly room for improvement in this proof of concept – tool marks from the milling process mar the finish of the keys slightly, for instance. There may be tips to be had from this article on silicone keyboard refurbishment to improve the process, but overall, we’d say [arturo182] is well on his way here.


I think you can flame-polish acrylic. That might improve the surface finish.
https://en.wikipedia.org/wiki/Flame_polishing
Though that does suggest that it is best for convex surfaces.
Milling all the way through and then glueing on a factory-surface piece would work too.
Two-shot moulding might even be possible, to add legends. It “only” needs another mould.
Vapor polishing the acrylic is a wee bit easier and slightly less combustible.
or a bead blast to give the matte finish often found on silicone keys
Its polished but that doesn’t remove marks like that, would need a slightly more abrasive method and I had no small enough soft tool that I could have used with a more abrasive polishing paste.
Nice job! Couple suggestions on the milling:
Using a corner radius end mill would eliminate the hard edge on the keys and make for nice softer edges.
For best surface finish on small parts and especially when using smaller diameter end mills, I always leave around 2 thou and then come back for a final light pass.
Heat is often a problem with plastics, and coolant can help avoid melting the surface and/or chips. For the last light pass, I always stop the mill and make sure the flutes and tip of the end mill are clear of any melted plastic.
Lastly, a Q-Tip in a Dremel with some tooth paste will polish away any last tooling marks.
+1
That’s exactly what happened :)
It had 1 roughing pass and 2 finishing passes.
No issues with melting, no cooling used.
The edges are by design, would be no issue to mill a chamfer in there. Thats up to Arturo if he wants to keep it like that.
From the small clip of the mill, it sounded like it was at a pretty high RPM, but that could have been partly the sound from the vacuum. I know I slow down the RPM any time I’m working with plastics, it’s not just heat from the cutting edges of the end mill, but also the friction with the end as it spins against an already milled bottom (when you’re just doing a finish pass on the sides).
And yea, I get that the hard edges are part of the design, but there are a lot of benefits to corner radius end mills – you pretty much use it as if it was a normal end mill and you get the nice radiused corners automatically.
It also eliminates any slight tooling marks when you mill a cavity in multiple depth increments. Once I bought one specifically for a pocket that needed a radius, I’ve come to use them by default unless I specifically don’t want the radius. They just give a nice finish overall.
Oh, and if you’re getting chipping, you could try using polycarbonate/lexan instead of acrylic. Acrylic is very brittle and much more prone to chipping and pitting. I have a history of acrylic failing me every time I use it!
Again, nice job. I’ve thought of doing a silicon button/key pad, but it always seemed daunting and I wasn’t confidant in being able to ensure the silicon fully made it’s way into the corners of all the keys. Seeing this inspires me to give it a try!
Yes RPM is high (20-24k) but it also moves fast (I think it was 1400mm/m) to not stay in one spot for too long for that reason. The small clip is from the top surface roughing, that is the most aggressive tool path I had.
I think I misunderstood you with the corner radius end mill, I thought you meant a ball end mill :)
Thanks for the tip. Don”t think I tried those before, a bit specific but certainly great for use cases like this.
So far the acrylic has been great but I get what you mean, I was sceptical to use it for milling before I started using it, had very bad experience from drilling acrylic. I think high rpm and high surface speed is helping here.
Q-tip in a Dremel… This is the 2nd awesome thing I learned today… Thanks Chris!
Ha! No problem! And when you cut the Q-tip in half to put in the Dremel, you get two polishers! ;)
Oh, and I almost forgot, if you need to polish a larger area, a cut section of a Nerf dart will fit snugly over the common orange conical grinding bit. Again, with some toothpaste or other polishing compound, it works great as a polishing tool.
My workshop is in the cellar, which is also used for my son’s Nerf battles, so when I needed to polish something, I noticed Nerf darts all over the place and it seemed like it was worth a try. It’s my go-to polishing tool for larger than Q-tip polishing now! ;)
I take it this is used with tact switches underneath the silicone, now I read metal domes (ugh). Is there any way to add conductive rubber in the molding process and make replacements for the more common keyboard contact rubbers found in organ-synth keys? Some of these are unobtainable. This would streamline this “blackberry” device. Board and rubbers no other things at all, standard industry practice. Harder rubber yes, these things wear out even under piano keys with controlled motion.
Yes you can do that – most of those types of keyboard have a conductive pad that the silicon dome is bonded to. To do that in this case just mill the mould with slots to insert your conductive pads and then add silicon. (Also possible to just manually ‘glue’ in after the fact – have a good keyed hole in your pad and fill that with fresh mixed silicon, put in place and when it sets it should be well attached – 2 part silicon stick to themselves really really well (annoyingly so if you ever need to make multipart moulds and miss a spot of mould release).
For a conductive pad material selection can come into it heavily, and there I can’t help much – using something like pure graphite can work if the keys will bottom out on something else so the graphite isn’t smashed to bits by heavy handed use, can mix in all sorts of powders to silicon to make it somewhat conductive, and you can just buy conductive material mat and cut them -there are too many options to really suggest without seeing what the existing parts already look like and knowing what resistance is needed (it might work with more or less than the factory dome but at some point the resistance will be too high so it won’t trigger and if its too low its possible it won’t work right either (and in both cases it might just damage something else in the circuit. Effectively feeding too much power into a poor little chip)
I am not sure what public documentation has been created for it, but an alternate technique for creating membrane-like keyboards in a resin printer by printing resin nubs/keys on a bed of muslin or screen. Basically, you stretch a piece of cloth across the bed of your Z-axis and secure it, then print your keymap as normal. Once you remove the cloth from the printer, the keys/nubs will be affixed to the cloth, creating a flexible print with hard components.
That also works for FDM printers as well – though I remember reading it was best to print a layer or two then lay the cloth (not tried it myself). Also FDM just doesn’t have the resolution of resin prints so you probably could not print in key markings with FDM but resin would let you,
Just did a search and conductive TPU filament exists. Print a grid of buttons halfway, lay on the mesh and finish printing the buttons. Clamp the mesh with conductive buttons into a mold to inject silicone so the mesh gets encapsulated. Won’t matter if the silicone doesn’t directly bond to the TPU, the mesh will hold them together.