A lot of projects we see around here are built not just because they can be built, but because there’s no other option available. Necessity is the mother of invention, as they say. And for [Jeff] who has many thousands of dollars of food stowed in a chest freezer, his need for something to keep track of his freezer’s status was greater than any commercial offering available. Not only are freezers hard on batteries, they’re hard on WiFi signals as well, so [Jeff] built his own temperature monitor to solve both of these issues.
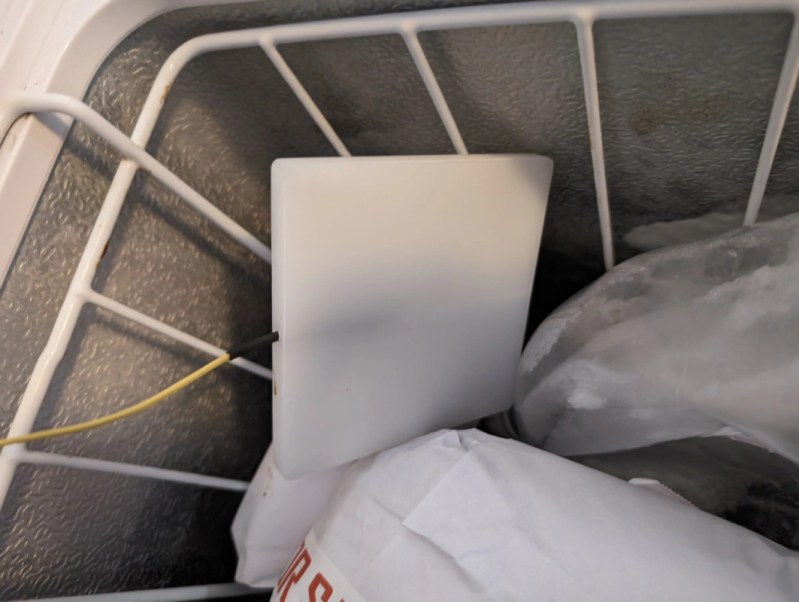
The obvious solution here is to have a temperature probe that can be fished through the freezer in some way, allowing the microcontroller, battery, and wireless module to operate outside of the harsh environment. [Jeff] is using K-type thermocouples here, wired through the back of the freezer. This one also is built into a block of material which allows him to get more diffuse temperature readings than a standard probe would provide. He’s also solving some other problems with commercially available probes here as well, as many of them require an Internet connection or store data in a cloud. To make sure everything stays local, he’s tying this in to a Home Assistant setup which also allows him to easily make temperature calibrations as well as notify him if anything happens to the freezer.
Although the build is very robust (or, as [Jeff] himself argues, overengineered) he does note that since he built it there have been some additional products offered for sale that fit this niche application. But even so, we always appreciate the customized DIY solution that avoids things like proprietary software, subscriptions, or cloud services. We also appreciate freezers themselves; one of our favorites was this restoration of a freezer with a $700,000 price tag.


The one I bought came with two sensors and a separate lcd temperature display that will sound an alarm if a limit set for a sensor is exceeded. It was so cheap that the display died a few weeks after I started using it. No chance to repair this black blob on an empty pcb. Luckily it can be read with rtl_433 from the outside of the freezer from a few meters away.
I used to have an ESP8266 with ESPEasy and two OneWire probes monitoring my fridge/freezer combination. Reporting to Domoticz, which handled alerts. Problem is the wires making a small gap in the door seals letting warmer air in, which in the freezer also caused frozen condensation. Decommissioned now.
Use a piece of Flat flex cable, the white kind to go trough the gap. Works wonders for me.
Ooh, good plan! I most likely have some laying around in the parts bin.
But there was a thing about the WAF as well. not sure if it can get around that.
Shockingly enough, RF signals can make it out of a fridge /freezer; and Lithium AAs handle the cold well.
Reliability of the RF signals may be an issue, but a strategically located receiver can resolve that.
If you’re using a thermocouple, this is a bad idea – each dissimilar metal joint creates another thermocouple pair, which will cause errors in the sensed voltage and throw off your measurements. You can get really thin-wire thermocouples (like less than .020″ dia) that will let the gasket close pretty much completely.
ehh??
“And for [Jeff] who has many thousands of dollars of food stowed in a chest freezer”
You must either not eat meat or not pay for what you do eat. It only takes a few hundred pounds (~5-10) cubic ft of frozen beef to get to $1k. Around here, it’s pretty common for people to people to buy a “quarter cow” or “half cow” which will fill a freezer and might last several months to a year or so.
Around here it is common to have freezers smaller than 4 cubic ft.
Half a cow, Half an Elk, a few turkeys and frozen chickens, some nice rib-eyes I got a decent deal on at a restaurant supply company, and then other random frozen things.
“Overengineered”
Just standard hobby project. I’ve built the same for monitoring the temperature of the wood burner and let Home Assistant remind me to add wood when the trending temperature of the burner starts to drop.
A container of water frozen solid then place a coin on top. If power failure happened while you were away, the water will thaw and the coin will move. If it ends up on the bottom, the food’s spoiled.
don’t drink the milk! why ? it’s spoiled!
don’t drink the milk! why ? it’s spoiled!
don’t drink the milk! why ? it’s spoiled!
(if you grew up when we only had 13 tv channels, you’ll get the joke)
13? When I grew up we had 3 plus the one from across the border.
2 of those 3 channels were PBS that sucked half of the time.
The glass of water trick is great for a freezer at a cottage or on the occasion you’re out of town for a week or 2; but it doesn’t let you know there’s a problem before you’re throwing out food.
I’ve been thinking that a flexPCB would be a perfect solution to get a sensor inside the freezer, without leaving a big gap around the wires for thermal losses. Only question is then how to have the sensor stick to the inside of the freezer. Feels like a job for a magnet, although the inner skin is probably plastic …
As Jeff points out, he spent way to much on K-Type thermocouple and a thermocouple amp. Normally use a sealed-wired DS18B20 temp sensor (+/-0.5C accuracy) on a DIY projects and thermocouples with commercial temperature controllers. For medical vaccine monitoring, have to use a NIST compliant temperature logger (typically +/-0.3C accuracy). The vaccine logger’s probe is in a small vial of glycol solution. When used in a medical refrigerator, the fridge alarms real-time, while to logger alarms on trends like Jeff’s project.
i have a dumb question…what is technique for “sealed-wired”? i have a few DS18B20s scattered around my house and i don’t remember how i sealed them up but i know it was dumb. i remember dipping one in epoxy, but that was dumb because it really needs to be potted or it just forms a skin that is easily detached or cracked.
anecdote…i have one deployed outside, under an eave so it’s (mostly) out of the sun/rain. on sunny days its value swings dramatically between two values separated by about 5-10degF. i assume there’s an air current that flows along my eaves and when the breeze is just right, it comes from the sunlit asphalt. but in the winter it sometimes shows an odd effect. i’ve only noticed it in those occasions when it stays below freezing for days at a time and there is snow that isn’t melting…it develops a very long time constant, as though it’s encased in ice or something. its temperature drifts slowly over the span of the day and never quite reaches the true high or the true low. like it had a low pass filter with a period of 6-12 hours. i visually inspected it and couldn’t see ice, but i haven’t yet tried heating it to see if i can melt it and break it out of that pattern. so i’m not sure the mechanism. it’s entered this state for about a week at a time, maybe 2 or 3 times in the ~10 years i’ve had this sensor in place.
but if i was putting one in a freezer i’d probably feel like i had to get to the bottom of that. fundamentally, i think, making it genuinely durable is the key to the success of this sort of project. and a hard goal to achieve in a one-off no matter what technology you use.
I use an accurite outdoor temp sensor with lithium batteries and an RTL-SDR dongle to record the temperature from the freezer as well as a few other locations in the house. As they transmit on 433 MHz, it’s easy to find community projects that already support them. I get about 40-50 ft range from the freezer with a few walls in between as well.
I’m always a fan of building the solution, but, If,, you already have “home automation hub” – home assistant or hubitat or ( the home automation console of your choice ) … a cheap zigbee temperature monitor works great. I have a $13 zigbee temperature sensor in my garage freezer – in a baggie for durability ;). Its been working great for over a year, and the console can provide alarms and alerts on temperature excursions if desired.
I have only had one temperature excursion, the door was blocked slightly ajar. I was alerted and closed it.
For a few dollars more you can get one that provides battery status to the hub and has a display on board.
I tried a few Matter over Thread sensors connected to my HA. Turns out I have a freezer that, when stocked with certain foods (frozen chicken breasts in my test) will drop the RSSI and sometimes lose connectivity. No such problems with a Lorawan sensor, both provided battery status.
What I am astonished by is that no one caught the greatest part of this build,
“power supply, which was just a cheap multi-voltage one I picked up at radioshack”
Although they are making a slow comeback. I also realize that the lower case “radioshack” instead of “Radio Shack” might just be a non branded electronics source. But it struck me as humerus.
Any project worth doing is worth OVER-doing.
haha are they making a comeback? i have a big box of wall warts for this sort of project, and if i just reach in blind i might come up with a radioshack one that was originally purchased in the 1990s.
No, I am not kidding, we actually have a RadioShack within driving distance. It kind of exists in a weird place, a mix of early 00’s RS with some modern sensibilities.
You can’t buy cell phones there, but you can buy answering machines, VHS cassettes, ESP32s, CB radios, and small electronic components. The power supply in question is one of those old white RadioShack wall warts, with a little slider switch to set the output voltage.
I’ve had luck with Yolink temperature sensors for exactly this application. Lorawan, and the new hub means you don’t have to depend on their cloud service anymore. Used Lithium AA batteries, in my expience they seem to last about a year.
Regarding running temperature sensor wires out the door seal… Do NOT run them through the interface of the door and the seal as it does what others have mentioned and can create a path for air. Instead, run the wires UNDER the door seal where it is bonding to the fridge/freezer. If any gap is created, just put a dab of silicone to seal it. Since you are not passing through the interface, you can glue it in place. The flexible seal between the seal and door is fully maintained.