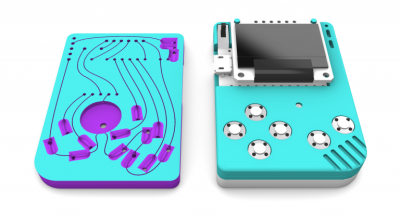
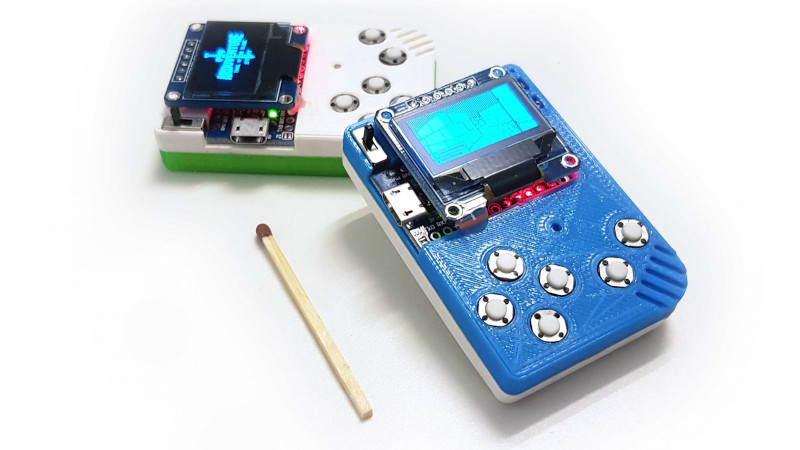
What is part way between a printed circuit board and a rats-nest of point-to-point wiring? We’re not sure, but this is it. [Johan von Konow] has come up with an inspired solution, 3D printing an Arduboy case with channels ready-made for all the wires. The effect with his 3DPCBoy is of a PCB without the PCB, and allows the console to be made very quickly and cheaply.
The Arduboy — which we originally looked at back in 2014 — is a handheld gaming console in a somewhat Gameboy-like form factor. Normally a credit-card sized PCB hosts all the components, including a microcontroller, display, and buttons. Each has a predictable footprint and placement so they can simply be wired together with hookup wire, if you don’t mind a messy result.

Here the print itself has all the holes ready-created for the components, and the path of the wires has a resemblance to the sweeping traces of older hand-laid PCBs. The result is very effective way to take common components — and Arduino pro micro board for the uC, an OLED breakout board, and some buttons — and combine them into a robust package. This technique of using 3D prints as a combination of enclosure and substrate for components and wiring has an application far beyond handheld gaming. We look forward to seeing more like it.
[Via the Arduboy community forum, thanks Kevin Bates for the tip.]


Have the patents on MultiWire boards expired ? With todays cheap CNC machines I can envision a consumer/hobbyist grade machine being a thing for prototypes.
Amazingly, the MultiWire patents (US Patents 4,175,816 and 4,094,572) should be expired as of today, according to Google Patents.
Quick MacAttack, buy combos of the figures in those patent numbers as lottery tickets LOL
I looked them up .. it seems they expired over 20 years ago.
Can you provide any background on this MultiWire board system? I’m not clear on the overlap with this project.
Pretty neat .. I think this is a great way to integrate “modules” (mcus, motor controller boards, displays etc.) into a tidy package.
I have independently had this same idea. I’m glad I’m not the only one that people are doing it. I think this may be a viable alternative to fabing your own PCBs at home, at least for one offs.
Hi,
I’m glad to see that the project finally reached HaD and its awesome audience.
I think that using 3D-Printed channels for wires instead of a traditional PCB is a promising idea. I call it 3DPCB and hope that it will inspire new ways of integrating electronics, reducing size, part count and complexity.
3DPCBoy is a great showcase for 3DPCB – you do not need to wait for a standard PCB and it is easy to replicate since it is rather self-explanatory due to the wire channels. I bought components for 50 kits in china (around $6 each) and offered them to all my colleagues that wanted to build one. Some of them had never used a 3D printer or soldered before – so far, they all got it to work.
If you want to try 3DPCB in other projects, I have some tips and more info in this post:
https://vonkonow.com/wordpress/2019/12/developing-3dpcb-3d-printed-circuit-board-with-lots-of-potential/
Thanks!
The many old oak cased hand cranked phones that i took apart as a kid (to get the magnets from the generator) that i now wish i still had….used to have all of the internal wiring laided in grooves in the oak and held in place with bee’s wax. When you opened the phone, all the wiring was in the back or sides with just a few loose wires going from the dry cells and the generator.
Thanks for posting this, I’ve got some leftover beeswax from an old project, and I often wire up my electronics projects without a PCB, so I might just give it a go!
my compliments! very neat project.
What about a dual print head setup where one of the heads prints with a filament of electrically conductive material. I have seen demonstrations where the printing stops and waits for magnets or other inserts to be dropped into voids left in the object which will then be printed over when the user orders the printing to continue. What if you dropped electronic components in where wire traces have already been printed. Could be integrated into a kind of pick and place automation to require no user intervention. The down side is that it would be impossible to repair or upgrade components in the unit, but the up side would be a very robust housing capable of withstanding incredible levels of abuse and punishment.
Or is someone already doing this somewhere?
Haven’t looked in a few years, but historically, “conductive” filament available for home based 3d printers had too high resistance to be used in PCBs. Wouldn’t be shocked if one of the printable resins could be conductive enough now.
But I’m definitely thinking of how best to embed wires in prints now. Possibly using Fritzing to design boards…
There are a few characteristics to look at:
– ‘Wire’ material resistance / length
– Durability of wire (flexing, cracking, oxidation, etc.)
– Connections to components (adhesion, flexing, penetration of any oxide layers)
– Cost
– Toxicity
– Recycling / disposal
This is VERY cleanly done..I’ve done things like this just not so cleanly…but then I got a cheap cnc engraver to mill PCBs out so I dont have to do this kind of thing anymore, just saying. Project is nice dont get me wrong.
Thank you!
I also have a cnc that I use it for SMD boards and when i need something durable, but less and less often.
What I like with 3DPCB is that people without a mill can replicate the project (it is also less noisy and does not create glass fibre dust ;)
Very nice project. Will build one, I always wanted an arduboy, but could never justify the cost (as it will most likely not be used very often).
Any hints for the parts? I actually found the push-buttons (EVQ11 is the keyword for those who are wondering), but not sure about the actual size of that slide switch…
I bought them in Huaqiangbei for almost nothing, but they can easily be found on ebay. Search for slide switch and sort on lowest price and you will find 20x for $1 including shipping…
I found many different types on aliexpress, but wasn’t sure which one to pick. Now searched on ebay, and seems the first that pop up are the right ones (SS12D00G4).
Thanks, will order some.
Hi
I just updated the post to include a version with easier to obtain components using 6x6mm TACT switches, a 9mm buzzer with dual audio channels and better mechanical OLED support.
(Follow the first link in the article above)
Any chance you would add the OLED Support to your first version? Or make the new version for the special switches from your first version? I just think the switches from your first version are better suited.
FWIW, you can attach two razor/exacto blades together and cut out traces cardstock. (If you use spacers, you can easily make wider traces.) I’ve made multi-layer cardboard PCB’s before. It works pretty good and you can stiffen everything with CA glue.