A Barn Find 6502 Is Restored

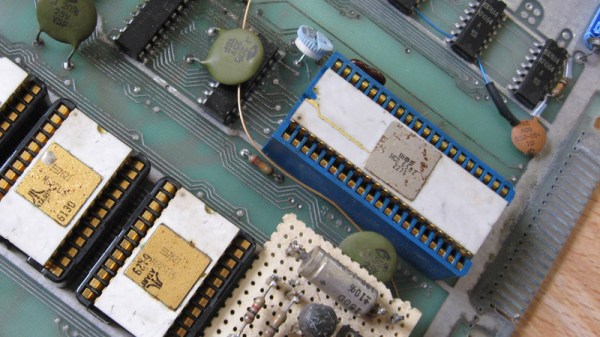
The phrase “Barn find” is normally associated with the world of older cars, where enthusiasts live in the hope that they may one day stumble upon a dusty supercar lurking unloved for decades on a remote farm. It’s not so often found in the context of electronics, but that’s the phrase that [John Culver] uses for a mid-1970s Atari arcade board that had been through a very hard time indeed and was in part coated with cow dung. It’s interesting because it sports a very early example of a MOS 6502 in a ceramic package, whose date code tells us was manufactured in week 22 of 1976.

Finding a microprocessor, even a slightly rare one, is not that great an event in itself. What makes this one interesting is the state it was in when he got it, and the steps he used to retrieve it from the board without it sustaining damage, and then to clean it up and remove accumulated rust on its pins. We are fast approaching a point at which older microprocessors become artifacts rather than mere components, and it’s likely that more than one of us with an interest in such things may one day have to acquire those skills.

We’re rewarded at the end with a picture of the classic chip passing tests with flying colours, and the interesting quirk that this is a chip with the famous rotate right bug that affected early 6502s. If you are interested in the 6502 then you should definitely read our colleague [Bil Herd]’s tribute to its recently-departed designer, [Chuck Peddle].

Lightbulb Glows When You Have That Eureka Moment

We’re not entirely sure where the lightbulb-idea concept came from, but it’s a cultural touchstone rapidly becoming outmoded by the prevalence of compact fluorescent and LED lighting. Despite this, [Alex Glow] and [Moheeb Zara] whipped up the Prometheus Lamp to let you experience it for real.

The build starts with a glass lightbulb souvenir from the Neon Museum in Las Vegas. Inside, a TinyLily Mini microcontroller board is tasked with talking to an accelerometer to detect movement. When the lightbulb is picked up and oriented in the vertical axis, it lights up a NeoPixel LED, glowing to indicate that you’ve just had a remarkable idea! It’s all powered off a single CR2032 coin cell, thanks to the low voltage requirements of the modern TinyLily components.

It’s a build that serves as a good way to learn about accelerometers, and it makes a fun desk toy, too. We’ve seen some other projects go by the name “Prometheus”, too — like a wrist mounted flame thrower. How’s that for variety?

3D Printing For Wire Paths Yields An Arduboy Minus The PCB

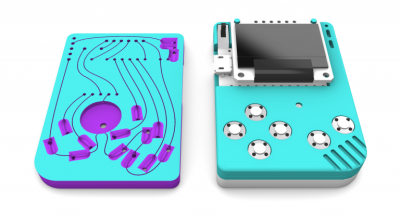
What is part way between a printed circuit board and a rats-nest of point-to-point wiring? We’re not sure, but this is it. [Johan von Konow] has come up with an inspired solution, 3D printing an Arduboy case with channels ready-made for all the wires. The effect with his 3DPCBoy is of a PCB without the PCB, and allows the console to be made very quickly and cheaply.

The Arduboy — which we originally looked at back in 2014 — is a handheld gaming console in a somewhat Gameboy-like form factor. Normally a credit-card sized PCB hosts all the components, including a microcontroller, display, and buttons. Each has a predictable footprint and placement so they can simply be wired together with hookup wire, if you don’t mind a messy result.

Here the print itself has all the holes ready-created for the components, and the path of the wires has a resemblance to the sweeping traces of older hand-laid PCBs. The result is very effective way to take common components — and Arduino pro micro board for the uC, an OLED breakout board, and some buttons — and combine them into a robust package. This technique of using 3D prints as a combination of enclosure and substrate for components and wiring has an application far beyond handheld gaming. We look forward to seeing more like it.

[Via the Arduboy community forum, thanks Kevin Bates for the tip.]

A Modern Take On The “Paperclip Computer”

Back in 1968, a book titled “How to Build a Working Digital Computer” claimed that the sufficiently dedicated reader could assemble their own functioning computer at home using easily obtainable components. Most notably, the design utilized many elements that were fashioned from bent paperclips. It’s unclear how many readers actually assembled one of these so-called “Paperclip Computers”, but today we’re happy to report that [Mike Gardi] has completed his interpretation of the 50+ year old homebrew computer.

A view behind the computer’s ALU

The purist might be disappointed to see how far [Mike] has strayed from the original, but we see his embrace of modern construction techniques as a necessary upgrade. He’s recreated the individual computer components as they were described in the book, but this time plywood and wheat bulbs have given way to 3D printed panels and LEDs. While the details may be different, the end goal is the same: a programmable digital computer on a scale that can be understood by the operator.

To say that [Mike] did a good job of documenting his build would be an understatement. He’s spent the last several months covering every aspect of the build on Hackaday.io, giving his followers a fantastic look at what goes into a project of this magnitude. He might not have bent many paperclips for his Working Digital Computer (WDC-1), but he certainly designed and fabricated plenty of impressive custom components. We wouldn’t be surprised if some of them, such as the 3D printed slide switch we covered last month, started showing up in other projects.

While the WDC-1 is his latest and certainly greatest triumph, [Mike] is no stranger to recreating early digital computers. We’ve been bringing you word of his impressive replicas for some time now, and each entry has been even more impressive than the last. With the WDC-1 setting the bar so high, we can’t wait to see what he comes up with next.

Continue reading “A Modern Take On The “Paperclip Computer””

Generate 3D Printable QR Codes With This Web Tool

Since most people are carrying a camera-equipped computer in their pockets these days, QR codes can be a great way to easily share short snippets of information. You can put one on your business card so people can quickly access your contact information, or on your living room wall with your network’s SSID and encryption key. The design of QR codes also make them well suited to 3D printing, and thanks to a new web-based tool, you can generate your own custom STL in seconds.

Created by [Felix Stein], the website provides an easy to use interface for the many options possible with QR codes. Obviously you have full control over the actual content of the code, be it a simple URL or a something more specific like a pre-formatted SMS message. But you can also tweak physical parameters like size and thickness.

Once you’re happy with the 3D preview, you can have the website generate an STL for either single or multi-extrusion printers. For those of us who are puttering along with single extruder machines, you’ll need to swap the filament color at the appropriate layer manually. With so many variables involved, you’ll also need figure out which layer the swap should happen on your own.

Incidentally, this is an excellent example of where STL leaves something to be desired. When using a format like 3MF, color and material information could be baked right into the model. Once opened in a sufficiently modern slicer, all the tricky bits would automatically sorted out. Or at least, that’s what Prusa Research is hoping for.

USB Password Keeper Runs On Tiny Chip

The most important rule of password use, especially when used for online logins, is to avoid reusing passwords. From there, one’s method of keeping track of multiple passwords can vary considerably. While memorization is an option in theory, in practice a lot of people make use of a password manager like Lastpass or KeePass. For those with increased security concerns, though, you may want to implement a USB password keeper like this one based on an ATtiny.

This password keeper, called “snopf”, is a USB device with an ATtiny85 which adds a layer of separation to password keeping that increases security substantially. Passwords are created by the USB device itself using a 128-bit key to generate the passwords, which are physically detached from the computer. Password requests are made by the computer to the USB device, but the user must push a button on the snopf in order to send the password to the computer. It does this by emulating a keyboard, keeping the password information off of the computer’s clipboard.

Of course, snopf isn’t perfectly secure, and the project’s creator [Hajo] goes into detail on the project’s page about some of the potential vulnerabilities. For most use cases, though, none of these are of serious concern. Upgrading your password keeper to a physical device is likely to be a huge security improvement regardless, and one was actually developed on Hackaday a few years ago.

A 3.3 V Tube Preamp Without An Inverter

If you’ve ever worked with vacuum tubes, you’ll probably have a healthy appreciation for high voltage power supplies. These components require higher potentials to get those electrons moving, or so we’re told. It’s not the whole truth though, as [Albert van Dalen] demonstrates with his tube preamplifier running from only 3.3 V. If your first thought is that he must have made a flyback converter to step that voltage up to something more useful then you’re in for a surprise, because the single 6J6 pentode really does run from just 3.3 volts. Even its heater, normally supplied with 6.3 V, takes the lower voltage.

The circuit appears at first sight to be a conventional single-ended design, but closer examination reveals a grid bias circuit more reminiscent of a bipolar transistor. This results in a positive grid voltage rather than the more usual negative, and an unusually high 0.3 mA grid current. The cathode current is only  0.15 mA, but the preamplifier delivers a 3.5x gain. There is more detail on his website.

It would be interesting to subject this circuit to a full audio analysis and comparison with a more conventional design. As with so much in the world of audio there’s some smoke and mirrors around what constitutes the so-called “valve sound”, and it’s a question whether the satisfaction comes through the sound itself or the bragging rights of having a unit with a vacuum tube on show.  Still, this is a simple enough design which takes few resources to build, so we look forward to seeing further experimentation. Careful though – down the vacuum audio route can lie folly.