The Creality Ender 3 is part of the new wave of budget 3D printers, available for less than $250 from many online retailers. For the money, it’s hard to complain about the machine, and it’s more than suitable for anyone looking to get make their first steps into the world of FDM printing. But there’s certainly room for improvement, and as [Simon] shows in a recent blog post, a little effort can go a long way towards pushing this entry-level printer to the next level.
The first step was to replace the printer’s stepper drivers with something a bit more modern. Normally the Ender 3 uses common A4988 drivers, but [Simon] wanted to replace them with newer Trinamic drivers that offer quieter operation. Luckily, Trinamic makes a drop-in replacement for the A4988 that makes installation relatively easy. You’ll need to change out a few caps and remove some resistors from the board to make everyone play nice, but that shouldn’t pose a challenge to anyone who knows their way around a soldering iron.
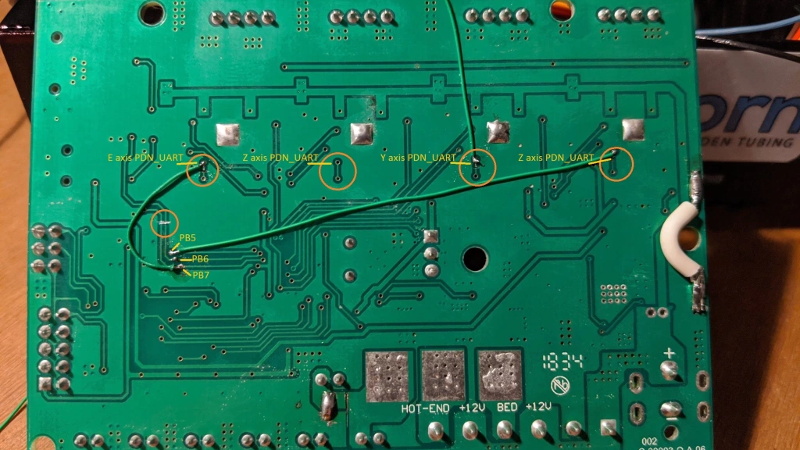
Beyond quieter running steppers, the Trinamic TMC2208 drivers also offer direct UART control mode. Of course the Ender’s board was never designed for this, so the MCU doesn’t have enough free pins to establish serial communications with the three drivers (for the X, Y, and Z axes). But [Simon] realized if he sacrificed the SD card slot on the board, the six pins that would free on the controller could be cut and rewired to the driver’s UART pins.
Combined with the Klipper firmware, these relatively minor modifications allows him to experiment with printing at speeds far greater than what was possible before. Considering the kind of headaches that a ~$200 printer would have given you only a few years ago, it’s impressive what these new machines are capable of; even if it takes a few tweaks.


He also could have just used an SKR Mini E3 board. It has 32 bit processor and UART controlled TMC2209’s. And connector layout is made to match Ender 3 board.
I already had the TMC2208’s, so this was effectively free – apart from a couple of hours worth of time.
I’ve considered the Mini E3 mind, doesn’t look too bad.
I guarantee this took more than “a couple of hours” (a couple = 2). A “few hours” might be more descriptive, but I’m guessing it’s also more than “a few” from start to finish.
At the end of the day your stock mainboard is still limited to 8-bits and you’re already out of flash ROM to do much with the UART inputs, you’ll have to sacrifice other firmware functionality for the code to do anything useful with the UARTS.
The software part of this would take “a couple of hour” alone.
There are many good reasons to just spend the $35 it costs to get the SKR Mini and not waste time with “upgrades” like this one.
But, it i a nice genuine “hack” though. Kudos on that.
No idea why you think this couldn’t be done in “a couple of hours”. Simon obviously has a decent understanding of Marlin already, the Creality board is pretty simple and well documented by other people who have made mods and the physical act of cutting traces, removing some simple components and soldering on some wires between via’s would only take a few minutes for someone who casually works with electronics.
Yeah, a few hours / a couple of hours two / three / four, something like that. The chips were free ;)
I have looked at the skr mini, but currently have no reason to upgrade.
“[Simon] wanted to replace them with newer Trinamic drivers that offer quieter operation.
exactly, I would like to know what makes one stepper driver noiser than other.
My friend connected larger stepper motor to standard China made stepper controller PCB and noise can be heard.
Let me know why software based stepper controllers are quieter.
thank you
They aren’t “software based” any more than the old drivers. They are software controlled and that’s not what makes them quiet.
What makes them quiet is the waveform. they present to the motor.
We speak of stepper drivers as controlling the amount of current sent to each coil in the stepper. It’s easy to think of this as a linear, analog thing like running DC through a coil and controlling the current by feeding it through a variable resistor. Except that’s not how it really works. Instead, at any given instant in time (with a old-style driver) each coil is either fully on (basically a short to the power supply) or fully off. The reason it doesn’t blow up from over-current is that it is only switched on for some tiny fraction of a second at a time. They are actually being switched on and off several thousands of times per second.
Coils however, including ones in a motor resist sudden changes in current. This is due to magnetic effects I won’t describe today. The result is that you get the effect of having an average current, somewhere in between full on and full off. The percentage of time when the coil is on vs off determines just where that average is. The driver works by varying this percentage to achieve the requested amount of current. This is known as PWM (Pulse Width Modulation).
That rapid switching on and off is what makes them so noisy.
These newer drivers use more complicated signals, not just fully on and fully off. They re-designed their signals to reduce the amount of noise.
In doing so however there are tradeoffs. You don’t get as much torque. The quietest modes might not provide enough torque to run your printer (or other device). So.. they have to be configurable. To do it the old way that would mean more pins leading to more jumpers.
They have also added other features such as the driver’s ability to set the desired current in software, report it’s own temperature, stall guard, etc… Each of these would have required more pins and more jumpers to configure. Had they done this the old way we would need modules much bigger than those old standard Pololus to hold all those pins plus a lot more jumpers! And every time they add a new feature everyone would have to redesign their motherboards for the new, bigger, many-pinned modules. Yuck!
Software configuration, through either a UART or SPI means that they can add as many features as they can dream up and all we need to take advantage of it is a new driver chip and a firmware update.
A nice cogent description!
Do you teach?
Thanks for the explanation!
The trinamic driver have the ability to change the internal stepping mode and current used in software. Your friends large stepper motors require a lot of current to start turning, once started the current can be reduced to reduce noise. Trinamic drivers can adjust this on the fly. they can also report feedback of current and allow skipped step detection. Even without software adjusting the steppers, the method that trinamic uses to chop the stepper current makes them very desirable. my printer runs almost silently on the desk next to me.
These days I wouldn’t bother adding bodge wires to a printer controller board. It’s just not worth the effort.
A few years ago I got a set of Trinamic drivers (can’t think of the number right now). They were for my RAMPS board. I did part of the usual hack, mounting the pins for the SPI wires up instead of down. I was so proud though because I did a few things different from the many examples I saw online.
instead of soldering them to the RAMPS board or to the LCD header adapter board I replaced the header on the LCD adapter board with one where the pins stick through like on an Arduino shield. That way I could just plug wires into the top. Also, instead of tying a separate wire for MOSI/MISO/SCK from each driver back to some very crowded, common point I made a wiring harness where one wire for each has multiple sockets to chain from the RAMPS to one driver to the next and so on.
Even so it was still a big mess cramming all those wires in there, and a lot of work too.
But then.. maybe a few weeks after I completed that I noticed something. People were starting to sell boards online where the SPI (and UART) wires are actually part of the PCB itself. No mess of wires! With some of these you could use old-style jumper configured drivers, SPI drivers or UART drivers all on the same board just by moving some jumpers. And they aren’t even expensive, $20-$30 will get you something that will probably work but with the usual questionable Chinese branding.
Of course that was a few years ago and at the time I was only shopping for a RAMPS equivalent. About the same price that would get me one of those then will get you one with a 32-bit ARM chip today.
So.. yah. Why bother with bodge wires?
Not sure the last time I’ve seen somebody use so many words to say so little.
You must not follow politics that much. They are the true masters.
Is hacking these days just about swapping boards with other boards? – Think you may have missed the point here.
I had the bare drivers laying around, without a use, and some time to spare – so why not ;)
I dont need to swap out the board for anything else just yet (I’ll spend the ~£25 on some filament) – it does everything I need at the minute.
Its quiet and prints at 100+mm/s, I know about acceleration preventing these speeds from being reached on smaller prints, but my larger prints complete a lot faster, and better quality, thanks to klipper.
I probably wouldn’t bother buying the chips and cutting traces just for this mod, but if you have them lying around…
Ok. Fair enough.
Perhaps I was injecting a bit too much of my own experience. Fitting all of those wires onto a RAMPS board was a real PITA and now I have a cramped mess of floating wires that like to catch on things and pull out. Your build isn’t like that.
My advice to others in order to save themselves headaches is to use Trinamics on Pololu-style plug-in modules and motherboards that are jumper-configurable to run whatever uart/spi/jumper lines are necessary to them.
Your build seems to work just as well and clearly you have the soldering skills to pull it off. Good job!
And my advice to others would be to spend the money and get a Prusa that already has quality components from the factory.
But that’s not always an option for everyone, so people do the best they can with what’s available to them.
Quality components, like poorly printed PETG hard parts?
Very nice hack. Did the software need to be adjusted in order for this to work?
Just had to add the tmc config for Klipper and it worked (not sure about marlin, might be similar?)
Yah, pretty much.
A couple of changes to configuration.h and configuration_adv.h. You just change the model number of the drivers in one spot. In another you turn on the SPI or UART interface and set the desired current. There is another #define to enable whichever silent mode you intend to run in another.
I suppose there is a little more to it if you want stall-guard. I think I remember also uncommenting a #define or maybe pasting in a line of code somewhere to add a G-code command which causes it to spit out all the drivers’ current diagnostic info.
Once this is done you have to build and upload. Do you have to do that in Klipper? Or is it simply a matter of editing the config file(s) on the SD card.
I do think I see Klipper in my future.
Good to know 👍
For Klipper you just add the lines to the config on the pi and it takes care of the rest, no need to flash anything manually.
“For the money, it’s hard to complain about the machine, and it’s more than suitable for anyone looking to get make their first steps into the world of FDM printing”
I would disagree with that 100%. Had one that I fought with for months. Never got a decent print out of it, and before long the cheap bearings introduced enough friction to cause missed steps on the y. New bearings helped for a while, then it happened again. 2208 drivers and a smaller drive pulley helped for a while, then the stepper failed and a new stepper went in, then I noticed the cheap rails were wearing because they were not even hardened. Replaced those, that’s when the hotend problems started, replaced that. Then the extruder starts slipping; plastic cracked. Replaced that. The hotend heater dies. The magnetic bed wasn’t strong enough so it would slip with larger mass prints. Also, before all the problems started the psu connector overheated (this was like a year after they claimed to have stopped crimping these but it was crimped). Ultimately gave up on it; the repairs had cost more than the machine was worth and things kept going wrong with it. Bought an anycubic kossel, put a good bed surface and my 2208’s in, flashed a community firmware, and have been printing fine since…for under $250 all in. Now you can get a photon for under $250 too. When someone recommends an ender 3 as a starting printer I have to assume that they don’t know what they are talking about, that they are being malicious, or that their idea of a starter printer is one that will teach you every design mistake that can be made one at a time the hard way.
The better Chinese companies do make changes to their products as they see reports of problems in the field, so it’s entirely possible that the Ender 3 one buys today is improved over the one you bought.
They had an issue with the crimped power connector. The community noticed and they were forced to fix it. People started getting units with soldered connectors. Then they switched back to crimping, which is what I got. Doesn’t sound like Creality is one of the better Chinese companies; sounds like they are the embodiment of the negative stereotype of a Chinese company…make a few decent units for good reviews, then slash quality to save a couple bucks per unit on the many people who buy based on the reviews of those few initial units. When people notice the quality is trash, the quality goes back up for some new good reviews and the cycle repeats. When there are better products from better companies around the same price it makes no sense to risk being one of the buyers during the quality slash periods. One thing is certain…Creality does make undisclosed changes that negativity effect quality and that by itself is reason enough to avoid their products.
I got an Ender 3 mid 2019 and it worked out of the box without any issues except being unbearably noisy (and a little slow). Tough I have to admit that I started to mod it (read: replaced everything except frame and motors) within weeks of arriva,l so I can’t say much about its durability.
P.S.
I bought the Ender 3 with the intention to be a project not with the intention be a reliable printer right out of the box.
If the latter had been my intention I woud’ve definitely bought a Prusa.
Exactly, this is actually the only reason I could give to justify buying one; as a learning experience. Same reason I might tell someone wanting to become a mechanic to start by buying a broken down old car that needs lots of work. As a functional out of the box device, the ender 3 is a really bad choice. As a repair project it makes sense, even if the end result is more expensive and less capable than a prusa.
Btw, congrats on your steppers; only two of my original steppers survived until retirement. One died all together, another lost torque, and the remaining two are wired funny so using them elsewhere required moving wires in the ph connectors. I still wonder how much they saved by buying stepper motors from a company that couldn’t even get the pin order correct.
The fact that there are 100k+ Enders out there that work perfectly fine out of the box for other people leads me to believe you’re the problem. Anyone who actually thinks a Prusa is a premium product is delusional. You’re getting a machine that prints well, but I would say an Ender 3 will match if not exceed the print quality of the mk3 right out of the box. Go take a look at the quality people achieve with stock machines, it’ll probably blow your tiny little narrow mind.
Oh honey, no.
What rails ? They run on the aluminium extrusion
One thing to watch out is if you want to go with TMC2209 (dunno about TMC2208) the pads on PCB (v1.1.3 at least) extend too much ant short to IC’s PPAD, can be easily rectified with a knife, but can cause some fireworks if powered form high current capable PS.
Who read “creality ender” and thought creativity ender?
Do you have any similar hacks or advice for the CR-10 V2?
Check klipper github, or klipper Facebook group, posted working jumper mod for CR10 V2 yesterday. Activated uart on x driver. But need to find more digital pins for y,z and e driver
How lucky I am that I enjoy hacking things, something that is less common nowadays, only the chosen ones know what I’m talking about c;
“For this hack, you just need to buy this SBC from this link, this module from this brand with this version, this other module from this brand with this version from this link, , download the code, burn it, ahhh you are already a hacker! :D