You’d think that being quarantined in your home would be perfect for hackers and makers like us, as we all have a project or two that’s been sitting on the back burner because we didn’t have the time to tackle it. Unfortunately, some are finding that the problem now is actually getting the parts and tools needed to do the job. When there’s a bouncer and a line outside the Home Depot like it’s a nightclub on Saturday night, even the simplest of things can be difficult to source when making in the time of COVID.
Which is exactly the situation I found myself in recently when I needed to drill a bunch of holes to the same depth. The piece was too big to put in the drill press, and while I contemplated just wrapping the bit in some tape to serve as a makeshift stop, I wasn’t convinced it would be accurate or repeatable enough. It occurred to me that a set of drill stop collars would be easy enough to design and 3D print, but before I fired up OpenSCAD, I decided to see what was already available online.
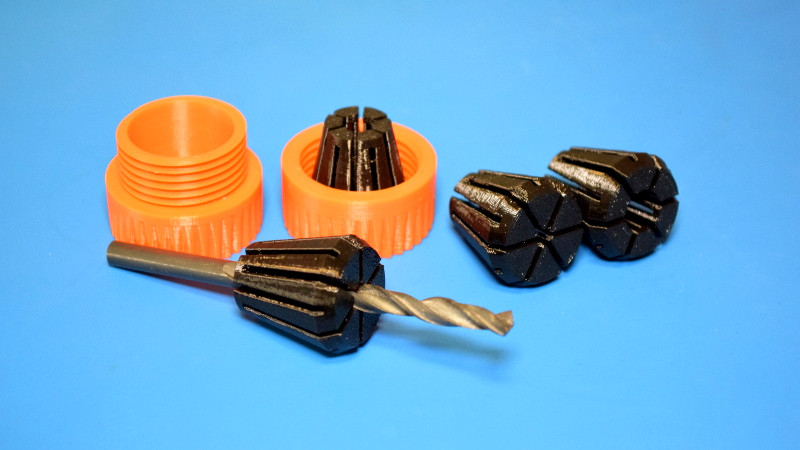
Which is how I found the “Collet Drill Stop” from Adam Harrison. Rather than the traditional ring and setscrew arrangement, his design uses a printable collet that will clamp down on the bit at an arbitrary position without tools. So not only could I avoid a trip to the store by printing this design out, it looked like it would potentially be an upgrade over what I would have bought.
Of course, it’s wise not to take anything for granted when dealing with 3D printing. The only way I could be sure that Adam’s design would work for me was to commit it to plastic and try it out.
Plastic Makes Perfect
Plastic is great for many applications, but terrible for others. Unfortunately it’s the only thing our desktop 3D printers can squirt out right now, so that means it often gets pushed into service when it really shouldn’t.
But that’s not really the case here. There will never be any serious load placed on the drill stop, it just needs to hold onto the bit securely enough that it doesn’t slide around. There’s no reason plastic can’t be used for this application, assuming you’ve got the right kind.
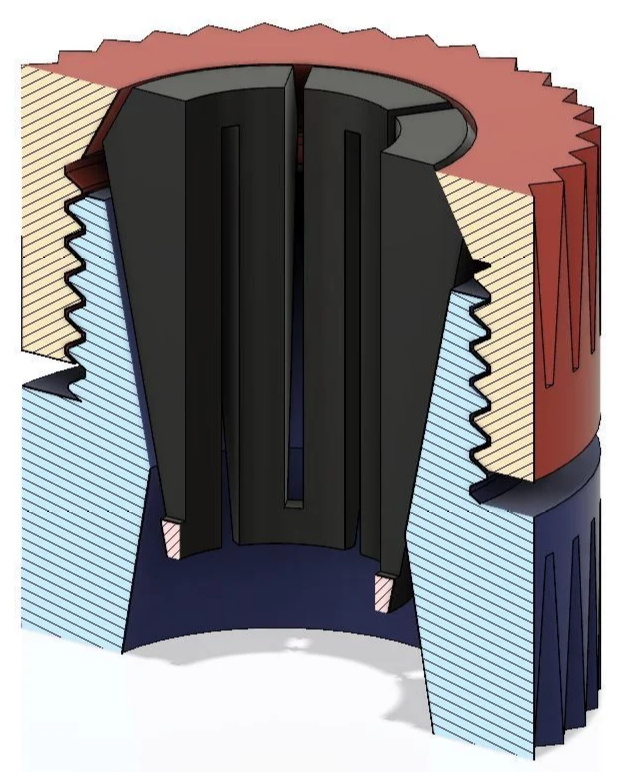
Which is where some people might get stuck with this design. As Adam explains, you really need to use two different plastics for this to work: a stiff plastic for the two-sided nut, and a soft and semi-flexible one for the collet itself so it can be squeezed down. He recommends PLA and PETG respectively, which is what I personally went with. For the collet, you want a material that can flex a millimeter or so without breaking, but it still hard enough to take some abuse.
Finally, the use of plastics for the drill stop actually has a considerable advantage over metal. The face of the PETG collet is soft enough to not mar or scratch the surface of whatever you’re drilling if you bottom out. If you’re just boring some holes in a piece of wood, it likely won’t matter, but if you’re trying to make openings in a control panel or something along those lines, it might be worth printing this out just to be sure you don’t inadvertently tear anything up.
Getting the Right Slice
Just as material selection is important for this print, so are the slicer settings. If you just print all the parts out using your normal configuration, things probably aren’t going to go very well for you. Adam recommends 100% infill on the PETG collet, which might sound like a lot, but won’t really make much of a dent on your spool given how small they are. On a Prusa i3 MK3 with default PETG settings, each collet took a little over an hour to print at 100% infill.
The nuts are a different story. A lower infill isn’t a problem for these parts, especially in PLA, but you do need to make sure you’re printing at a high enough resolution for the threads to come out cleanly.
The only problem with that is, half of each nut has no surface detail at all on it. The threads might need to get printed at 0.1 mm, but the knurled body would be more than happy with a lower resolution that doesn’t take so long to print.
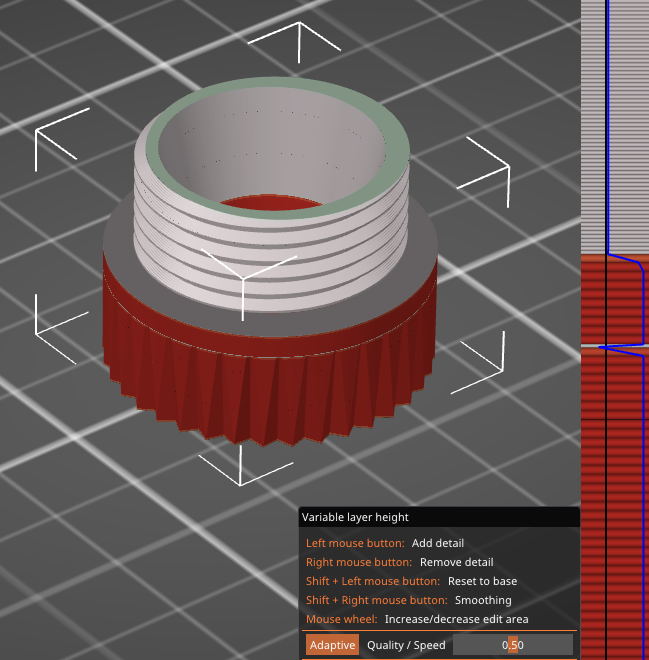
Traditionally you’d just set the slicer to 0.1 mm and deal with the extended print time. But these days we’ve got tricks like variable layer height. PrusaSlicer just added automatic layer height adjustment in version 2.2.0, and if you haven’t played with it already, this print is a great example of how it can be beneficial.
When sliced with a static layer height of 0.1 mm, each side of the nut would take approximately two hours to print. But by enabling variable layer height and selecting the adaptive mode, the slicer will automatically determine where the resolution is actually needed. In the image, you can see that PrusaSlicer has rightly concluded that the detail level can be reduced on the bottom half of the nut, and turned back up when it gets to the threads. By doing a large chunk of the print at 0.25 mm, total print time was reduced to slightly over one hour.
Taking it for a Spin, Literally
So before you spend the roughly four hours necessary to print out the nut and a couple different sized collets, you probably want to know how well the thing works. Well, I’m happy to report that it more than met my expectations.
 The printed threads on the nut are exceptionally smooth, and the slight flex of the PETG allows each collet to adapt to fit different sized bits while clamping down tight once the nut has been snugged up. As long as you’ve selected the appropriate sized collet, this thing isn’t going anywhere. The pressure necessary to get the stop to slide up the bit even with a hand-tightening is considerable, and certainly more than would ever be put on it while drilling.
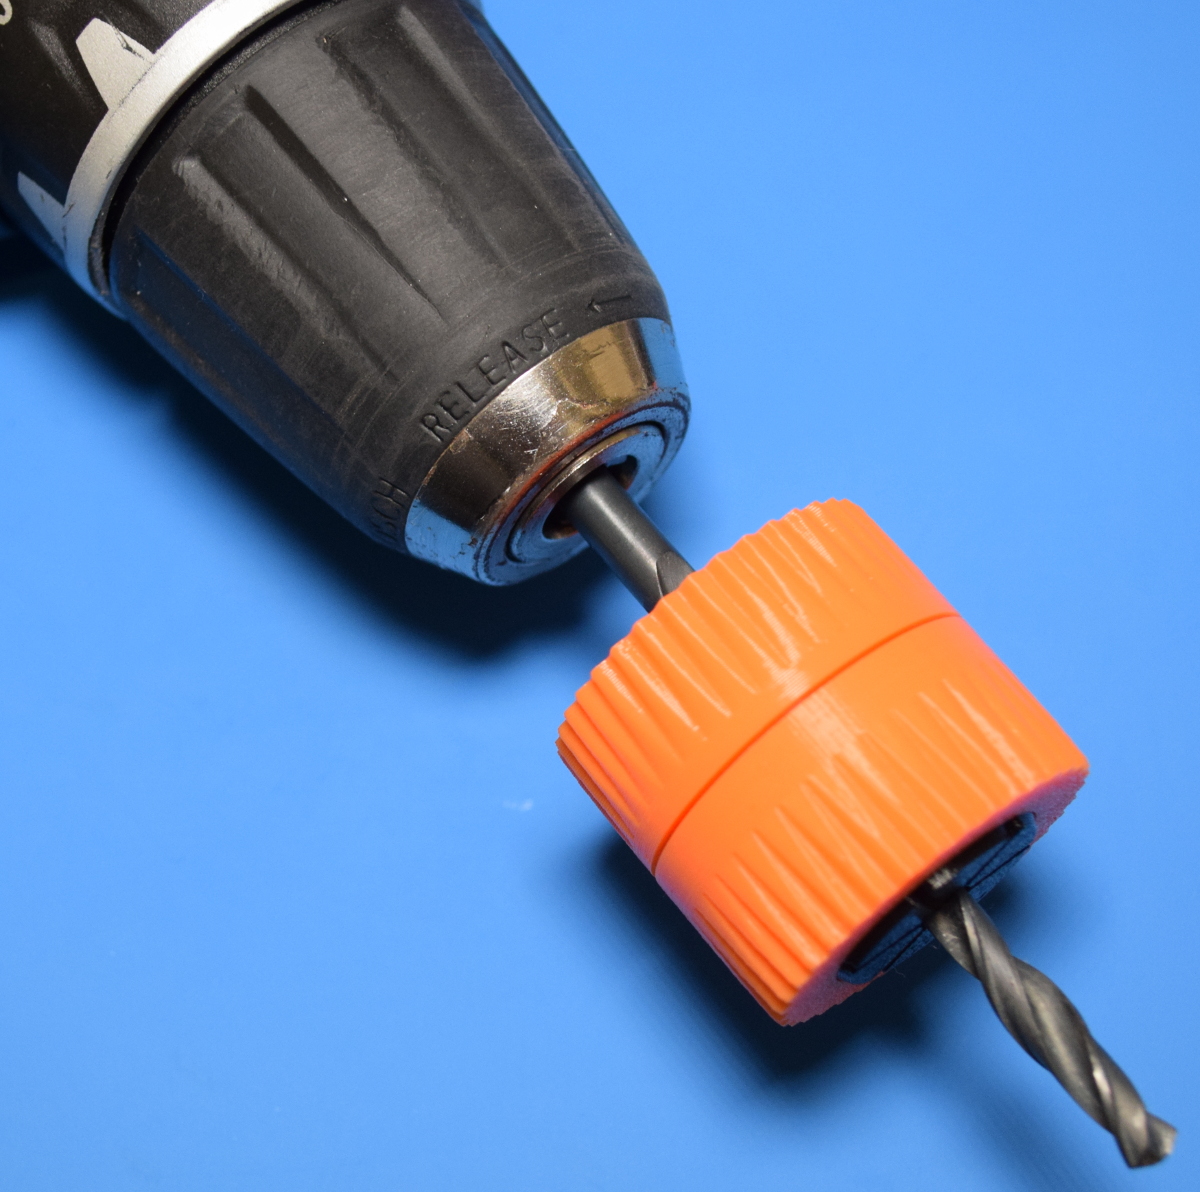
That said, it’s not perfect. The whole assembly is rather large, so depending on the length of the bit you’re trying to use it on, you might not be able to set the appropriate depth before the rear of the nut runs into the chuck. The diameter of the nut is also wide enough that you might have trouble if you’re working in a tight spot, though that’s probably more of an edge case.
All things considered, it would probably be a stretch to say that Adam Harrison’s “Collet Drill Stop” is actually better than a simple set of metal collars. But the tool-free design is certainly very convenient, and as long as you aren’t trying to use it with very short bits, its performance should be more than sufficient for the kind of light duty work most of us get ourselves into. I know it will certainly still be in my bag of tricks long after quarantine is lifted.


If you warm up the drill a little bit and stick it through a piece of plastic, you can make the piece run the grooves of the drill and just use a set screw to hold it in place from the side.
What is the point of this comment?
I think they are offering a low tech option for those who don’t have access to a 3D printer or for those who don’t want to spend more time making this (admittedly cool) tool than the time they will save by using it.
It solves the problems of the proposed solution: too large, difficult to set up accurately.
The 3D printed collet nut is over-engineered for the purpose. It’s a neat solution, but it’s engineering for the sake of engineering when there are simpler solutions that work better.
https://ae01.alicdn.com/kf/HTB1P.WPrk7mBKNjSZFyq6zydFXar/8pcs-Woodworking-Drill-Depth-Stop-Collars-Ring-Dowel-Shaft-Chuck-Wrench-DIY-Woodworking-Tools-3-16mm.jpg
I thought this would be, drill thru a dowel of wood and leave it on the bit and adjust depth with the chuck grip length of the bit and block. If you don’t want to mar finish put a layer of masking tape on the surface and ease into it and stop. In drilling metal nothing is going to melt.
But that’s not tool-free, which is the point of this design. If you just wanted to print collars, you could do that in a few minutes.
Then use a small knurled knob instead of a grub screw. Problem solved.
I agree, there are also the major advantages of not potentially damaging the drills with the set screw, and the obvious advantage as listed in the article of not being metal therefore not marring surfaces.
Certainly there are happy middle grounds between a bulky collet and a simple ring and grub, but I disagree that this collet design has no advantage and is just engineering for the sake of engineering.
What is the point of yours?
Or if you’re just looking for easy junkbox collets, slice the thin end off a doorknob. Or fat end if you think the other way round.
“a stiff plastic for the two-sided nut, and a soft and semi-flexible one for the collet itself so it can be squeezed down. He recommends PLA and PETG respectively,”
I wonder how ABS would do in place of the PLA.
If I printed something from PLA and kept it in my toolbox it probably wouldn’t survive the July/August heat!
ABS is softer/tougher than PLA in my experience. PLA for stiffness, ABS or PETG for flexibility/durability.
Depending on the depth of the hole a plunge router might make a decent drill press. You could print a drillmate type harness for your battery operated drill. In the event that you end up buying something, machinists use portable drill presses with magnetic bases for drilling and tapping.
I also made one tool like that, check it out.
https://www.thingiverse.com/thing:4252330
Another benefit of using plastic is that it acts like a fuse. When you fuck up it tends to break first, saving you from having to replace the more expensive components.
Plastic fuse and drills do not sound like a good idea…
Oh by the way, another handy depth stop makeshift besides tape around your bit is a length of insulation off a coax cable or other thick cable. If it goes on real tight, a small section is good enough for a few holes, but if you want to be sure of the depth over many, use a longer piece that stops against the chuck. This can however be compressed if you lean on the drill too hard.
This looks like an ER-32 collet or at least similar in size. If you want less bulky, try the ER 16 or 11 size. Another possibility is the DA collet syle. https://www.3dcontentcentral.com/Download-Model.aspx?catalogid=171&id=71155
No, it doesn’t.
ER32 collets are 40mm in diameter.
ER32 is 32 mm in diameter.
For 40mm you need ER40.
But of course, with this tapered stuff it depends on where an how you measure it.
For more info, check out DIN6499.
(Which apparently costs EUR43.70 for a pdf. Huh?)
I just use a block of wood
Nobody never used a wine-bottle cork?
What is wrong with the industry standard — Masking Tape?
Too easy to push past the tape. Even several layers can slip due to weak adhesive. These collets are cool, but I agree with the folks above that there are simpler solutions that work as well or better. I’m glad I read their comments!
I use the polyurethane rubber washer found under the head of hex head tek screws used for roofing. Does not damage the drill, and easy to slide up and down to the right position.