Friendly Flexible Circuits: The Cables

Flexible cables and flex PCBs are wonderful. You could choose to carefully make a cable bundle out of ten wires and try to squish them to have a thin footprint – or you could put an FFC connector onto your board and save yourself a world of trouble. If you want to have a lot of components within a cramped non-flat area, you could carefully design a multitude of stuff FR4 boards and connect them together – or you could make an FPC.

Flexible cables in particular can be pretty wonderful for all sorts of moving parts. They transfer power and data to the scanner head in your flat-bed scanner, for instance.  But they’re in fixed parts too.  If you have a laptop or a widescreen TV, chances are, there’s an flexible cable connecting the motherboard with one or multiple daughterboards – or even a custom-made flexible PCB. Remember all the cool keypad and phones we used to have, the ones that would have the keyboard fold out or slide out, or even folding Nokia phones that had two screens and did cool things with those? All thanks to flexible circuits! Let’s learn a little more about what we’re working with here.

FFC and FPC, how are these two different? FFC (Flexible Flat Cable) is a pre-made cable. You’ve typically seen them as white plastic cables with blue pieces on both ends, they’re found in a large number of devices that you could disassemble, and many things use them, like the Raspberry Pi Camera. They are pretty simple to produce – all in all, they’re just flat straight conductors packaged nicely into a very thin cable, and that’s why you can buy them pre-made in tons of different pin pitches and sizes. If you need one board to interface with another board, putting an FFC connector on your board is a pretty good idea.

Continue reading “Friendly Flexible Circuits: The Cables”

Single Flex PCB Folds Into A Four-Wheel Rover, Complete With Motors

You’ve got to hand it to [Carl Bugeja] — he comes up with some of the most interesting electromechanical designs we’ve seen. His latest project is right up there, too: a single PCB that folds up into a four-wheel motorized rover.

The key to [Carl]’s design lies with his PCB brushless motors, which he has been refining since we first spotted them back in 2018. The idea is to use traces on the PCB for the stator coils to drive a 3D printed rotor containing tiny magnets. They work surprisingly well, even if they don’t generate a huge amount of torque. [Carl]’s flexible PCB design, which incorporates metal stiffeners, is a bit like an unfolded cardboard box, with two pairs of motor coils on each of the side panels. This leaves the other surfaces available for all the electronics, with includes a PIC, a driver chip, and a Hall sensor for each motor, an IMU and proximity sensor for navigation, and an ESP32 to run the show.

With machined aluminum rotors and TPU tires mounted to the folded-up chassis, it was off to the races, albeit slowly. The lack of torque from the motors and the light weight of the rover, along with some unwanted friction due to ill-fitting joints, added up to slow progress, especially on anything other than a dead flat surface. But with some tweaking, [Carl] was able to get the buggy working well enough to call this one a win. Check out the build and testing in the video below.

Knowing [Carl], this isn’t the last we’ll see of the foldable rover. After all, he stuck with his two-wheel PCB motor design and eventually got that running pretty well. We’ll be keeping an eye out for progress on this one.

Continue reading “Single Flex PCB Folds Into A Four-Wheel Rover, Complete With Motors”

Linux Fu: The Chrome OS Flex Virtualization

The Flex Desktop is user-friendly and responsive

You’ve probably heard about Google Chromebooks. Like Android, Chrome OS is based on some variant of Linux, but it is targeted at the “cloud first” strategy so Chromebooks typically don’t have a huge amount of storage or compute power. If you have a real Chromebook, you can also use it to run certain other kinds of programs via virtualization. However, Google has recently pushed out Chrome OS Flex which is meant to install on a spare laptop you might happen to have hanging around. Seems attractive to take that only Windows 7 laptop and repurpose it to run Chrome OS, especially if you can run Linux apps on it. Unfortunately, Chrome OS Flex has a very different use case and I would only recommend installing it if you meet the exact use case it addresses.

The other option, of course, is to just install Linux on that old hardware. There are several distributions that are made for that purpose and, honestly, even most of the major distributions will work fine on older hardware with a little tweaking to turn off some of the more resource-costly features. That assumes you know how to install, tweak, and maintain Linux.

Continue reading “Linux Fu: The Chrome OS Flex Virtualization”

The eurorack rail piece, just printed in white plastic, not yet folded, with a folded example in the upper right corner

Bend Your Prints To Eliminate Supports

When designing even a reasonably simple 3D-printable part, you need to account for all the supports it will require to print well. Strategic offsetting, chamfering, and filleting are firmly in our toolkits. Over time we’ve learned to dial our settings in so that, hopefully, we don’t have to fumble around with a xacto knife after the bed has cooled down. On Twitter, Chris shows off his foldable 3D print experiments (nitter) that work around the support problem by printing the part as a single piece able to fold into a block as soon as you pop it off the bed.

The main components of this trick seem to be the shape of the place where the print will fold, and the alignment of bottom layer lines perpendicular to the direction of the fold lines. [Chris] shows a cross-section of his FreeCad design, sharing the dimensions he has found to work best.

Of course, this is Twitter, so other hackers are making suggestions to improve the design — like this sketch of a captive wedge likely to improve alignment. As for layer line direction alignment, [Chris] admits to winging it by rotating the part in the slicer until the layer lines are oriented just right. People have been experimenting with this for some time now, and tricks like these are always a welcome addition to our toolkits. You might be wondering – what kinds of projects are such hinges useful for?

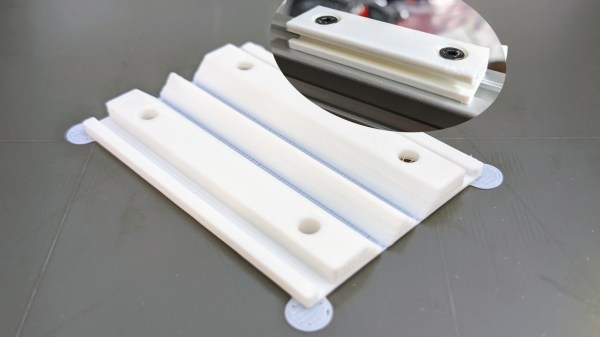
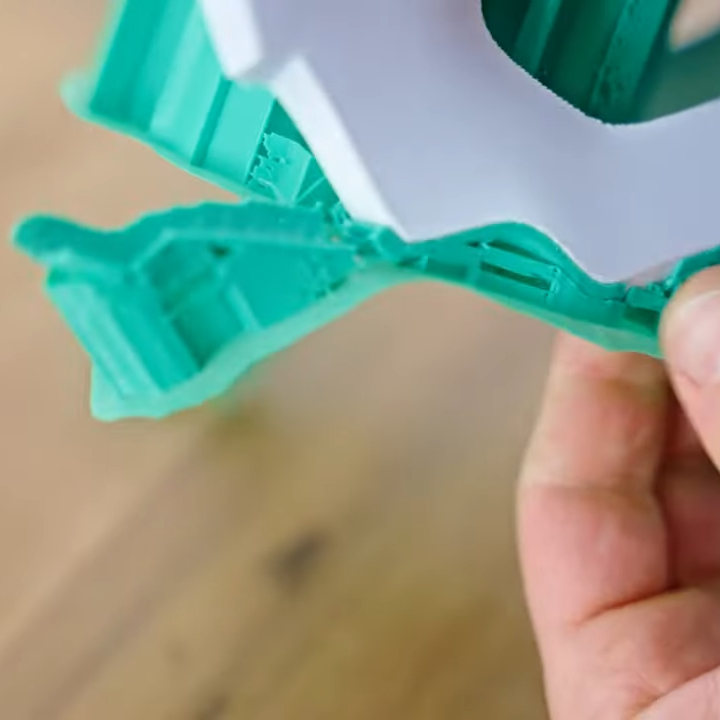
The example Chris provides is a Eurorack rail segment — due to the kind of overhangs required, you’d be inclined to print it vertically, taking a hit to the print time and introducing structural weaknesses. With this trick, you absolutely don’t have to! You can also go way further and 3D print a single-piece foldable Raspberry Pi Zero case, available on Printables, with only two extra endcaps somewhat required to hold it together.

Foldable 3D prints aren’t new, though we typically see them done with print-in-place hinges that are technically separate pieces. This trick is a radical solution to avoiding supports and any piece separation altogether. In laser cutting, we’ve known about similar techniques for a while, called a “living hinge”, but we generally haven’t extended this technique into 3D printing, save for a few manufacturing-grade techniques. Hinges like these aren’t generally meant to bend many times before they break. It’s possible to work around that, too — last time we talked about this, it was an extensive journey that combined plastic and fabric to produce incredibly small 3D printed robots!

We thank [Chaos] for sharing this with us!

Slipping Sheets Map Multiple Bends In This Ingenious Flex Sensor

When thoughts turn to measuring the degree to which something bends, it’s pretty likely that strain gauges or some kind of encoders on a linkage come to mind. Things could be much simpler in the world of flex measurement, though, if [Fereshteh Shahmiri] and [Paul H. Dietz]’s capacitive multi-bend flex sensor catches on.

This is one of those ideas that seems so obvious that you don’t know why it hasn’t been tried before. The basic idea is to leverage the geometry of layered materials that slip past each other when bent. Think of the way the pages of a hardbound book feather out when you open it, and you’ll get the idea. In the case of the ShArc (“Shift Arc”) sensor, the front and back covers of the book are flexible PCBs with a series of overlapping pads. Between these PCBs are a number of plain polyimide spacer strips. All the strips of the sensor are anchored at one end, and everything is held together with an elastic sleeve. As the ShArc is bent, the positions of the electrodes on the top and bottom layers shift relative to each other, changing the capacitance across them. From the capacitance measurements and the known position of each pad, a microcontroller can easily calculate the bend radius at each point and infer the curvature of the whole strip.

The video below shows how the ShArc works, as well as several applications for the technology. The obvious use as a flex sensor for the human hand is most impressive — it could vastly simplify [Will Cogley]’s biomimetic hand controller — but such sensors could be put to work in any system that bends. And as a bonus, it looks pretty simple to build one at home.

Continue reading “Slipping Sheets Map Multiple Bends In This Ingenious Flex Sensor”

Flexible PCB Earrings Put The Art In Art Deco

Earrings have been a hackers’ target for electronic attachment for quite a while, but combining the needed components into a package small enough to wear in that finicky location is quite a challenge. If [Sawaiz Syed]’s Art Deco Earrings are anything to go by, ear computers have a bright future ahead of them!

This is a project unusually well described by its name. It is in fact an earring, with art deco styling. But that sells it way too short. This sliver of a flex circuit board is double sided to host an ATtiny, accelerometer, LDO, and eight 2020 formfactor controller-integrated LEDs. Of course it’s motion sensitive, reacting to the wearer’s movement via LED pattern. [Sawaiz] makes reference to wearing it while dancing, and we can’t help but imagine an entire ballroom all aglow with tiny points of LED light.

The Art Deco Earrings are also set apart by the thoroughness of their documentation (have we mentioned how much we love detailed documentation?). [Sawaiz] not only drops the source in your lap, but the README in the Github repo linked at the top walks the reader through each component of the design in detail. Plus the PCBA render is so complete it includes a model of the wire loop to fit through the wearer’s ear; how cool is that? The single piece that’s still in progress is the battery. The earring itself hosts an LDO, so all that is required is stashing a battery somewhere discrete, perhaps in the user’s hair? We’re looking forward to seeing what [Sawaiz] works out.

For the full effect, check out the gif of an assembled unit in action after the break.

Continue reading “Flexible PCB Earrings Put The Art In Art Deco”

Printed It: Collet Drill Stop

You’d think that being quarantined in your home would be perfect for hackers and makers like us, as we all have a project or two that’s been sitting on the back burner because we didn’t have the time to tackle it. Unfortunately, some are finding that the problem now is actually getting the parts and tools needed to do the job. When there’s a bouncer and a line outside the Home Depot like it’s a nightclub on Saturday night, even the simplest of things can be difficult to source when making in the time of COVID.

Which is exactly the situation I found myself in recently when I needed to drill a bunch of holes to the same depth. The piece was too big to put in the drill press, and while I contemplated just wrapping the bit in some tape to serve as a makeshift stop, I wasn’t convinced it would be accurate or repeatable enough. It occurred to me that a set of drill stop collars would be easy enough to design and 3D print, but before I fired up OpenSCAD, I decided to see what was already available online.

Which is how I found the “Collet Drill Stop” from Adam Harrison. Rather than the traditional ring and setscrew arrangement, his design uses a printable collet that will clamp down on the bit at an arbitrary position without tools. So not only could I avoid a trip to the store by printing this design out, it looked like it would potentially be an upgrade over what I would have bought.

Of course, it’s wise not to take anything for granted when dealing with 3D printing. The only way I could be sure that Adam’s design would work for me was to commit it to plastic and try it out.

Continue reading “Printed It: Collet Drill Stop”