We’ve seen some very unique custom keycaps recently, but nothing quite like the embroidered ones that [Billie Ruben] has been experimenting with. Using a clever 3D printed design, she’s crafted what could well be one of the most easily customizable keycaps ever made…assuming you’ve got a needle and thread handy.
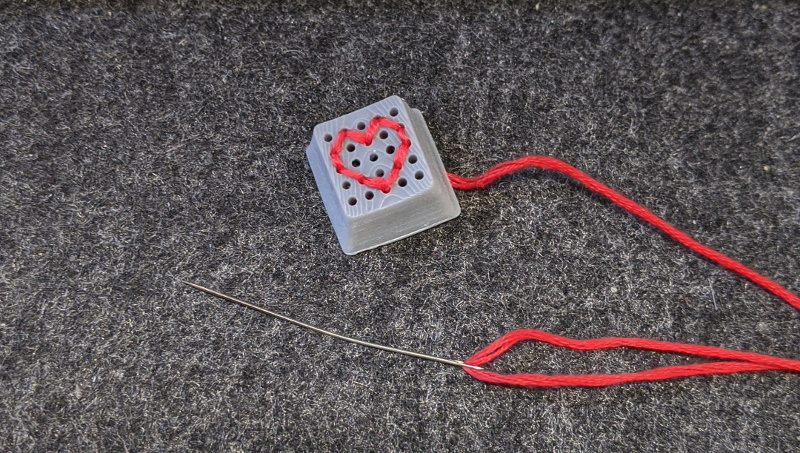
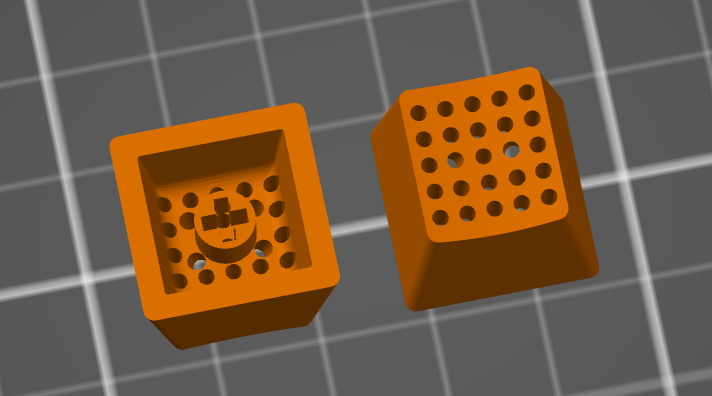
The idea is to take a standard keycap blank and pop an array of 25 holes in the face. Your thread or yarn is run through these holes, allowing you to create whatever shape you wish within the 5 x 5 matrix. While it’s somewhat tight quarters on the underside of the cap, nothing prevents you from using multiple colors or even materials to do your stitching. As an added bonus, the soft threads should provide a very comfortable and particularly tactile surface to tap on.
 Now the most obvious application is to simply stitch up versions of all the alphanumeric keys, but there’s clearly room for some interpretation here. [Billie] has already shown off some simple iconography like a red heart and we’re sure creative folks will have no trouble coming up with all sorts of interesting needlepoint creations to top their prized mechanical keyboards.
The intricate details necessary to make this idea work may be beyond the common desktop FDM 3D printer, so [Billie] ran these prototypes off on a resin printer (she attributes the visible layer lines to a hasty print). She’d love to hear feedback from other keyboard aficionados who’ve made the leap to liquid goo printing, so be sure to drop her a line if you print out a set of your own. It sounds like a new version is in the works which will provide a false bottom to cover the stitching from below, but functionally these should get you started.


Great idea!
All decorative issues aside, this suggests all kinds of tactile enhancements for the visually challenged, and perhaps some other fun tweaks using conductive material on the key face.
I feel like a cheaper option would be a small vertical mill (the ones used for drilling and milling PCBs) and a blank set of keycaps, and then going to town on them with a high precision drill bit.
It would be a lot more tedious of course, but it might be a viable alternative if you only want to embroider a small number of keys.
Cool idea at any rate, I might actually try this.
Yeah, the advantage of using a mechanical drill is you can go much smaller and at finer resolution. These keycaps here have 1.5mm holes with a 3.3mm grid. I’d rather have a 0.5mm hole on something like a 2mm grid. This would allow for much better stiching design detail. And if you want to put letters or numbers on it, having a 5×7 grid is definately nicer than the 5×5 these caps have. The only problem with the finer grid is probably the central stem that is used to attach the cap to the key. This design here fits neatly around the standard stem, and for a different grid you would probably have to “cheat” your way around that a little. I could see it built as a 2-part keycap tho, having just the stem with a flat plate attached, that can be glued inside the keycap after you’ve done the decorative stiching on the front part…
Looks like a way to make Braille keycaps. Should be room for two 2×6 matrices of holes with a space between. https://braillebug.org/braille_deciphering.asp
Background: There are professional computer cleaners that can be hired to clean the desktop/laptop computers in large organisations. Most of the “gunk” used to build up around the roller balls in the last generation of mice. And the cleaners would use what looked to me like a 100mm (4″) flat Decorators Paintbrush with the bristles trimmed by about 70% to make them much stiffer (more abrasive, but still gentle enough to not damage keys) to clean the “gunk” from keyboards.
My very first though on seeing the image above was, how the hell would you clean the keys ? Would you need to yank them out with a keycap puller and then stick them in a dish washer or a washing machine.
I thought of the same problem and the same solution. Cherry caps aren’t hard to pull with a tool. Now the wear from your fingertips and the holes is a different problem (any tips on aramid yarn?)
I take the keyboard to the supply pipe from the air compressor and blow the crumbs out.
I rotate my keyboards, so I have a clean one while the other one is being washed. I take off the keycaps and wash them in a solution of detergent. I don’t usually let them go too dirty, so a gentle rub with my fingers would be enough to get the gunk off. I wash off the debit off the case in a shower.
Cool art piece but if this is going to be used on a regular basis then keeping it clean is gonna be a problem not to mention the fact that the thread is going to be wearing out and needing to be replaced fairly often on a keyboard that gets used more then occasionally..
You raise a fair point but consider this, anti-microbial fabric is a thing, and i bet they make that from threads ^^
Theres also kevlar and all kinds of fun materials that the anti-microbial stuff could be combined with, some company somewhere might already make the exact thread to fill both your requirements :)
Point is, if you really wanted to do this for a ‘daily driver’ (so to speak) then you probably could find the materials :D
All those little hole just waiting for finger grease to accumulate and dip into the underlying PCB ? No thanks…
Yeah, seems like you’d want to seal these. Maybe even embed in epoxy although that destroys the texture element.
Um, how do you get thread through the middle hole without it interfering with the mounting post?
Glow-in-the-dark yarn…