Over the last couple of years, we’ve seen an incredible number of DIY keyboard builds come our way. Some have had their switches nestled into laser-cut aluminum and others 3D printed plastic. They may be soldered together on a custom PCB, or meticulously hand-wired. But however they were built, they almost all shared one thing in common: they ran some variant of the open source QMK keyboard firmware.
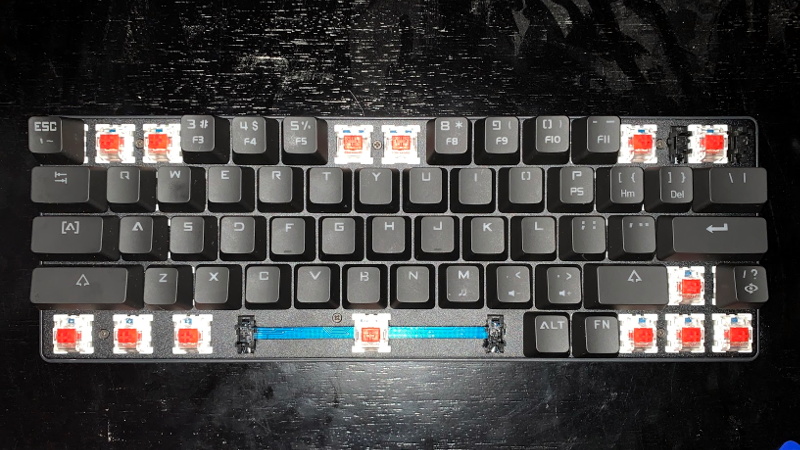
But what if you just want to run an open firmware on the keyboard you picked up for $50 bucks on Amazon? That’s exactly where [Stephen Peery] found himself nine months ago with this DK63 gaming keyboard. Since so many of these small RGB LED mechanical keyboards are very similar to existing open source designs, he wondered what it would take to blow out the original firmware and replace it with a build of QMK.
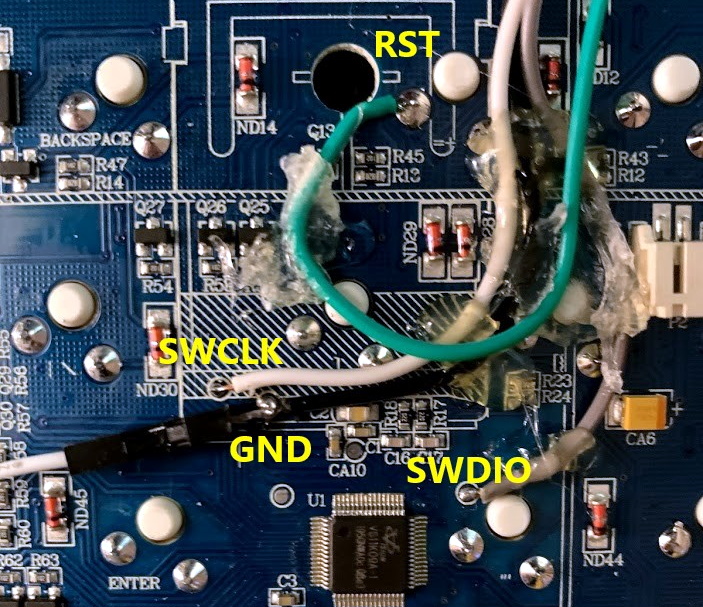 While [Stephen] doesn’t have everything working 100% yet, he’s nearly reached the end of his epic reverse engineering journey. The first step was tearing apart the keyboard and identifying all the components it used, then pulling the original firmware out of the updater. From there, between Ghidra and Serial Wire Debug, he was able to figure out most of what the stock firmware was doing so he could replicate it in QMK.
According to his README, the RGB LEDs and Bluetooth functionality don’t currently work, but other than that it seems QMK is up and running. If you’re OK with those concessions, he has information on the page about flashing his build of QMK to the stock DK63 with the ST-Link V2 so you can give it a shot. Though you do so at your own risk; we wouldn’t recommend doing this on your only keyboard.
We’ve seen commercially manufactured keyboards running QMK before, but it usually involves completely replacing the original controller with new electronics. That [Stephen] got this all working on stock hardware so other owners can follow in his footsteps is really a considerable accomplishment.
[Thanks to Baldpower for the tip.]


while i applaud this effort, i wonder if they aren’t woefully undervaluing their time… even at a paltry $10 an hour i bet he could have just bought a keyboard that can do QMK natively or even build one cheaper.
Or maybe this was a fun adventure he wanted to go on, without worrying about costs or any potential monetary incentives. Not to mention showing how to do it for others and getting people who may not be aware that something like this is possible interested.
Hacks like this would only apply for the same or derivative models. The good news is that it is still available. Most wannabe copy/paste crowds won’t have the skills or motivation to do anything else anyway.
what do you learn if just buy another thing if the first thing does not work? If everything would just be done for monetary reasons this hackaday would bee a pretty empty, uninteresting place. Learn, spread knowledge, inspire, try to make the world a better place, be bad ass ;)
Comments like that show that many people still don’t get the definitive goal of such hacks/activities:
– if it allows countless of people to benefit of one hack then this isn’t time wasted but benevolent activity to the masses (good karma)
– if it allows to reuse/enhance an item instead of throwing it away of buying a new one the ecological footprint is reduced and this is obviously a good thing to everybody
– and then projects like this often don’t have an economical sense but as they allows one to learn something this is where the real value resides (knowledge > money)
People who engage in the whole “value time” fallacy are either people with time running out in their live (old people or people with a know life-threatening condition (ie. cancer)) or people who thinks that money is a goal where it’s merely a mean.
Stephen here, I do indeed value my time. I’m a Web Dev by day and an electronics nerd by night. This was an exercise in learning more about keyboards and MCUs in general. I learned a lot of things along the way any met some really nice people. It started off by learning how to reverse engineer ARM MCUs and how to extract firmware from vendor update tools. I then learned how to use Ghidra to reverse the stock firmware. After that the QMK guys recommended that I get ChibiOS running on my MCU and that took a couple of months. I had to learn how to us an StLink to debug along with uploading / downloading FW. I also ended up getting a Saleae logic analizer to figure out the matrix key scan and RGB LED logic. All of this was new to me. I had a lot of fun and learned soo much. I think this type of project would be good for engineering students or people who want to start moving past Arduino.
I ported QMK onto Durgod K320, without any needs to resolder…
Similarly, some (very talented ;) ) people managed to port qmk to the Anne pro 2 (https://openannepro.github.io/) without resoldering, and it works flawlessly.
Any details on how you did this online anywhere?
He’s not “resoldering” (whatever that’s supposed to mean), he’s wiring in the programmer.
@KH Naah you didn’t ;-)
Its having a STM32 chipset. Just boot it up with factory’s boodloader and flash in the QMK via the USB.
I’d love to flash the Durgod K320 without disassembling the keyboard. Can you direct me to some link or share how you did it? Thanks a lot!!
Is there guide on how he did this, if so it would be greatly appreciated