Porting QMK To A Cheap Mechanical Keyboard

Over the last couple of years, we’ve seen an incredible number of DIY keyboard builds come our way. Some have had their switches nestled into laser-cut aluminum and others 3D printed plastic. They may be soldered together on a custom PCB, or meticulously hand-wired. But however they were built, they almost all shared one thing in common: they ran some variant of the open source QMK keyboard firmware.

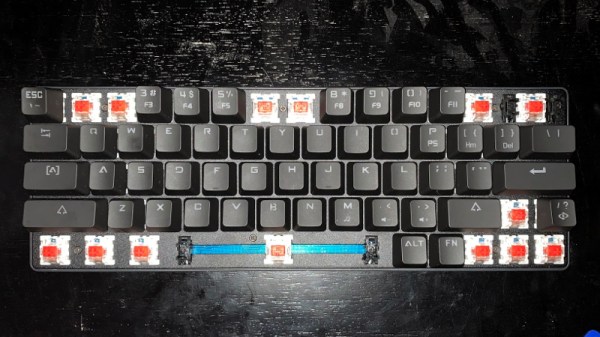
But what if you just want to run an open firmware on the keyboard you picked up for $50 bucks on Amazon? That’s exactly where [Stephen Peery] found himself nine months ago with this DK63 gaming keyboard. Since so many of these small RGB LED mechanical keyboards are very similar to existing open source designs, he wondered what it would take to blow out the original firmware and replace it with a build of QMK.

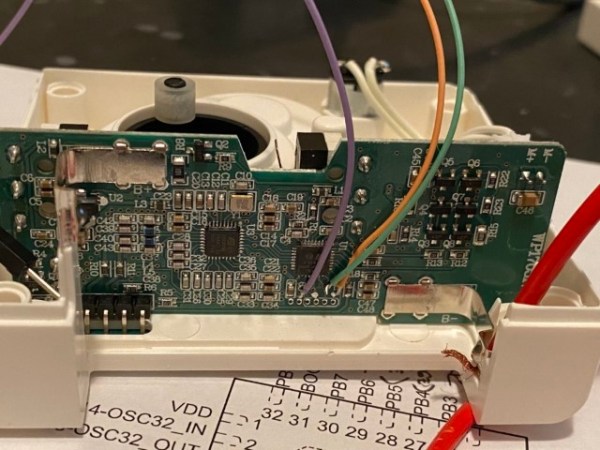
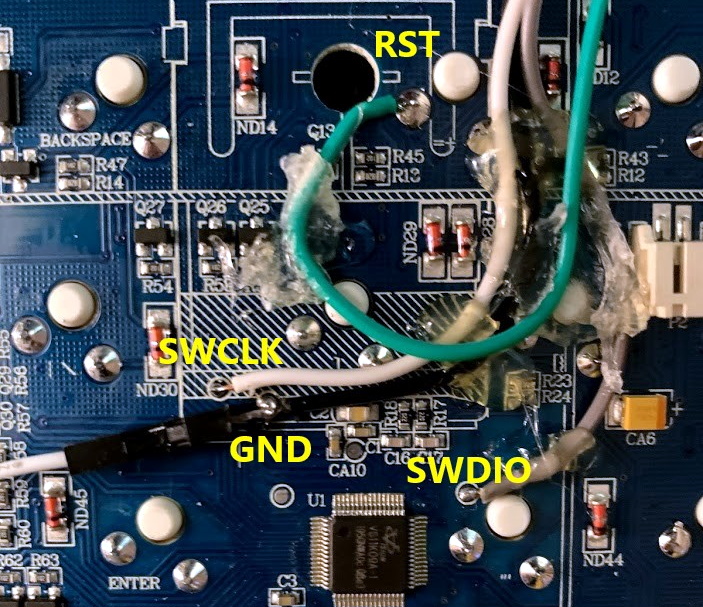
While [Stephen] doesn’t have everything working 100% yet, he’s nearly reached the end of his epic reverse engineering journey. The first step was tearing apart the keyboard and identifying all the components it used, then pulling the original firmware out of the updater. From there, between Ghidra and Serial Wire Debug, he was able to figure out most of what the stock firmware was doing so he could replicate it in QMK.

According to his README, the RGB LEDs and Bluetooth functionality don’t currently work, but other than that it seems QMK is up and running. If you’re OK with those concessions, he has information on the page about flashing his build of QMK to the stock DK63 with the ST-Link V2 so you can give it a shot. Though you do so at your own risk; we wouldn’t recommend doing this on your only keyboard.

We’ve seen commercially manufactured keyboards running QMK before, but it usually involves completely replacing the original controller with new electronics. That [Stephen] got this all working on stock hardware so other owners can follow in his footsteps is really a considerable accomplishment.

[Thanks to Baldpower for the tip.]

Son Of Rothult

We are continuously inspired by our readers which is why we share what we love, and that inspiration flows both ways. [jetpilot305] connected a Rothult unit to the Arduino IDE in response to Ripping up a Rothult. Consider us flattered. There are several factors at play here. One, the Arduino banner covers a lot of programmable hardware, and it is a powerful tool in a hardware hacker’s belt. Two, someone saw a tool they wanted to control and made it happen. Three, it’s a piece of (minimal) security hardware, but who knows where that can scale. The secure is made accessible.

The Github upload instructions are illustrated, and you know we appreciate documentation. There are a couple of tables for the controller pins and header for your convenience. You will be compiling your sketch in Arduino’s IDE, but uploading through ST-Link across some wires you will have to solder. We are in advanced territory now, but keep this inspiration train going and drop us a tip to share something you make with this miniature deadbolt.

Locks and security are our bread and butter, so enjoy some physical key appreciation and digital lock love.

Hacking A Cheap Laser Rangefinder

When a new piece of technology comes out, the price is generally so high that it keeps away everyone but the die hard early adopters. But with time the prices inch down enough that more people are willing to buy, which then drives the prices down even more, until eventually the economies of scale really kick in and the thing is so cheap that it’s almost an impulse buy. Linux SBCs, Blu-ray lasers, 3D printers; you name it and the hacker community has probably benefited from the fact that it’s not just the hacker community that’s interested anymore.

Which is exactly what’s started to happen with laser rangefinders. Once almost exclusively a military technology, you can now pick a basic “laser tape measure” for less than $40 USD from the normal overseas suppliers. Unfortunately, as [iliasam] found, they aren’t particularly well suited other tasks. For one there’s no official way of getting the data out of the thing, but the other problem is that the sample rate is less than one per second. Believing the hardware itself was promising enough, he set out to reverse engineer and replace the firmware running on one of these cheap laser rangefinders (Google Translate from Russian).

His blog post is an absolute wealth of information on how these devices operate, and a must read for anyone interested in reverse engineering. But the short version is that he figured out a way to reprogram the STM32F100C8T6 microcontroller used in the device, and develop his own firmware that addresses the usability concerns of this otherwise very promising gadget.

With some minor hoop jumping, the laser tape measure PCB can be hooked up to an ST-Link programmer, and the firmware provided by [iliasam] can be used to enable an easy to use serial interface. Perfect for pairing with an Arduino or Raspberry Pi to get fast and accurate range data without breaking the bank.

It probably won’t surprise you to see this isn’t the first time [iliasam] has gotten down and dirty with a laser rangefinder. This extremely impressive build from last year allowed for incredibly accurate 3D scans of his room, and before that he created his own rangefinder from scratch.

Continue reading “Hacking A Cheap Laser Rangefinder”

Video Review: STM32F0-Discovery Board

The STM32 Discovery boards are nothing new, we’ve looked at them several times. But the newest sibling in the line might be just the thing to make the leap from your steadfast 8-bit projects. We got our hands on it and recorded a video review.

The STM32F0-Discovery gives you a programmer and ARM Cortex-M0 chip all on one convenient board. The top portion is the ST-Link V2 programmer, and includes jumpers and a programming header which let it easily program off-board chips.

The included microcontroller is an STM32F051R8T6 which includes 64kb of program memory and 8kb of RAM. Coming in at $1.80-3.77 in single units and in a hand-solderable LQFP package this raises an eyebrow for our future projects. It has an 8 MHz internal oscillator with 6x PLL which means you can run at 48 MHz without an external crystal (check out [Kenneth Finnegan’s] PLL primer if you don’t know what this is).

The only thing holding us back is the development environment. ST provides everything you need if you’re on Windows, but we want a Linux friendly solution. We know other Discovery boards have worked under Linux thanks to this project. This uses the same ST-LINK V2 so it should work as well. If you want one of your own head over the ST page to see if they’re still giving away samples. There should be a button labeled “Register for your FREE KIT”.

STM8S-Discovery: Microcontrollers Reach A New Low

A complete microcontroller development kit for little more than the cost of a bare chip? That’s what STMicroelectronics is promising with their STM8S-Discoveryseven dollars gets you not only a board-mounted 8-bit microcontroller with an decent range of GPIO pins and functions, but the USB programmer/debugger as well.

The STM8S microcontroller is in a similar class as the ATmega328 chip on latest-generation Arduinos: an 8-bit 16 MHz core, 32K flash and 2K RAM, UART, SPI, I2C, 10-bit analog-to-digital inputs, timers and interrupts and all the usual goodness. The Discovery board features a small prototyping area and throws in a touch-sense button for fun as well. The ST-LINK USB programmer/debugger comes attached, but it’s easy to crack one off and use this for future STMicro-compatible projects; clearly a plan of giving away the razor and selling the blades.

The development tools are for Windows only, and novice programmers won’t get the same touchy-feely community of support that surrounds Arduino. But for cost-conscious hackers and for educators needing to equip a whole classroom (or if you’re just looking for a stocking stuffer for your geeky nephew), it’s hard to argue with seven bucks for a full plug-and-play setup.

[thanks Billy]