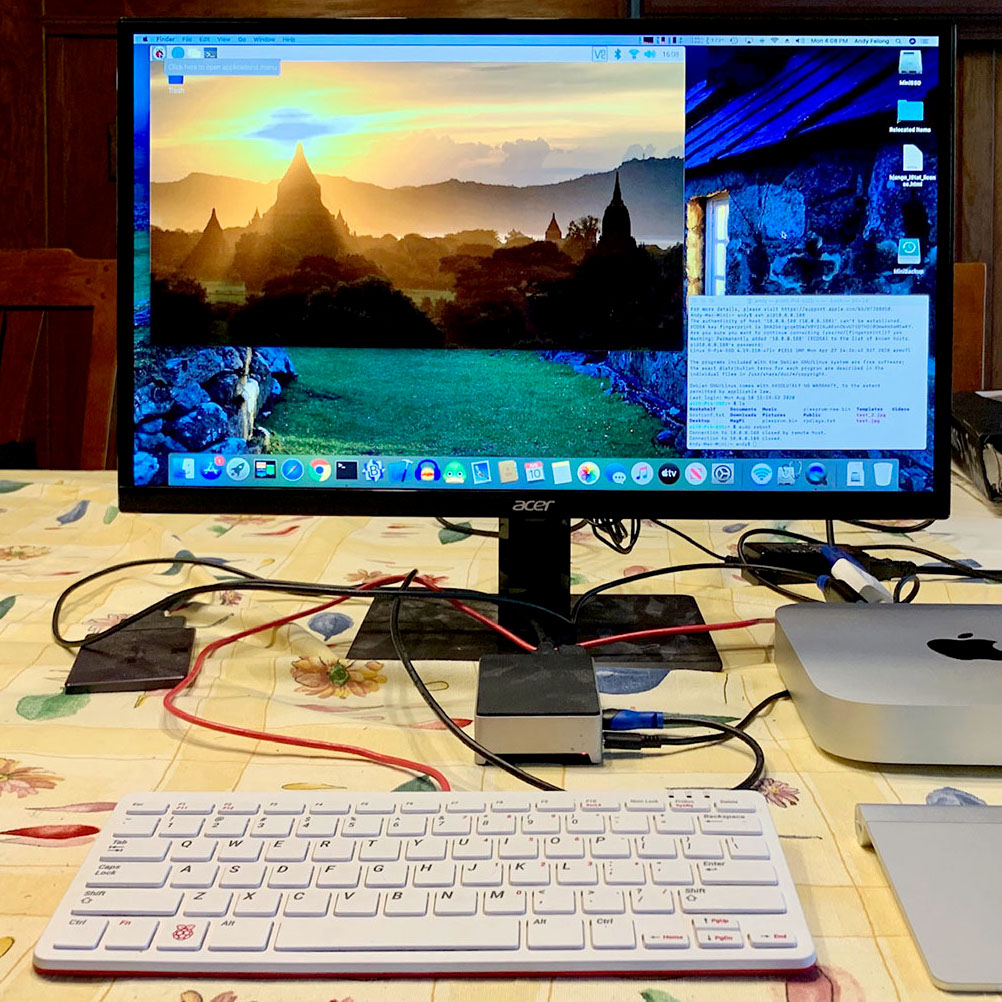
Here’s a simple tip from [Andy], whose Raspberry Pi projects often travel with him outside the workshop: he suggests adding a small HDMI-to-USB video capture device to one’s Raspberry Pi utility belt. As long as there is a computer around, it provides a simple and configuration-free way to view a Raspberry Pi’s display that doesn’t involve the local network, nor does it require carrying around a spare HDMI display and power supply.
The usual way to see a Pi’s screen is to either plug in an HDMI display or to connect remotely, but [Andy] found that he didn’t always have details about the network where he was working (assuming a network was even available) and configuring the Pi with a location’s network details was a hassle in any case. Carrying around an HMDI display and power supply was also something he felt he could do without. Throwing a small HDMI-to-USB adapter into his toolkit, on the other hand, has paid off for him big time.
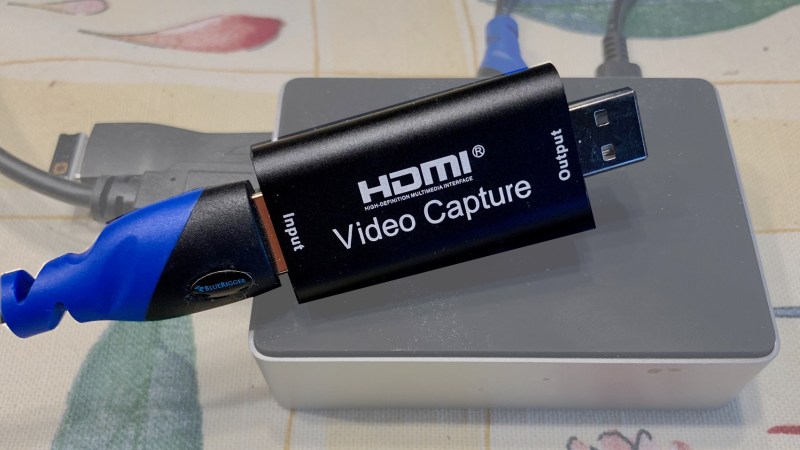
The way it works is simple: the device turns an HDMI video source into something that acts just like a USB webcam’s video stream, which is trivial to view on just about any desktop or laptop. As long as [Andy] has access to some kind of computer, he can be viewing the Pi’s display in no time.
Many of his projects (like this automated cloud camera timelapse) use the Pi camera modules, so a quick way to see the screen is useful to check focus, preview video, and so on. Doing it this way hit a real sweet spot for him. We can’t help but think that one of these little boards could be a tempting thing to embed into a custom cyberdeck build.


That’s a neat little tip. Will have to get one to throw in my bag. I’m sure it’ll come in handy in more than that situation. Thanks!
here is another tip, visit you hifi store and get various HDMI adapters e.g HDMI Male To HDMI Male , Fmale to fmale and hdmi to mini + micro and a good quality USB extension and you wont have to carry a larger bulkier HDMI cable. I’ve found the capture device plus a few adapters fits into a small headphones bag.
Though you might come up with a couple of types if you scratch through your GPU and tablet product boxes. Often had them thrown in.
I got one of these a few months back on a whim, and I’ve used it way more than I expected. When getting a display on another device is as easy as opening up a window on your computer, it really opens up some interesting possiblities.
Easy as opening a window? I am curious as to which app is opening a window? I tried ‘detecting’ a monitor with no luck.
Thanks!
That would be because it is not a monitor. It would be presented to the OS as a webcam or imaging device, so use an appropriate application. You could plug “basic webcam software ” into your search engine of choice, or you could use an application like obs-studio, which is probably overkill for most use cases. I think that windows 8, 8.1, 10 has a preinstalled Camera application in the start menu.
I loaded OBS which is overkill at the moment. Before that, I used the Windows Camera which for some reason would start and close, which is why I went with OBS.
@Fred
Did you “Turn on app permissions for your camera” ?
or just use VLC
I recently bought one of those capture cards it’s very useful. An Android phone or tablet can view the output incidentally with a USB OTG cable.
You can get versions of these HDMI to USB devices with HDMI passthrough too.
HDMI 1 to 2 spliter, about $10.
Does this ignore the security bit?
It shouldn’t. The usb device should register as a camera, not a mass storage device. I’ve, it should also work with an old tablet, if you happen to have one around.
If it isn’t an unauthorized HDCP stripper then it can’t decrypt HDCP video. Raspberry Pi does not output HDCP to the best of my knowledge since the drivers are open source and cannot be trusted to enforce it.
Yes it ignores it, you can capture a firestick running Prime video or netflix.
I have a usb-c powered monitor I carry around (wish it was smaller).
I mean if he’s already borrowing the keyboard and mouse from the other computer, why not just unplug it’s monitor and borrow that too?
Because sometimes the other computer might be a notebook or the monitor has a different interface or an all in one device where the monitor has no accessible interface at all.
Why borrow? There is a great small keyboard/touchpad combo from Rii, the i8+. It’s ultra compact, backlit, they have RF or bluetooth versions and has a built in battery that last a pretty long time. I find that they are not overly priced and plus they come in many different colors.
Amazon Link: https://www.amazon.com/Rii-Bluetooth-Touchpad%EF%BC%86QWERTY-Smartphones-Raspberry/dp/B01GCPVZDW
Apparently, it’s also possible to use Synergy on RPi, which could be pretty sweet with the HDMI USB adapter solution
Hmm
I wonder what the latency is like.
Not that I’m a tux racer pro gamer but having a mouse or terminal lag a second is more than a little irritating
Latency is probably somewhere between “Heinous” and “Horrible”, but this isn’t for a primary display – it’s for troubleshooting and configuration of things that normally run headless.
This project: https://mtlynch.io/tinypilot/
Uses the same or similar dongle to make a remote web access. Latency gets fair discussion in the article.
It’s surprisingly really good, considering. They’re known as “Can’t Link”, after the Elgato “Cam Link”.
Have a look at EposVox’s video on YouTube titled “The cheapest capture card money can buy.. is actually WORTH buying? (BlueAVS/Goodan USB 2.0 CamLink)”. Latency testing placed it joint-second at the time of review.
I’ve used it several times with my laptop to avoid hooking up a monitor, worked great.
You can also hook them up to Android phones if they support UVC.
If you get one, open it and make sure it’s got a tiny heatsink on it. If not, fit one to avoid premature hardware failure.
I’ve been doing this for a bit. My next step is to use a Arduino pro mini/ Leonardo to make into a virtual keyboard for the pi.
The Pro Micro is generally the first choice for keyboard builds; see the Gherkin or Reviung designs for examples of small open source options.
I’m in the process using a Teensy to do the same, although with a USB->Serial input so I can run it in Windows for a specific use case.
Wouldn’t it be great to be able to hook the usb cable directly to raspi and have raspi provide it’s screen. Ideally you could connect it to computer like above or even phone or pad.
Wait for the next release
It’s already possible you just need to set your raspi act as Ethernet device and connect using e remote client (i.e tight vnc)
Providing the network settings aren’t totally locked down by admin on the host…. though when you’re hitting levels of lockdown that high you might also be blocked from installing a new USB device or even have unused ports epoxied up.
Hmmmm epoxied eh.. I like that.
Or be a wifi access point all its own. Cheaper too. No need to get permissions or info from anyone. You can even start vncserver from ssh as root if you want to use a GUI editor on the pi to edit root owned config files. And of course, in any resolution you prefer. No need for extra hardware at all.
Came here to say this. My cyberdeck project will create a hotspot if it doesn’t find a known or open wifi connection. Then I just ssh or VNC in from a laptop, tablet, phone, etc
RPi 400 wouldn’t let me vnc to a tablet without HDMI connection to a monitor!
Yep – good for any headless workstation/tower. Keep one in my bag (along with VGA->HDMI dongle) for diagnosing problematic systems. Saves finding a crash cart (if there’s even one on site)
I had a plan to get an RPI4 and try to achieve the same result without additional hardware by using the UVC gadget driver and USB in OTG mode (along with Ethernet and audio source).
Does this seem doable ? What would be the drawbacks ?
As an option I am thinking about also having the RPI acting as a keyboard/mouse gateway to only have one set of input devices. Maybe it would even make more sense to get an RPI400 for that…
interesting, but you still need to supply power over the usb-c so now you need a modded y cable or power to some other point (POE?). Might be easier to get a RPI CM4 and find/design a breakout board that does what you need.
Do these adapters introduce any noticeble lag? Would be nice to capture and run OpenCV on the output of those hdmi microscope cameras.
I find with the new „cheap“ sticks, like in the photo, the time lag is neglectable, maybe one or two video frames. There is a guy on YouTube who does test these kind of devices and publishes the precise delay.
Maximum input (4K) 3840×2160 at 30Hz at 8/10/12 bit color
Maximum output (2K) 1920x1080p at 30 fps
Output format: M-JPEG (every fame is compressed as a individual jpeg image).
There is a similar USB 3.0 HDMI capture for just a tiny bit more that can output a maximum of 1080p at 60 fps.
There is no support HDCP, which makes sense.
Any delay would be in the time taken to generate jpeg images.
In fact there’s at least one USB 3.0 version with better specs available for sale for $12. Funny how right after this article was published the slower, more expensive version linked to in the article sold out.
The USB 3.0 ones, generally aren’t USB 3.0. They’re just a blue USB plug, they don’t even have the extra pins in them. I have several different variants. Stick with the cheap USB 2 one.
3.0 is a scam, same electronics inside + USB 3.0 plug :-(
So the exact same macrosilicon MS2109 chip that does everything in both. That is dirty, thanks for the heads up.
I was wondering why with ~10x the datarate (~400MB/sec vs ~40MB/sec) it was not able to do 4x the image size at 2x the framerate.
Here is a single page description of the chip award winning MS2109 chip:
Features:
Input:
HDMI 1.4b
supports DVI 1.0
supports HDCP 1.4
supports RGB444,YCBCR422,YCBCR444,YCBCR420 color space
supports deep color 24/30/36
CEA-861-E/CEA-861-F
Maximum 3840×2160 at 30Hz
Output:
MJPEG
1920×1080 at 30Hz
user customizable
USB 1.1
UVC 1.0
Audio:
SPDIF
default 96kHz single channel
mono
USB audio complies with UAC 1.0
supports shared input
USB 2.0 compliant device
Supported OS:
Windows xp/7/8/10
Android 5.0
MacOS
Only requires additional hardware of a 24MHz external crystal to function
Internal PLL
Power:
Built in power on reset circuit
Internal LDO 3.3 V
Package:
QFN-48 (7mmx7mm)
RoHS compliant
Search for “ad83504c-4884-46b2-85ee-2c93c68d8cd5” to find the Chinese image of a datasheet summary that I translated above from using the camera on an android phone with google’s translation application.
Some youtube reviewer tested them with obs-studio and they have a latency of 48 milliseconds.
(ref: At 4 minutes 16 seconds in https://youtu.be/daS5RHVAl2U?t=256 and the s/w used was https://obsproject.com/ or https://github.com/obsproject/obs-studio ).
We are using one almost exactly like the one in the picture at our church. When the guy presenting music on the screens changes there at most is a few (maybe no more than 10) millisecond delay before the streaming software has the new view and is processing it. Pretty basic. Not sure how fast you need to capture for OpenCV but it just basically takes any HDMI and makes it a webcam without much lag.
Must dépend on which hw you get – mine cost 17€ but was unusable with live vidao as around 4-500ms delay compared to the audio which was direct from the mixing desk. Horrible to watch..
this is a beautiful demonstration of how perception is driven. Hal uses it for basically a slideshow and underestimates the latency, while Brian uses it for moving pictures and overestimates the latency. who’s right? obviously both are! and they wonderfully bracket what you can expect out of the device. :)
In my experience the „unusable“ delay is from the source eg the camera, not the HDMI stick. So you either need to route the audio as well through the camera or put a hardware or software delay into the audio path.
To test my assumption directly connect some HDMI hardware monitor to your source and compare the picture with the live scene.
If you need a keyboard and mouse as well, and are carrying a laptop to use with the HDMI capture card, you can check out KeyMouSerial:
http://peterburk.github.io/programs/#keymouserial
The EspUSB is also a good option for USB keyboard & mouse over WiFi from a phone.
Been looking for a project like this for years, long before the hdmi-usb dongles started popping up.
Thank you for posting the link! This will be on my christmas projects list.
You can also use Synergy to reuse the host machine’s keyboard and mouse.
https://learn.adafruit.com/synergy-on-raspberry-pi
Noooooo, how did I miss this before I started building effectively the same thing?
I’ve gotten as far as passing just the basic numbers and letters as a virtual keyboard.
Your project is both super useful and somewhat embarrassing to me personally, as yours already provides everything I needed and more. I’m annoyed I missed it in my research, as it looks perfect for what I want.
Thanks, you’ve likely saved me hours of continued work on a project that was doomed to be an “also-ran at best”.
BTW: am I the only user with heavy problems with the ethernet in the Raspberry PI 4 when there is also an USB device connected? In 1Gbps mode I have losses of more that 30%, and in 100Mbps, about 5% of packets are lost. But if I disconnect the USB, everything works like a charm.
Try a ferrite choke on the usb cable as close to pi as possible; ensure you use a power supply rated to include additional usb power consumption.
Or it could be that interaction between the frequencies of certain screen resolutions and the networking and the USB device makes for an extra antenna to pick up more signal to swamp things.
It happens even without connecting the monitor.
Might find its power related. I had problems on older pi’s because my power supply was dropping to 4.9v. enough for cpu, not enough for ethernet to be reliable. New psu. Consistent 5.1v, problem solved
Well, it is the one that comes with the RPi 4…
These are pretty neat, I got one a while ago to use with a Pi 4 as KVM. Here are two different projects:
https://pikvm.org/
https://mtlynch.io/tinypilot/
Hackaday featured the second one in July:
https://hackaday.com/2020/07/24/tinypilot-provides-kvm-over-ip-with-low-cost-and-even-lower-latency/
I’m a bit surprised [Michael Lynch] (TinyPilot) is using a self-developed “USB-C splitter box”[1] to power the Pi and OTG-KeyMou the server over/through the Pi’s single USB-C connector.
Wouldn’t it be easier to power the Pi through the 5V pins on the pin header and just cut the +5V line of the OTG-2-server cable?
The Pi gets all the power it needs and both Pi and server are protect from “stray” current flowing between them.
Am I missing something?
[1] https://tinypilotkvm.com/product/tinypilot-power-connector
> just cut the +5V line of the OTG-2-server cable?
I think that’s essentially what his splitter box is. A fancy enclosure with connectors for a cable with a cut 5v line, with a 5v line that’s connected to the second USB-C connector to power the Pi. At least that’s what I did (only with shrink tube around the cables instead of fancy boxes and solder instead of connectors).
Not sure which Pi models have USB on the go, but I’m sure I’ve seen someone use a tablet with an SSH client on it and connected to the pi directly via USB OTG.
The pi zero and pi 4 models both do USB OTG to my knowledge. I think the compute modules can do it too but all other pi models cannot because of the USB hub built-in. I have a zero-w I was carrying around as a pocket sized vpn but I kept having issues with the Ethernet over usb dropping a lot and making my SSH session drop.
A tablet or a phone with OTG and at least Android 6 can use the capture card directly and work as a monitor.
This is great tip. I recently bought one from Amazon.
However I ran into issue and haven’t found he solution.
When I connect it and use VLC to view the capture the output is very grainy and hard to read any text. However if I use OBS quality is great, output is very nice and crisp.
Any ideas what could be wrong with VLC setting.
My guess is your using ‘MJPG’ (Motion-JPEG, compressed) not ‘YUYV’ (YUYV 4:2:2)
v4l2-ctl -d 2 –list-formats-ext
I use this trick for setting up TX2s to click on the stupid user agreement menu/initial ubuntu setup. It’s laggy but it’s better than carrying around a whole monitor just for one task.
Do these things do 4:4:4 colorspace capture? If not, you may find small, colored text comes out blurry.
I can’t believe these things are only $6 on Amazon. Gotta love Moore’s law.
Or More’s Law,
“If x is enough, then, too much is just right!”
B^)
Only $12 and change on Amazon?!? Sheesh, I remember when an NTSC capture device cost me several hundred dollars (and I thought that was a deal). While it doesn’t seem like all that long ago to this old man, it was probably 20 years ago or more. A lot has changed since then when it comes to computer and video technology.
I think I’ll get one, even though I don’t really have a use for it anymore!
I chain my Pi 400 -> micro hdmi to hdmi cable -> hdmi capture card to usb – > usb to usb-c adapter -> Samsung note20 ultra (using usb camera pro app) to turn my cellphone into a portable display! Barely noticeable lag.
That sounds absolutely horrible.
I’ve been using one of these for just this purpose. Lately mostly to test my MiSTer setup. I use VLC but it tends to need a little setup each time so I can select the correct resolution and other settings. It can do YUY2 at 1920×1080 but only at 5fps, you have to switch to MJPG to get 30fps at that resolution. Lower resolutions can do 60fps in MJPG. Also good for capturing screenshots or videos without needing extra software on the connected device. Audio comes through too, just make sure to select the right audio device.
I’ve tried to use an HDMI Capture Card to connect my Raspberry Pi 400 to an Android phone and also tried a tablet but I don’t hear the audio like when I connect to a TV. How do I ‘select the right audio device’ as you mention? I don’t see any options in the USB Camera App on the Android devices. The video works but I need to reduve the default resolution on the Raspberry Pi for that to work.
Thanks!
Marc
If you can figure out how to call your VLC modifications from the command line, you can create a script to activate it, or (in Windows) paste the command-line switches into the properties box for a VLC shortcut to start VLC in the correct mode. (Maybe even listening for hot-plugging of the specific usb device to call the script/shortcut).
Another handy dongle to have is an HDMI to composite video adapter. I found one labeled with Black Web brand name at Walmart. I still occasionally run into a conference room that has an old school NTSC composite video projector input for a VCR or whatever, but nothing else readily accessible whiteout doing some disassembly of their Crestron or AMX room control panels – something that alarms librarians, janitors and the like. As long as you don’t make your presentation too busy with tiny fonts (and you shouldn’t anyway), it works pretty well. It is handy to have male/female BNC – RCA pin jack adapters too.
I go the HDMI to VGA, VGA to component, component to composite, composite to RF modulator channel 3 route, as long as you use CGA colors and 320×240 scaled fonts it comes out fine. ;-) … for reals though, convertors were nasty late 20th century, very muddy, but you can usually make out anything you’d run at 800×600 on a TV nowadays.
This would be handy with a otg adapter to use my phone as a screen. Never thought about that before. Thanks!
I’ve been using this trick a while. Unfortunately my ultra cheap capture card is actually a tv capture with hdmi to composite converter, so i need to add hdmi_safe=1 to config.txt and deal with poor resolution / bad colour.. and i tend to try type on my laptop instead of the usb keyboard.
Been eyeing up the serial to usb-hid keyboard adapters, but rather expensive
“If you have a second computer you can buy a device to look at your first computer.” A system which requires you to use a computer as a monitor is flawed.
I was so excited to get my first Raspberry Pi years ago. Then I realized “Oh, I need to buy another monitor because HDMI.” Screw that noise. I thought the whole point of the Pi was developing countries and such. Is HDMI the standard in the third world? I haven’t touched it in all this time.
Ain’t it more of a case that what’s old is new again? In late 70s you’d hook up your TTL tinkertoy to a Z80 motivated terminal, that was probably as smart and at some points in time maybe had more RAM than your micro. The other way to do it was bitbang the screen and lose half your CPU oomph. Very common for display processors to actually contain a processor. There’s probably 3 or 4 in a modern TV, even of the non-smart variety, got a junked TV board around that’s got 2 atmels a RISC something or other and an ARM on it.
And before I forget, if you want a minimal TV output terminal these days, approx 1990ish to 2000ish VCRs with onscreen display and/or subtitles may have had a nice little display processor in with a screen or two worth of RAM, character generator etc in. Yoink those out of junked ones and it’s a single chip video solution for arduino, 8 bits, etc.
I feel like if you have the ability to install code to run some random junkyard display you found via bit-banging, well, then what was your original problem?
Not entirely sure what your point is. You don’t need a screen on your Raspberry Pi at all, none of mine do, except the one which I purchased for the job of driving a specific screen – but I don’t have that one setup to use that screen as a UI for actually working on the device, I ssh in for that. This dongle is just a cute way to use a screen you already have on hand if you need to attach a screen for some reason.
I don’t think the whole point of a Pi is developing countries. Maybe you’re thinking of OLPC or something.
I think it’s a brave life you’re living, with no HDMI in it.
The “point” is, even when you “ssh in” you’re using a computer as a monitor.
Sorry you didn’t get the memo on the developing world aspect.
My TV has HDMI, but y’know, priorities….
Still not sure what your point is. Do you wish to have a version of the Raspberry Pi with zero ability for output of any sort? Or do you wish the Raspberry Pi to have an integrated monitor, which would like drive the pricing up substantially?
Could you forward me the memo on how the Raspberry Pi was intended for only the developing world? They’ve been using HDMI since they were invented, so they are really bad at their job, I guess?
Jeez, dude MY POINT was they’ve been using HDMI and not something more common and barebones. Asking for a couple more wires, not a monitor (or as this article suggests, an entire computer).
The memo?
https://www.google.com/search?q=raspberry+pi+developing+world
Dunno why I can’t reply directly to your post, but … so a lot of people are using Raspberry Pi units for projects in developing countries, in spite of the fact that for some reason developing countries do not have access to HDMI devices? I dunno, to me that doesn’t equate to “I thought the whole point of the Pi was developing countries”.
The original RPi had a video output using the standard RCA connector.
The RPi B+, RPi 2, RPi 3 and RPi 4 all have composite video, it is just well hidden inside the “4 pole stereo output and composite video port” now.
The RPi Zero has a unpopulated 2 pin header labelled TV for composite video.
“sdtv_mode” in /boot/config.txt .can be used to tweak the output away from the default which is NTSC.
Why do people call saying “the RPi screen” ?
The RPi doesn’t have a screen. It may have a video-out port to which you can attach a monitor, but the RPi is just a “box”. that doesn’t have its own built-in video screen. These comments are very misleading.
i think my best raspberry pi accessory is the $3 ubec i use as a power supply. i have never powered a raspberry pi with the usb port. i dont even think i own a usb adapter that can power the thing, but i have powered it with a car battery.
i guess a usb capture gizmo is a good idea for when you dont have a spare monitor though. which is incidentally why i still havent powered my pi4.
So I don’t need to have ‘haul around a monitor and spare HDMI cable’, I just have to carry around an entire spare computer (with monitor and HDMI cable)? Make sense. WTF.
Nice work…I have encountered the same issue but I have a slightly different workaround.
I recently have been using “Smoopi” (https://github.com/wolfmanjm/kivy-smoothie-host) to run a lot of 3d printers/mills/etc which are often at schools and/or institutions which typically are a pain to get network approval (and when you do it is hard to get access to service after).
So I have begun setting up all the installs with the wifi setup to look for my phone/tablet hotspot and attempt to connect if it sees it. Then I can SSH in and do whatever updates (even the autoupdates and such since it is sharing my phone’s internet) then disconnect and the machine is ready to run again. The machines in this case are of very low risk to actually hack for any gainful purpose (if you can get in the wifi you could likely just access the hardware directly) and are usually not connected to the network otherwise.
OK. Got a cheap one in the mail. How do I use it?
Fire up software that can use a camera, such as Skype.
I downloaded OBS and am using it.
One other nice benefit of this setup worth mentioning is that it is trivial to record the output with your choice of video recording/webcam software. This is especially useful when the Rpi scrolls quickly past some error message on startup.
VLC > Media > Open Capture Device. Select video device, check advanced options. Then add/replace options: :dshow-size=1920×1080 :dshow-aspect-ratio=”16:9″ :dshow-audio-samplerate=48000 :dshow-audio-channels=2 :live-caching=0 :dshow-fps=60
This results in clear and fast display as MJPEG.
Source:
https://www.youtube.com/watch?v=sTvQ4PBqueA
https://gist.github.com/ThatGuySam/669ee0d844a67ebc2cd1b8301c8e1b30