
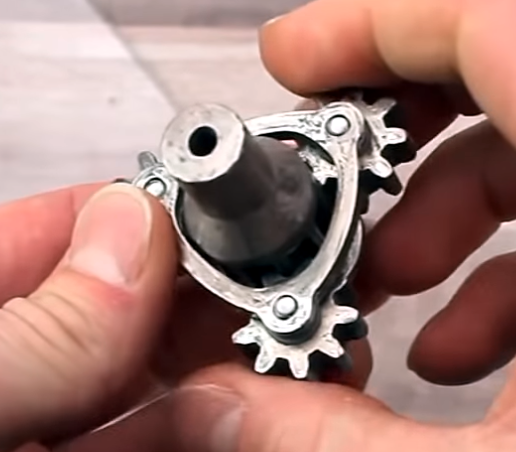
Everyone wants to print using metal. It is possible, but the machines to do the work are usually quite expensive. So it caught our eye when MakerBot announced a printer — armed with an experimental extruder — that can print stainless steel parts. Then we read a bit more and realized that it can only sort of do the job. It needs a lot of help. And with some reasonable, if not trivial, modifications, your printer can probably print metal as well.
The key part of the system is BASF Ultrafuse 316L Stainless Steel filament, something that’s been around for a few years. This is a polymer with metal incorporated into it. This explains the special extruder, since metal-bearing filament is hell on typical 3D printer nozzles. However, what comes out isn’t really steel — not yet. For that, you have to send the part to a post-processing facility where it is baked at 1380 °C in a pure hydrogen atmosphere using special equipment. This debinding and sintering produces a part that the company claims can be up to 96% pure metal.
It sounds as though there may be more than one post-processing facility possible, but for now everything is available from MatterHackers. However, metal printing still doesn’t come cheap. A roll of filament — it looks like a 1 kg roll — costs $465. That comes with a “ticket” for postprocessing one batch of parts that weigh up to 1 kg. Additional tickets are $50. They also suggest you use a special pen to attain bed adhesion, which costs only $18, but is out of stock as we write this.
 On the other hand, if you need a part in stainless steel, this isn’t that expensive. According to Matterhackers, you can run this filament through most 3D printers, although we are betting you will want a pretty stout extruder and nozzle. You’ll also need a heated bed that can make at least 100 °C. A lot of beds can’t get that high, or have coatings that won’t tolerate that high a temperature. MakerBot’s METHOD X printer can do this, but you could probably upgrade your printer to do it as well.
So how is this better than just having someone do a metal print for you? We can print PLA models to get the design right and then send out to a service provider with a big-money metal printer. It sounds like you might get a faster turnaround by doing it yourself, but it isn’t clear to us why that has to be the case. We took a 40 mm x 40 mm x 4 mm bracket design and asked a service company for a price. In 316L steel, the part would cost $70 shipped. You could get it in aluminum for the same price, or titanium for $112. Gold was also an option, but at $6,400, we’ll pass. The same part in PLA was about $10, and at that price, we’d say it makes sense to print at home. But for metal, we’re comparing a $50 ticket and other material and wear costs with $70, delivered.
The video below shows some design tips, some of which are common sense to designers used to 3D printing. However, some appear to have to do with the sintering process and we wondered how much the part’s dimensions might change after the sintering process. The video claims you should scale your parts 120% in the X and Y dimensions and 126% in height. The video mentions a 100 cubic millimeter limit on parts, but if you read up, you’ll see they really mean a cube 100 mm on each side, which is 1,000,000 cubic millimeters, and significantly bigger.
 So will you try this out? Unless you have a pretty robust machine, you’ll need some upgrades first. Then you still have to wait for your metal part to come back in the mail. As cool as it would be to print in stainless, we’ll wait until we can produce the metal part with no outside help.
If we were going to try it, we might think about a ruby nozzle. Maybe we’ll wait for the $400,000 printers to show up on the surplus market.


Ok, how do you print ceramic ?
Use a printer designed for liquid food products. Only instead of frosting, fill the feed hopper with “mud” (unfired clay). Then transfer your print bed to a kiln. (Assuming the bed is a metal sheet)
you want 100% infill and you’ll need to degas the slip, as air pockets or bubbles will cause the ceramic to explode during firing
Print in a vacuum?
Probably not necessarily. After you fill the feed hopper with mud/clay/slip, you would probably put just the hopper into a vacuum chamber, suck out enough air to get rid of bubbles, then put the hopper onto the 3d printer.
or use a vibration wand as they do in concrete pours. Of course theirs is much bigger but the principle is the same. Adapt an electric toothbrush? A 50/60 hz electromagnet against the metal hopper side? Something like that
Nah and nah. Just let it dry fully first, there’s literally thousands of YouTube videos showing this already.
There are ceramic SLA resins. They do shrink quite a lot after spending some time in the furnace (like 30% or so?!) but you get a proper ceramic part.
Check out this subreddit:
https://www.reddit.com/r/Ceramic3Dprinting/
With a paste extruder.
https://www.thingiverse.com/search?q=paste+extruder&type=things&sort=relevant
https://www.youtube.com/results?search_query=print+ceramic
Check out http://3dMatters.co.uk – it details how you can print metals and ceramics in a very affordable system that contains everything you’ll need.
There are resins with clay particles suspended in it. After printing, the part is then fired in an oven to burn away the resin and to form the ceramic.
Here’s an example:
https://tethon3d.com/product/porcelain-ceramic-resin/
The youtuber Integza has used it to 3D print rocket nozzles, with various success. During firing, there’s quite a volume loss, which results in substantial internal stresses.
Where can you order custom 3D-printed metal parts for $70?!? Never heard of that before.
I think they are confusing machined parts, which even then seem too cheap.
I’d like to know where you got this price too. Very cheap.
Printing with plastic, then sending the plastic part to be processed, is not “print(ing) stainless steel parts” unless you work for the marking department and get to lie to people for a living…
If you want to be a journalist, try calling things what they are instead of using whatever their marketing dept hands you.
Exactly what percentage of metal in the filament qualifies as ‘printing metal’? The fact that these things only shrink like 10-15% in sintering suggests that there’s a lot of metal in there to begin with. 85% by volume? More than that by weight?
Are the mechanical properties of the unprocessed 3d printed part like that of a metal? No, they are like a polymer.
Nobody but the anally retentive ‘tomatoes are technically fruit and not vegetables’ crowd would try to claim that this is really anything like what an impartial reader would interpret as printing a metal part.
Sure it. This mechanical engineer would strongly disagree with your elitism. You printed it.. Had some post-processing done and now you have a metal part. Why is that complex?
This is not new. The Virtual Foundry has been selling high metallic content filaments in a bunch of different materials for years. They use a slightly different process for sintering, using a special powder to support the print as well as drive out air while sintering. The process is something you can do at home if you have the right equipment, and if you don’t, they sell all the sintering equipment.
There is a local company that does this print-to-sintering. I tried it with some little parts as test-order. But there is also a guy with a laser-powder printer and he is always cheaper, because he fills the volume then prints it in batches.
Could probably get by with one of these ovens for significantly less upfront cost, too: https://www.soulceramics.com/collections/heat-treat-ovens/products/olympic-kiln-1823fle
Coincidentally, the famous Dan Gelbart’s metal 3D printing business made the news last week: https://techcouver.com/2021/02/16/dan-gelbart-rapidia-metal-3d-printing/
Dan himself describing the process as only he can: https://youtu.be/nyYcomX7Lus (long video, but worth it)
What is a point, if there is cheaper and more reliable alternative exist for quite some time?
https://www.appropedia.org/Open-source_metal_3-D_printer
But of course we need continuous extrusion to make it really usable.
Seems pretty pointless. The value of 3DP is largely in actually owning the machine and being able to go from idea to part, in a few hours, for pennies.
I’d rather have a pro handle the entire process instead of doing half of it myself with expensive tooling.
How hard is to do sintering DIY?
Metal sintering is tough compared to ceramics and glass. Oxidation is a huge problem, and often even just an inert environment like Argon isn’t enough. Commercial ovens use a mix of hydrogen and argon called forming gas, or even 100% hydrogen environments, both of which can actually react with the oxides on the surface and reduce them back to metal. There are obvious reasons why handling hydrogen (at high temperatures no less) is not a good idea. The “hobbyist friendly” approach to dealing with oxidation is to add in some sacrificial material like paper or charcoal dust which will combust and react with the oxygen at a lower temperature before the part can oxidize (this is what The Virtual Foundry does). It certainly helps with the process, but it still means you have a relatively dirty atmosphere, and don’t get the oxide reduction you do with forming gas.
The other challenge with the BASF filament is the debinding process. With MIM filament/pellets, you need a debinding step to remove the majority of the polymer from the part before firing, lest you get even more impurities in your part (commercial powder metallurgy is all about good debinding). Most binders are solvent-debound, though there are some that can be debound in a high temp water bath, which is promising for home-gamers.
Normally “forming gas” is a mixture of nitrogen and hydrogen. But of course Argon mixtures are also possible and similar.
The sacrificial material only produces CO2, which is not a sufficient inert gas for all materials.
I do not understand, how you can prevent the workpiece from falling apart during “debinding”. As I understand, the binding polymer is the only thing, that gives it any structural integrity until it is sintered together.
You need at minimum a high temperature oven that is programmable, i.e. can ramp temperatures and follow a temp profile. Currently the commercial ones I am aware of are around the $10K range, although I’m not certain why this is. They are usually an amalgam of a steel box lined with fire bricks, a watlow controller, resistive heating elements, one or several K-type thermocouples, and a power supply. I have no idea what about them commands that high a price. I think the community ought to open source dev one and drive that price down.
Would something like this not work? https://www.soulceramics.com/collections/heat-treat-ovens/products/olympic-kiln-1823fle
They have other sizes and prices too.
Aren’t people looking for metal parts usually looking for precision? Unless the exact amount is very very predictable can one really get there with a process that includes shrinkage?
My guess is this is for parts which can’t be tested in normal materials, so before you spend thousands of dollars having the parts machined you can do this for less and have a functional PoC.
At least it has to be consistent and predictable.
I was in the makerbot webinar also. You forgot the heated chamber man. 60 degrees C. It is not trivial to upgrade to that.
Pay attention. I didn’t get paid to attend that and write an article on it.
ok how about this, print a ceramic “form” fire it. The fill it with your chosen molten metal…… then clean it up and machine the precision surfaces. The end result is… precise and as strong as the chosen metal in a cast part can be. For small parts this could be done at home but not sure how many people would have the necessary tooling for the machining and small foundry. With an oxy+acetylene torch one can certainly reach some formidable temps in a well insulated small kiln.
There is a new service here that gave me some low quotes for small parts –
https://www.exone.com/en-US/Metal-3D-Printing-Services
I haven’t tried it yet though. I found out about it from an announcement that that exone is working with Dan Gelbart’s company Rapidia to market their printer as well. I think it’s using a powder bed process, so hopefully prices will decrease if they start offering parts made on the Rapidia machines also.
Comment was in reply to Dan but got lost with javascript off.