We’ve seen a number of heart rate monitoring projects on Hackaday, but [Peter’s] electrocardiography (ECG) Instructable really caught out attention.
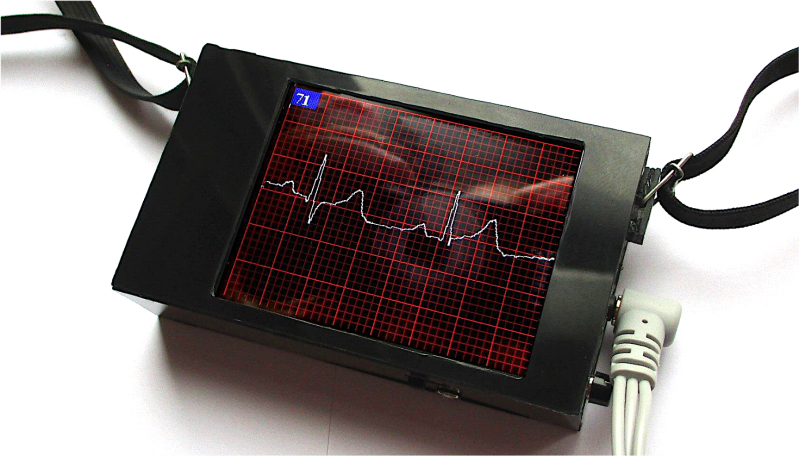
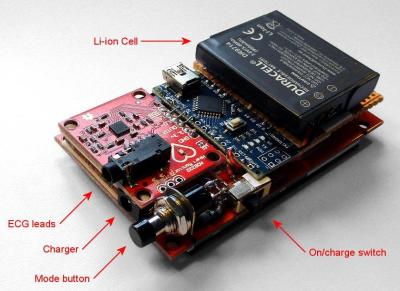
If you’ve followed Hackaday for any period of time, you’re probably already somewhat familiar with the hardware needed to record the ECG. First, you need a high input impedance instrumentation amplifier to pick up the millivolt signal from electrical leads carefully placed on the willing subject’s body. To accomplish this, he used an AD8232 single-lead ECG module (we’ve actually seen this part used to make a soundcard-based ECG). This chip has a built-in instrumentation amplifier as well as an optional secondary amplifier for additional gain and low-pass filtering. The ECG signal is riddled with noise from mains that can be partially attenuated with a simple low-pass filter. Then, [Peter] uses an Arduino Nano to sample the output of the AD8232, implement a digital notch filter for added mains noise reduction, and display the output on a 2.8″ TFT display.
Other than the circuit itself, two things about his project really caught our attention. [Peter] walks the reader through all the different safety considerations for a commercial ECG device and applies these principles to his simple DIY setup to ensure his own safety. As [Peter] put it, professional medical electronics should follow IEC 60601. It’s a pretty bulky document, but the main tenets quoted from [Peter’s] write-up are:
- limiting how much current can pass through the patient
- how much current can I pass through the patient?
- what electrical isolation is required?
- what happens if a “component” fails?
- how much electromagnetic interference can I produce?
- what about a defibrillator?
[Peter] mentions that his circuit itself does not fully conform to the standard (though he makes some honest attempts), but lays out a crude plan for doing so. These include using high-valued input resistors for the connections to the electrodes and also adding a few protection diodes to the electrode inputs so that the device can withstand a defibrillator. And of course, two simple strategies you always want to follow are using battery power and placing the device in a properly shielded enclosure.
[Peter] also does a great job breaking down the electrophysiology of the heart and relates it to terms maybe a bit more familiar to non-medical professionals. Understanding the human heart might be a little less intimidating if we relate the heart to a simple voltage source like a battery or maybe even a function generator. You can imagine the ions in our cells as charger carriers that generate electrical potential energy and nerve fibers as electrical wires along which electrical pulses travel through the body.
Honestly, [Peter] has a wealth of information and tools presented in his project that are sure to help you in your next build. You might also find his ECG simulator code really handy and his low-memory display driver code helpful as well. Cool project, [Peter]!
Measuring ECG is something that is near and dear to my heart (sorry, couldn’t resist). Two of my own projects that were featured on Hackaday before I became a writer here include a biomedical sensor suite in Arduino shield form factor, and a simple ECG built around an AD623 instrumentation amplifier.


Use BLE for easy isolated communications. And if the power usage could be lowered enough, a small solar panel of the kind often used in garden lights can be used for wireless charging without the high EMI levels inductive charging has.
Excellent accomplishment, now make it wireless and small enough to fit inside a tricorder and usable from several feet/meters away.
Dubin’s book gives some good, simple physiology explanation regarding the waveform. Interestingly, the displayed waveform in the lead image suggests his timebase is a bit off from normal EKG machines if one is to assume the standard time line rather than the displayed heartrate (the displayed heartrate on a “quick” read would be about 80bpm). Or he may not be keying heartrate based on the R wave. But that’s too pedantic for such an excellent job.
Dubin’s book is fantastic. Also he’s a convicted pedophile.
The Subway guy was also a convicted pedophile but doesn’t subtract from the tastiness of Subway sandwiches. I still maintain Dubin’s book is a good read, social atrocities of the author aside.
I built a pocket size ECG logger with wifi for live viewing last year after my own AV nerves failed and I had to get a pacemaker. I used an ESP32 and the same AD8232 breakout board.
The breakout board includes series resistors to limit current to safe levels, per the AD8232 datasheet. The breakout board also has a fairly low cutoff filter configuration, something in the ballpark of 120hz maybe. In my case I wanted to clearly see my 350us pacemaker pulses, so I increased the cutoff frequency to above 1Khz, and sampled the signal at 8Khz.
The biggest source of noise is the fact that the cheap ECG leads you can buy are unshielded. I made my own shielded leads by taking a 3.5mm to RCA cable meant for a camcorder and replacing the RCA ends with ECG pad snaps. That made a huge difference. The signal still goes to crap if you move your muscles a lot, but that’s mainly due to the actual nerve activity to actuate your muscles.
The ECG actually came in handy for debugging myself. The first month or so, my heart rate was instantaneously bouncing between 50bpm and 100bpm. I was able to catch the transitions,
and send the plot to my cardiologist. He had me come in the next day to tweak my settings. Luckily it was something he could tune out in software.
I wear it for a few minutes every couple months or so, just to keep an eye on what’s going on. My nerves have since healed and started working again mostly, so the pacemaker is usually idle. Every so often my nerves won’t quite do the right thing and the pacemaker will kick in. I can sometimes feel it because my ventricles contract earlier than optimal and it feels more rough due to less volume of blood. It’s fun to see the sporadic “capture pulses” on the ECG when that happens.
Tangentially, I’ve been looking into BLE lately for work. Messing around with an announcement scanning tool, I have discovered that I personally emit a burst of 6 packets every minute or so. It’s probably a good thing that my attempts to connect have so far failed!
Very interesting info, thanks for sharing!
Great story, what times we live in that building an own ECG and participating in your own health processes is possible. Did you document the design somewhere?
I intended to when I started, but it turned into a huge time sink just getting the ESP32’s ADC to sample reliably. After beating my head against it for over a week to get the ADC to work, I was ready to take a break. Overall it was a relatively hectic time, since I was still going in for dr appts and scans every couple weeks, and I was just getting back into the swing of things at work.
The software triggered ADC mode on the ESP32 is just straight up buggy to the point of not being worth using. It’s as if there’s a race condition that prevents the input of the ADC from being electrically connected to anything. I think a lot of other projects mistakenly classify it as nonlinearity, but in my case it was enough to completely miss the 350uS capture pulses. I suspect there’s a bug in the firmware of a lower level coprocessor. The workaround was to use the I2S peripheral to sample the ADC in its DMA configuration. That particular configuration was very poorly documented, but after several hours of experimenting I managed to get it to work reliably. It doesn’t seem to suffer from the same bug and produces usable data.
I also spent way more time than I originally intended dialing in the 3D printed enclosure, but I was really going for a very tightly integrated package. I managed to get the MCU, ECG board, and a micro SD card socket into something like 8cm x 6cm x 1cm, with all the connectors on the top, and a push button on the side to mark notable events and toggle the wifi with a long press. Rather than include a battery, I just plug in the ESP32’s USB to a portable battery.
The 3D printing was very satisfying though, because I ended up with a very high quality snap-together part with a matte finish, and it highlighted all the quality improvements I’ve been able to make to my hobby grade 3D printer over the years. It started as an Anet A8, but I’ve since replaced the frame, the extruder, the X and Y motors, the controller and the stepper drivers, added a bed probe, upgraded to linear rails on the X and Z axes, and most recently built a filament dry box that virtually eliminated oozing and stringing. It’s to the point where I can plug it in after 6 months, print a usable part on the first try, and turn it off again for 6 months.
As one doing compliance work, the attention to the compliance physics warms the recesses of my dark and evil heart.
But, as the writer had previously designed medical stuff at the professional level, I do not see how the writer could not know the definitions of ‘fault’ and ‘component’. The words used in all IEC standards are defined per IEC60050; and these two terms are defined per IEV references 155-11-21 and 192-04-01. Also, faults are well defined per the CB test report and the various mitigation and analysis reports required for medical equipment.
There are two other things the writer missed – software safety and immunity. See IEC62304 and IEC60601-1-2. And the Particular standard for cardiac monitors is IEC60601-2-27 (60601-1 is the general standard for medical electrical equipment), where even more requirements and mitigation and tests are heaped on yet other requirements.
I do not understand the comments about creepage along the body of a resistor, because a resistor body is only rated for functional insulation (yes, some are rated for BI but are disallowed for medical equipment). There is no creepage across a resistor unless it has a (1) a specific safety function and (2) the component is not safety-critical.
I have to say this guy a much more brave soul than myself – I would not have the guts to publish such an article. Good luck and God speed, abuse the Force, long live the emperor, etc.
I bet that doesn’t have even ONE component made by ECG Sylvania!
B^)