Better Living Through Biomedical Engineering

We don’t often think of medicine and engineering as being related concepts, and most of the time, they aren’t. But there’s a point where medicine alone may not be enough to treat a particular ailment or injury, and it might be necessary to blend the mechanical with the biological. When a limb is lost, we don’t have the technology to regrow it, but we can apply engineering principles to build a functional facsimile that can help the patient regain lost independence and improve their quality of life.

The area where these two disciplines overlap is called biomedical engineering (BME), and it’s a field that’s seeing fantastic growth thanks to advances in 3D printing, materials science, and machine learning. It’s also a field where open source principles and DIY are making surprising inroads, as hobbyists look to put their own knowledge and experience to use by creating low-cost assistive devices — something we were honored to help facilitate over the years through the Hackaday Prize.

Continue reading “Better Living Through Biomedical Engineering”

A credit card-sized PCB with two sensing pads and a small OLED display

Card/IO Is A Credit Card-Sized, Open Source ECG Monitor

Of all the electrical signals generated by the human body, those coming from the heart are probably the most familiar to the average person. And because it’s also quite simple to implement the required sensors, it makes sense that electrocardiogram (ECG) machines are a popular choice among introductory medical electronics projects. [Dániel Buga], for instance, designed a compact ECG system the size of a credit card, cleverly dubbed Card/IO, that clearly demonstrates how to implement a single-lead ECG.

Although obviously not a medical-grade instrument, it still contains all the basic components that make up a proper biosignal sensing system. First, there are the sensing pads, which sense the voltage difference between the user’s two thumbs and simultaneously cancel their common-mode voltage with a technique called Right Leg Driving (RLD). The differential signal then goes through a low-pass filter to remove high-frequency noise, after which it enters an ADS1291 ECG analog front-end chip.

The ADS1291 contains a delta-sigma analog-to-digital converter as well as an SPI bus to communicate with the main processor. [Dániel] chose an ESP32-S3, programmed in Rust, to interface with the SPI bus and drive a 1″ OLED display that shows the digitized ECG signal. It also runs the user interface, which is operated using the ECG sensing pads: if you touch them for less than five seconds, the device goes into menu mode and the two pads become buttons to scroll through the different options.

All source code, as well as KiCad files for the board, can be found on the project’s GitHub page. If you’re just getting started in the biosensing field, you might also want check out this slightly more advanced project that includes lots of relevant safety information.

Continue reading “Card/IO Is A Credit Card-Sized, Open Source ECG Monitor”

Fiber-Infused Ink Allows 3D-Printed Heart Muscle To Beat

Illustration from Anatomy & Physiology, Connexions Web site. http://cnx.org/content/col11496/1.6/, Jun 19, 2013.

What makes a body’s organs into what they are is more than just a grouping of specialized cells. They also need to be oriented and attached to each other and scaffolding in order to create structures which can effectively perform the desired function. A good example here is the heart, which requires a large number of muscle cells to contract in unison in order for the heart component (like a ventricle) to effectively pump blood. This complication is what has so far complicated efforts to 3D print complex tissues and entire organs, but recently researchers have demonstrated a way to 3D print heart muscle which can contract when stimulated similarly to a human heart’s ventricle.

At the center of this technique lies a hydrogel that is infused with gelatin fibers. Using a previously developed Rotary Jet-Spinning technology that was reported on in 2016, a sheet of spun fibers was produced that were then cut up into micrometer-sized fibers which were dispersed into the hydrogel. After printing the desired structure – taking into account the fiber alignment – it was found that the cardiomyocytes (the cells responsible for carrying the contractile signal in the heart muscle) align along the thus laid out pattern, ultimately creating a cardiac muscle capable of organized contraction.

These findings come after many years of research into the topic, with e.g. Zihan Wang and colleagues in a 2021 paper reporting on the challenges remaining with 3D printing cardiac tissue, yet also the massive opportunities that this could provide. Although entire heart replacements (via therapeutic cloning with the patient’s own cells) might become possible too, more immediate applications would involve replacements for damaged cardiac muscle and other large structures of the heart.

ECG Project With All The Messy Safety Details

We’ve seen a number of heart rate monitoring projects on Hackaday, but [Peter’s] electrocardiography (ECG) Instructable really caught out attention.

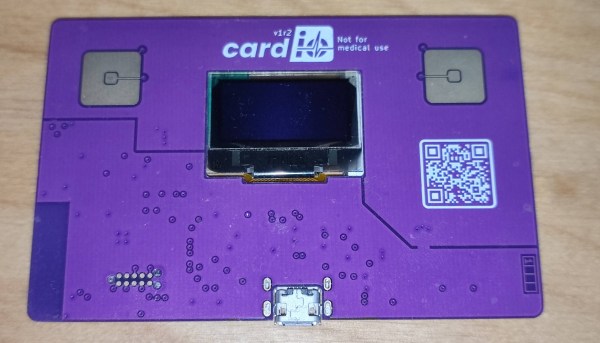
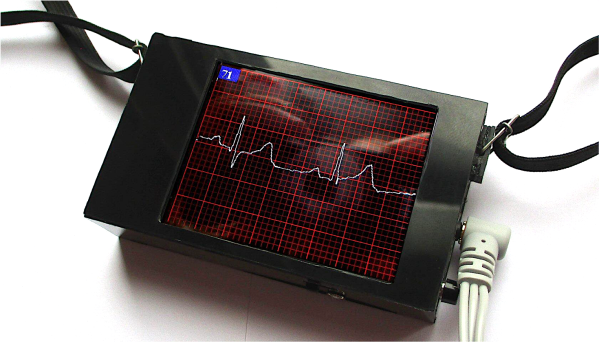
If you’ve followed Hackaday for any period of time, you’re probably already somewhat familiar with the hardware needed to record the ECG. First, you need a high input impedance instrumentation amplifier to pick up the millivolt signal from electrical leads carefully placed on the willing subject’s body. To accomplish this, he used an AD8232 single-lead ECG module (we’ve actually seen this part used to make a soundcard-based ECG). This chip has a built-in instrumentation amplifier as well as an optional secondary amplifier for additional gain and low-pass filtering. The ECG signal is riddled with noise from mains that can be partially attenuated with a simple low-pass filter. Then, [Peter] uses an Arduino Nano to sample the output of the AD8232, implement a digital notch filter for added mains noise reduction, and display the output on a 2.8″ TFT display.

Other than the circuit itself, two things about his project really caught our attention. [Peter] walks the reader through all the different safety considerations for a commercial ECG device and applies these principles to his simple DIY setup to ensure his own safety. As [Peter] put it, professional medical electronics should follow IEC 60601. It’s a pretty bulky document, but the main tenets quoted from [Peter’s] write-up are:

  1. limiting how much current can pass through the patient
  2. how much current can I pass through the patient?
  3. what electrical isolation is required?
  4. what happens if a “component” fails?
  5. how much electromagnetic interference can I produce?
  6. what about a defibrillator?

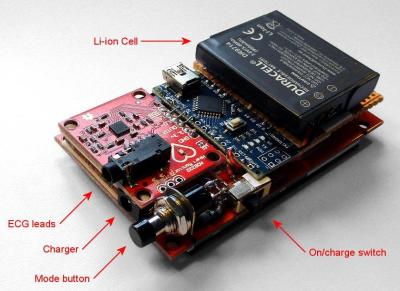
[Peter] mentions that his circuit itself does not fully conform to the standard (though he makes some honest attempts), but lays out a crude plan for doing so. These include using high-valued input resistors for the connections to the electrodes and also adding a few protection diodes to the electrode inputs so that the device can withstand a defibrillator. And of course, two simple strategies you always want to follow are using battery power and placing the device in a properly shielded enclosure.

[Peter] also does a great job breaking down the electrophysiology of the heart and relates it to terms maybe a bit more familiar to non-medical professionals. Understanding the human heart might be a little less intimidating if we relate the heart to a simple voltage source like a battery or maybe even a function generator. You can imagine the ions in our cells as charger carriers that generate electrical potential energy and nerve fibers as electrical wires along which electrical pulses travel through the body.

Honestly, [Peter] has a wealth of information and tools presented in his project that are sure to help you in your next build. You might also find his ECG simulator code really handy and his low-memory display driver code helpful as well. Cool project, [Peter]!

Measuring ECG is something that is near and dear to my heart (sorry, couldn’t resist). Two of my own projects that were featured on Hackaday before I became a writer here include a biomedical sensor suite in Arduino shield form factor, and a simple ECG built around an AD623 instrumentation amplifier.