3D printed ring with 4-integrated electrodes for measuring bioimpedance for measuring blood pressure from the finger

Smart Ring Measures Blood Pressure

Continuous blood pressure monitoring has always been a major challenge for the biohacking community. Those giant arm cuffs aren’t exactly the kind of thing you want to wear all day and the wrist monitors aren’t super great either. So, [Kaan] and his research team set out to create a better continuous blood pressure monitor. This time as a ring.

When your heart beats, the volume of blood in the blood vessels increases ever so slightly. This increase in volume results in a decrease in electrical impedance because blood is fairly conductive. We’ve seen a similar volume measurement using light for detecting heart rate, but [Kaan] says with impedance, you won’t need to worry about the effect of skin tone on the accuracy of the measurement.

As far as the hardware is concerned, they inject a small, constant 10 kHz sinusoidal current into the finger through 2 current-injecting electrodes, and then measure the resulting voltage drop across the finger with two sensing electrodes, a standard 4-probe Kelvin approach. Their results seem pretty good. They are within 5.27 millimeters of mercury (mmHg) of the gold standard for systolic blood pressure and 3.87 mmHg for diastolic blood pressure across 10 subjects, which they say are within the American Association for the Advancement of Medical Instrumentation’s (AAMI) guidelines. That’s definitely something to catch your attention.

We’ve seen several attempts to measure blood pressure using the analogous photoplethysmography technique, but those generally don’t seem to work out. Will the impedance plethysmography approach overcome the optical technique’s shortcomings? Only time will tell.

Showing pulse oximeter and color sensor combining to measure oxygen in blood and skin tone

Perfecting The Pulse Oximeter

We’re always looking for interesting biohacks here on Hackaday, and this new research article describing a calibrated pulse oximeter for different skin tones really caught our attention.

Pulse oximeters are handy little instruments that measure your blood oxygen saturation using photoplethysmography (PPG) and are a topic we’re no strangers to here at Hackaday. Given PPG is an optical technique, it stands to reason that its accuracy could be significantly affected by skin tone and that has been a major topic of discussion recently in the medical field. Given the noted issues with pulse oximeter accuracy, these researchers endeavored to create a better pulse oximeter by quantifying skin pigmentation and using that data to offset errors in the pulse oximeter measurements. A slick idea, but we think their results leave a lot to be desired.

Diagram showing pulse oximeter and color sensor combining to measure oxygen in blood and skin toneTheir idea sounds pretty straightforward enough. They created their own hardware to measure blood oxygen saturation, a smartwatch that includes red and infrared (IR) light-emitting diodes (LED) to illuminate the tissue just below the surface of the skin, and a photosensor for measuring the amount of light that reflects off the skin. But in addition to the standard pulse oximeter hardware, they also include a TCS34725 color sensor to quantify the user’s skin tone.

So what’s the issue? Well, the researchers mentioned calibrating their color sensor to a standard commercially-available dermatology instrument just to make sure their skin pigmentation values match a gold standard, but we can’t find that data, making it a bit hard to evaluate how accurate their color sensor actually is. That’s pretty crucial to their entire premise. And ultimately, their corrected blood oxygen values don’t really seem terribly promising either. For one individual, they reduced their error from 5.44% to 0.82% which seems great! But for another user, their error actually increases from 0.99% to 6.41%. Not so great. Is the problem in their color sensor calibration? Could be.

We know from personal experience that pulse oximeters are hard, so we applaud their efforts in tackling a major problem. Maybe the Hackaday community could help them out?

3D printed Hagrid's lantern with a magic wand

Micro:bit Brings 3D Printed Magic Lanterns To Life

[Elenavercher] loves engaging her primary school students, inspiring their imagination as well as teaching them the design thinking process. She has found that the very accessible rapid prototyping culture of 3D printing, micro:bit, and the like are perfect for teaching her students problem-solving and teamwork, and is always coming up with new lessons that will catch their attention. That brings us to her latest design, an interactive lantern and wand, which you could say is of the wizarding variety.

The lantern and the wand each have an integrated micro:bit serving as their brains. When the user shakes the wand, releasing a spell, the micro:bit in the wand, sends a user-defined number to the micro:bit in the lantern. The lantern has NeoPixels built-in, which then turn on, illuminating the lantern. When the user presses a button on the micro:bit instead of shaking it, the wand sends a signal to the lantern that tells it to “turn off.” Pretty simple, right?

The design itself is something any seasoned hacker could recreate; however, the magic in this build is how [Elenavercher] beautifully engages her elementary-aged students in the engineering design process. She starts off by encouraging her students to prototype the lantern and wand using paper which is a very inexpensive way to help them visualize the final product before investing too much time into the 3D design, a critical engineering design step — prototype fast and cheap with whatever you have on hand.

She then helps them design the lantern and wand in Tinkercad, a very beginner-friendly, yet increasingly capable CAD program. We really appreciate her detailed steps for the design as well as for navigating Tinkercad, both of which will help teach any tiny tikes in your life how to recreate the design. What’s really handy about Tinkercad is you can do mechanical CAD as well as write code for the micro:bit all within the same program. But [Elenavercher] also provides the final .hex file if you’d rather just get the build up and running.

Continue reading “Micro:bit Brings 3D Printed Magic Lanterns To Life”

Rock, paper, scissors game that uses servos to choose one at random for the computer.

Forget ChatGPT And Play Rock-Paper-Scissors With Yourself Instead

This isn’t like the cool AI everyone’s getting caught up with these days, but we’re sure it will make a fun party gimmick nonetheless.

The premise of [CrazyScience]’s game is really simple, with three servos connected to labels that display rock, paper, and scissors, respectively. The game code is written to pick a label to display at random. Furthermore, an ultrasonic distance sensor detects when the player has moved their hand close to the game, indicating the player has chosen a hand and is challenging the game. The result of the game is decided by the player, so we imagine you could pretend you never lost and no one would know.

It would be cool to see the game support multiple players, keep score, or make sure you can never win. And you’ll probably want to add the randomSeed function in the code too. But that seems like a version two problem.

The only thing left to do is add some AI since that’s all we’re doing nowadays. But maybe you’re the type to enjoy the simple 8-bit pleasures instead. If you ask us though, we’d rather play with friends.

Continue reading “Forget ChatGPT And Play Rock-Paper-Scissors With Yourself Instead”

pulse oximeter as a small sticker that sticks on your fingernail and measures heart rate, motion, and blood oxygen

This Fingernail Sticker Can Detect When You Stop Breathing

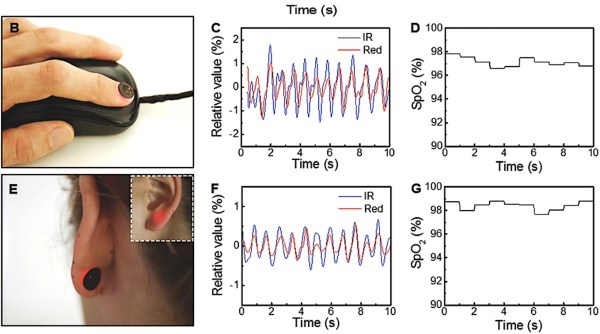
Sometimes we dig through the archives to see what kind of crazy hacks we can pull out of the depths of the world wide web and this one was worth sharing. Researchers at Northwestern University developed a sticker that’s applied to the fingernail and measures heart rate, motion, and blood oxygen, all without a battery.

The photoplethysmograph (PPG) system is similar to what we’ve covered before and the motion sensor is simply an accelerometer, so we won’t go over those aspects of the device. The parts of the device that did catch our attention were the battery-less operation as well as its size. It’s just so dang small! And fits snuggly on a fingernail or on even on your earlobe. The size here is actually a very interesting feature and not just a marketing plug. Because the device is so small and lightweight, it is very easy to adhere to the fingernail or skin with very little sensory perception. Basically, the person wearing the device won’t even notice it’s there. That’s definitely an advantage over the traditional, bulky, hospital-grade instruments we’ve grown accustomed to.

The device adheres really well given its small and lightweight design, so motion artifacts are significantly reduced. Motion artifacts in PPG-based devices are due to the relative motion between the optode (LED and photodiode) and the skin. The traditional approaches of ensuring the device don’t move are for the patient to keep very still during a recording, to wear the device tightly against the skin (think of how tightly you need to wear your smartwatch to get consistent readings), or use some seriously tough and uncomfortable adhesive as you may have done if you’ve ever gotten an electrocardiogram reading before. This device eliminates those three problems.pulse oximeter as a small sticker that sticks on your fingernail and measures heart rate, motion, and blood oxygen

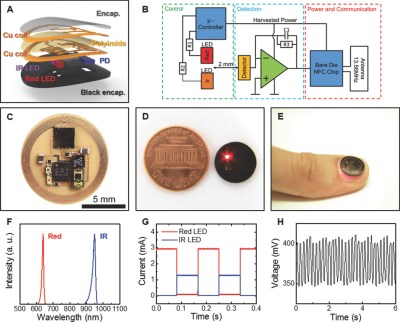
The other aspect of the device that caught our attention is its use of wireless power instead of a battery. In some senses, this could be seen as an advantage or as a disadvantage. The device relies on NFC for power and data transmission, a pretty common approach for devices that only need to be used intermittently. Wireless power could be a bit problematic for continuous monitoring devices which provide readings every second or several times a second. But who knows, wireless power seems to be everywhere these days.

Digging into the details a bit, the double-layer antenna is designed around the circumference of the device using wet etching to create traces on a copper polyimide foil. The team electroplated holes through the different layers of the device (optode layer, first antenna layer, polyimide, second antenna layer, component layer, protective top coat) connecting the antenna to the die pad NFC chip (SL13A, AMS AG). Connecting the chip requires some pretty fine-pitch soldering techniques, but nothing we’re not accustomed to here at Hackaday. Overall, they seemed pretty successful, obtaining a Q factor of 16 and a transmission distance of 30 mm using a smartphone and not some giant reader antenna.

Definitely, a really cool project that we recommend checking out.

Raspberry Pi biosensor with screen-printed electrodes

Raspberry Pi And PpLOGGER Make A Low-Cost Chemiluminescence Detector

[Laena] and her colleagues at the La Trobe Institute for Molecular Science in Melbourne, Australia used a Raspberry Pi to make a low-cost electrochemiluminescence (ECL) detector to measure inflammation markers, which could be used to detect cardiovascular disease or sepsis early enough to give doctors a better chance at saving a patient’s life.

ECL reactions emit light as a result of an electrically-activated chemical reaction, making them very useful for detecting biochemical markers in blood, saliva, or other biological samples.  ECL setups are fundamentally fairly straightforward. The device includes a voltage reference generator to initiate the chemical reaction and a photomultiplier tube (PMT) to measure the emitted light. The PMT outputs a current which is then converted to a voltage using a transimpedance amplifier (TIA). That signal is then sampled by the DAQCplate expansion board and the live output can be viewed in ppLOGGER in real-time.

Using the RPi allowed the team to do some necessary, but pretty simple signal processing, like converting the TIA voltage back to a photocurrent and integrating the current to obtain the ECL intensities. They mention the added signal processing potential of the RPi was a huge advantage of their setup over similar devices, however, simple integration can be done pretty easily on most any microcontroller. Naturally, they compared their device to a standard ECL setup and found that the results were fairly comparable between the two instruments. Their custom device showed a slightly lower limit of detection than the standard setup.

Their device costs roughly $1756 USD in non-bulk quantities with the PMT being the majority of the cost ($1500). Even at almost $2000, their device provides more than $8000 in savings compared to ECL instruments on the market. Though cost is much more than just the bill of materials, we like seeing the community making efforts to democratize science, and [Laena] and her colleagues did just that. I wonder if they can help us figure out the venus fly trap while they’re at it?

Flexible, Thin-Film Biosensors

We like to keep a pulse on the latest biosensor research going on around the world. One class of biosensors that have really caught our attention is the so-called thin-film sensors, pioneered by the Rogers Research Group at Northwestern University.

We’re no strangers to the flexible PCB here at Hackaday. Flexible PCBs have become increasingly accessible to small-scale developers and hobbyists, explaining why we’re seeing them incorporated into many academic research projects. The benefit of these types of sensors lies in the similarity of their mechanical properties to those of human skin. Human skin is flexible, so matching the flexibility of skin allows these thin-film sensors to adhere more comfortably and naturally to a person’s body. Continue reading “Flexible, Thin-Film Biosensors”