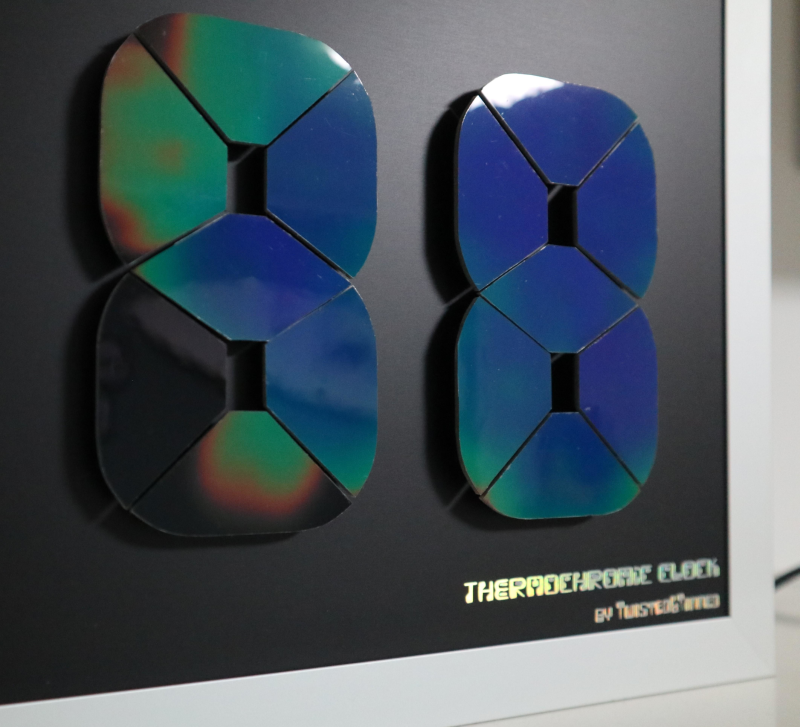
We love timepiece projects round these parts, so here we are with another unusual 7-segment clock design. Hackaday’s own [Moritz Sivers] wasn’t completely satisfied with his last thermochromic clock, so has gone away and built another one, solved a few of the issues, and this time designed it to be wall mounted. The original design had a single heater PCB using discrete resistors as heating elements. This meant that the heat from active elements spread out to adjacent areas, reducing the contrast and little making it a bit hard to read, but it did look really cool nonetheless.
This new version dispenses with the resistors, using individual segment-shaped PCBs with heater traces, which gives the segment a more even heat and limited bleeding of heat into neighbouring inactive air-gapped segments. Control is via the same Wemos D1 Mini ESP8266 module, driving a chain of 74HC595 shift registers and a pile of dual NMOS transistors. A DS18B20 thermometer allows the firmware to adjust for ambient temperature, giving more consistency to the colour change effect. All this is wrapped up in an aluminium frame, and the results look pretty nice if you ask us.
Both PCB designs and the Arduino firmware can be found on the project GitHub, so reproducing this should be straightforward enough for those so inclined, just make sure your power supply can handle at least 3 amps, as these heaters sure are power hungry!
Got a perfectly good clock, but desperately need a thermochromic temperature/humidity display? [Moritz] has you covered. And if this digital clock is just too simple, how about a mad 1024-element analog thermochromic clock instead?


I like this. But maybe 3-in-1 – faster-better-cheaper?…
Rather than make a rat’s-nest of wire-interconnected PCB tiles having heater traces warming a layer of thermochromic sheet painstakingly cut to match the tiles, make one double-sided PCB with mouse-cut and etched channels to thermally isolate the segments.
One side of each segment is copper-clad to evenly conduct heat. The copper-clad side of each thermally isolated segment is covered with thermochromic ink or paint.[1][2] Thermochromic paint is available in a wide range of colors and temperature ranges. Order a silk-screen template for the PCB so the thermochromic paint can be applied in complex patterns. If the PCB fab can apply the thermochromic ink or paint, mass-produced thermochromic displays become reality.
To clarify, one side of the PCB has the heater traces, the other side of the PCB has the thermochromic paint or ink coated copper-clad thermally isolated segments. The PCB edges can carry the electronics, thereby preserving the single-PCB design. No bundles of interconnecting wires.
* References:
1. Thermochromic ink & paint:
https://www.sfxc.co.uk/collections/thermochromic-ink
2. Thermochromic Color Changing Paint [01:30]
https://www.youtube.com/watch?v=MjBHbQAtEsE
https://www.youtube.com/watch?v=MjBHbQAtEsE
Thanks for all the suggestions.
Having a single PCB with isolated segments is kind of what I did on my temperature and humidity display.
https://www.instructables.com/Thermochromic-Temperature-Humidity-Display-PCB-Ver/
Due to the large size of this clock I moved to individual PCBs for the segments because it is probably cheaper than one giant (280x350mm) PCB.
I like the idea of applying thermochromic paint as solder mask, I will ask my PCB manufacturer if they can do it.
This Thermochromic clock is amazing I really loved it. With the passage of time we are getting new innovations looking for what will be in future with new features and technology. Great work done..Appreciated.
A Thermoelectric coupling using the Peltier effect would cool and heat those Thermochromic display elements, allowing it to change colors much faster by just changing current flow.
I started replying to you, working out in my head how this would work – essentially you’d be best off buying small peltier elements, and putting them on aluminum heat spreaders cut to the shape of the segments. Honestly – if you also add a thermistor to each of the segments you could even control what color it ended up being. Even a calibration routine and some duty cycle switching on each of the segments may be enough. And…I guess going the opposite route – if instead of making the heat/cold even across the entire element, you could choose a material that wasn’t as conductive, or that lost heat easily to allow multi-color per segment.
I tried out peltiers on my first thermochromic project
https://hackaday.com/2019/08/19/the-thermochromic-display-you-didnt-know-you-needed/
The idea was exactly to change colors faster but cooling a bunch of peltiers you need proper heatsinks and fans and you easily end up in thermal latch-up. Elliott Williams once wrote that every peltier based project is doomed to fail and he’s not completely wrong about that.
Can we please get a nano-watt clock challenge? Or more general: Nano-watt displays?
I would suggest epaper for this purpose.
My old Casio LCD clock ran for years (>10) with a pair of AA batteries. There was a bleeder resistor (that I removed) connected the batteries for some reason.
I get it’s a novelty for YouTube sure, but as a practical clock … I am sure electricity supply companies will be very keen!
One would need a way to quickly turn off the segments as well. Heating can be quick, but waiting to cool blends the numbers.
I guess there is a lot more aspects that can be balanced
– tune the heating to not overheat the segments/overshoot the heating. a little less/shorter time might reduce the thermal load quite a bit
– use a thin pcb to reduce thermal mass
– air flow – passive air flow improvements? maybe use a fan for short puffs of air to help cooling when switching?
– is there paint with a higher temperature? This would increase power consumption, but could speed up cooling towards ambient
Adding peltiers as mentioned above?
This increases cost/complexity. But a full bridge driver would not be hugely complex. Mounting them relative to a common heat sink? The peltiers could even be used as sensor (when off)