Improved Thermochromic Clock Uses PCB Heaters For Better Contrast

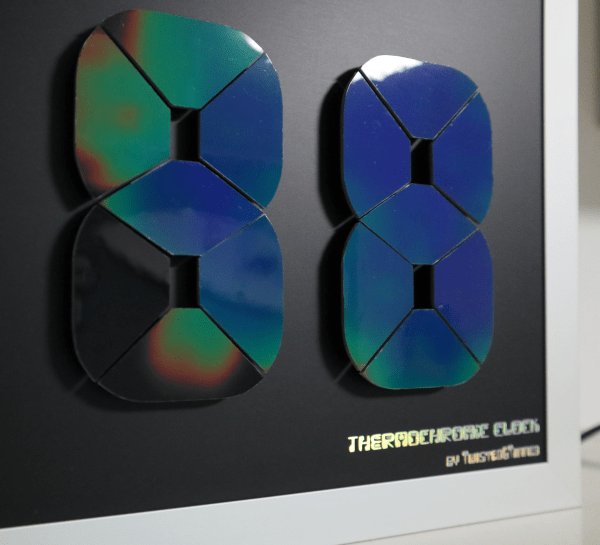
We love timepiece projects round these parts, so here we are with another unusual 7-segment clock design. Hackaday’s own [Moritz Sivers] wasn’t completely satisfied with his last thermochromic clock, so has gone away and built another one, solved a few of the issues, and this time designed it to be wall mounted. The original design had a single heater PCB using discrete resistors as heating elements. This meant that the heat from active elements spread out to adjacent areas, reducing the contrast and little making it a bit hard to read, but it did look really cool nonetheless.

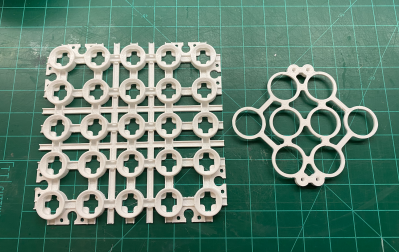
This new version dispenses with the resistors, using individual segment-shaped PCBs with heater traces, which gives the segment a more even heat and limited bleeding of heat into neighbouring inactive air-gapped segments.  Control is via the same Wemos D1 Mini ESP8266 module, driving a chain of 74HC595 shift registers and a pile of dual NMOS transistors. A DS18B20 thermometer allows the firmware to adjust for ambient temperature, giving more consistency to the colour change effect. All this is wrapped up in an aluminium frame, and the results look pretty nice if you ask us.

Both PCB designs and the Arduino firmware can be found on the project GitHub, so reproducing this should be straightforward enough for those so inclined, just make sure your power supply can handle at least 3 amps, as these heaters sure are power hungry!

Got a perfectly good clock, but desperately need a thermochromic temperature/humidity display? [Moritz] has you covered. And if this digital clock is just too simple, how about a mad 1024-element analog thermochromic clock instead?

Continue reading “Improved Thermochromic Clock Uses PCB Heaters For Better Contrast”

A Lego cup holder with a glass of water and electronics on a breadboard

LEGO Cup Holder Helps You To Stay Hydrated

Eat more fruit, exercise more, drink more fluids; early January is traditionally the time to implement New Year’s resolutions. Most of the common ones simply require willpower, but if it’s staying hydrated that you’re targeting, then some help is available. [Pepijn de Vos] designed a LEGO cup holder and an accompanying desktop app that tell you exactly how much water you’ve had so far, making it easier to get to those eight glasses a day.

The basic idea is simple: the cup holder contains a load cell that senses the weight of your drinking vessel. If the weight decreases, then a message is sent to your PC detailing the amount lost. If the weight increases, then the glass must have been refilled and the previous weight is disregarded. This way, the app simply needs to add up all the amounts reported, without having to compensate for the weight of the empty glass.

The tricky bit was integrating a load cell into the LEGO structure. It required some fiddling with Flex System hoses to ensure the platform’s weight rested only on the load cell, while still being stable enough to safely hold a full glass of water. The load cell is read out through an amplifier and A/D converter, while the USB communication is handled by a Teensy 3.

[Pepijn] modified an existing GNOME desktop widget to display a cup icon and the total volume consumed, which seems to work pretty smoothly judging from the video embedded below. All the code and even a complete set of LEGO build instructions are available on the project’s Github page. If simply monitoring your fluid intake isn’t enough of a nudge for you, then check out this device that floods your desk if you don’t drink enough.

Continue reading “LEGO Cup Holder Helps You To Stay Hydrated”

UV Resin Perfects 3D Print, But Not How You Think

At this point, everyone knows that the print quality you’ll get from even an entry level UV resin printer far exceeds what’s possible for filament-based fused deposition modeling (FDM) machines. But there’s a trade-off: for the money, you get way more build volume by going with FDM. So until the logistics of large-format resin printers gets worked out, folks looking to make things like replica prop helmets have no choice but to put considerable time into post-processing their prints to remove the obvious layer lines.

But thanks to this somewhat ironic trick demonstrated by [PropsNstuff], you can actually use UV resin to improve the finish quality of your FDM prints. The idea is to put a layer of resin over the layer lines and other imperfections of the 3D print, cure it with a handheld UV flashlight, and then sand it smooth. Essentially it’s like using resin in place of a body filler like Bondo, with the advantage here being that the resin cures in seconds.

The thick resin fills in tough spots quickly.

Now to be clear, this isn’t a new idea. Our very own [Donald Papp] investigated the process back in 2018, and [Thomas Sanladerer] covered the idea in a video of his own the following year. But the difference here is that [PropsNstuff] doesn’t just coat the whole print with resin, he takes a more methodical approach. Working in small sections, he targets areas that really need the high-build properties offered by this technique.

With the tough spots addressed, he then moves on to coating larger areas with resin. But this time, he mixes leftover resin from his SLA printer with talcum powder to make a mix that can be brushed on without running everywhere. It takes a few thin coats, but with this mix, he’s able to build up large swaths of the print without losing any surface detail.

Is it still a hassle? Absolutely. But the final result does look spectacular, so until we figure out how to build the replicators from Star Trek, it looks like we’ll have to make up for our technological shortcomings with the application of a little elbow grease.

Continue reading “UV Resin Perfects 3D Print, But Not How You Think”

Potassium ferrioxalate crystal

Growing Spectacular Gem-Like Crystals From Rust And Simple Ingredients

When we talk about crystals around here, we’re generally talking about the quartz variety used to make oscillators more stable, or perhaps ruby crystals used to make a laser. We hardly ever talk about homegrown crystals, though, and that’s a shame once you see how easy it is to make beautiful crystals from scratch.

We’ve got to say that we’re impressed by the size and aesthetics of the potassium ferrioxalate crystals [Chase Lean] makes with this recipe, and Zelda fans will no doubt appreciate their resemblance to green rupees. The process starts with rust, or ferric oxide, which can either be purchased or made. [Chase] chose to make his rust by soaking steel wool in a solution of saltwater and peroxide and heating the resulting sludge. A small amount of ferric oxide is added to a solution of oxalic acid, a commonly used cleaning and bleaching agent. Once the rust is dissolved, potassium carbonate is slowly added to the solution, turning it a bright green.

The rest of the process happens more or less naturally, as crystals begin to form in the saturated solution. And boy, did they grow — long, prismatic lime-green crystals, with a beautiful clarity and crisp edges and facets. The crystals don’t last long under light, though — they quickly lose their clarity and become a more opaque green.

[Chase]’s crystal-growing efforts have shown up here before, when he turned humble table salt into beautiful cubic crystals. We find the whole crystal-growing process fascinating, and we’re looking forward to more of this in the future.

Detail of an LED display made using ping-pong balls

Modular Design Enables Huge Ping-Pong Ball LED Displays

Ping-pong balls have many uses: apart from playing table tennis, they have been used for countless art projects, science experiments, and even to raise ships from the bottom of the ocean. As it turns out, they also come in handy as diffusers for LED pixels, allowing the construction of large-size displays without requiring large individual LEDs.

[david] designed an LED ping-pong ball display using 3D printed components, which allows for the construction of arbitrarily-large LED displays thanks to a strictly modular design. The basic unit is a small piece that holds a single LED module and has a cup-like structure for attaching a standard table tennis ball. Twenty-five of these basic units combine together into a panel that also contains wiring ducts. Finally, any number of these panels can be combined into a display, thanks to clips that give the structure rigidity in the out-of-plane direction.

A 3D-printed frame for making an LED display
A single panel holds 25 LEDs and comes with cable ducts. On the right is a clip for connecting multiple frames together.

Of course, simply mounting LED modules is not enough to create a display: the LEDs also need to be connected to power and data lines. [david] didn’t relish the thought of having to cut and strip 1,800 pieces of wire, and therefore devised a clever way of automating this process: he put a bunch of wires onto a piece of card stock and used a laser cutter to burn off the insulation at regular intervals. Then it was simply a matter of soldering these wires onto the LEDs and snipping off pieces along the data bus.

The finished panel is driven by a combination of a Teensy 3.2 to generate the data signals and a Raspberry Pi to process the images. You can see the rather impressive result in the video embedded below; if this inspires you to build your own, you’ll be happy to hear that the STL files and all code are available on [david]’s project page.

Massive LED displays are always fun to watch, and although this is not the first one to use ping-pong balls as diffusers, its modularity and open-source design makes this one perhaps the easiest to replicate. Assuming you have a good supplier of ping-pong balls, of course.

Continue reading “Modular Design Enables Huge Ping-Pong Ball LED Displays”

What You Should Know Before Buying An Industrial Sewing Machine

I’ve been sewing off and on since I was a kid, and I really started to get into it about ten years ago. Even though I technically outgrew my little 3/4 size domestic machine pretty quickly, I kept using it because it always did whatever I asked it to. I even made my first backpack on it before deciding it was time for something bigger. Don’t ask me how I managed to not kill that machine, because I have no idea.

Left: a 3/4 size Janome 11706. Right: a full-size Singer Heavy Duty 4452.

Last year, I got a so-called heavy duty Singer that claims to have 50% more power than a standard domestic machine. This bad boy will make purses and backpacks with ease, I thought. And it does. Well, most of the time.

I found its limits when I tried to make a bag out of thick upholstery material. And honestly, when it comes down to finishing most bags — sewing the thickest and most difficult seams — the machine often lifts up from the table on the end opposite the needle.

What I really need is an industrial sewing machine. Not to replace the Singer at all, but to complement it. I can totally justify this purchase. Let me tell you why.

Continue reading “What You Should Know Before Buying An Industrial Sewing Machine”

The Cucumber House That LEGO Built

How far are you prepared to go to build a novelty seasonal ornament? Maybe a gingerbread house, or perhaps a bit of 3D printed glitter to hang on your Christmas tree. For [The Brick Wall], none of this was enough. Instead what was needed was a complete LEGO automated factory that builds a log cabin, from the unlikely raw material of cucumbers.

What has been created is the LEGO equivalent of a timber mill, with the various machines served by an overhead gantry crane. The cucumbers are trimmed to square, before being transferred to a saw which cuts out the notches for the interlocking corners. Another saw line chops the sections around door and windows to length, and finally the roof planks are cut in a vertical saw. The video below is reported as taking 83 days to complete from planning to filming, and 18 cucumbers to build the house. We’re not sure the cucumber will become a regular building material, but we salute the effort involved here.

Though this may be one of the biggest we’ve seen, we’ve featured many LEGO machines making things before.

Continue reading “The Cucumber House That LEGO Built”