Thermoplastics are great, because you can melt them down and reform them into whatever you like. This is ably demonstrated by [The Q] by recycling old soda bottles into usable 3D printer filament.

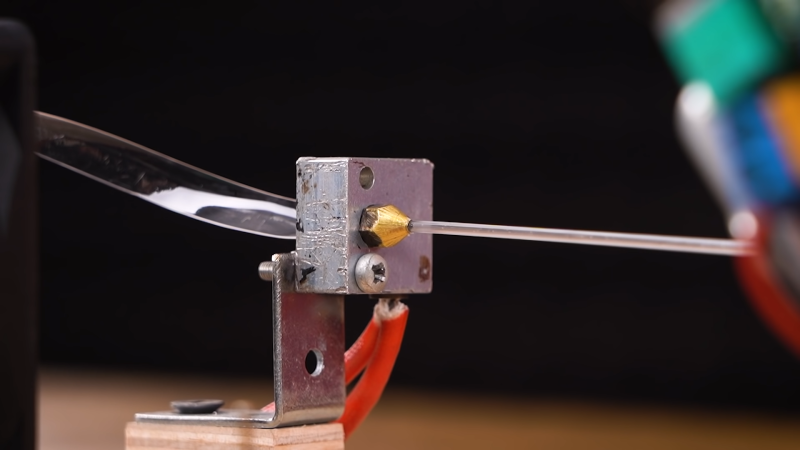
Soda bottles are usually made out of PET plastic, or polyethylene terephthalate, which is one of the most popular thermoplastics in modern society. A soda bottle can be cut into a continuous long, thin strip with the use of a simple hand-operated machine that slices the bottle with a blade. This strip of plastic can then be fed through a heated nozzle in order to produce filament for 3D printing. [The Q] demonstrates both parts of this process, including using a motorized reel to take up filament as the bottle material is fed through the extruder.
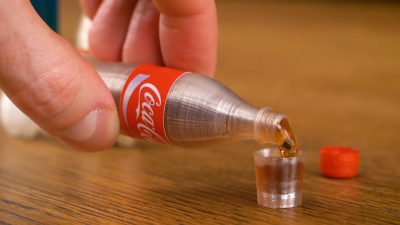
The filament is then demonstrated by printing tiny versions of soda bottles. [The Q] fills these with soda and gives them the appropriate lids and labels for completion’s sake. It’s a neat way to demonstrate that the filament actually works for 3D printing. It bears noting that such prints are almost certainly not food safe, but it’s really a proof of concept rather than an attempt to make a usable beverage container.
Like similar builds we’ve seen in the past, the filament is of limited length due to the amount of plastic in a single bottle. We’d like to see a method for feeding multiple bottles worth of plastic into the extruder to make a longer length spool, as joining lengths of filament itself can be fraught with issues. Video after the break.


Simple design … I must do it for me (I already have all the required parts).
To solve the “short filament issue”, I would try to join the bottle strips before converting them to filament. If joining the strips before turning them into filament, I would expect the printer nozzle to soften the imperfections.
Steve
is it GREEN??
Where seems to be enough width to cut fingers in the ends and alternate the finger and then plastic weld them, perhaps with something the shape of a flat screwdriver lengthwise to increase wed surface area.
PS: if you cut the fingers at different locations (from each other along the length) so only one at a time is being melted when converting to filament then you have less chance of breakage.
I was thinking a tool sort of like a vacuum sealer. Or maybe a long dwell time with an actual vacuum sealer. Heat the strips and press them together. Feed them through and the extruder will even out any imperfections.
Easy enough to test with a soldering iron. In fact, why not overlap and just touch the sides? The excess will backup a little from the overlap and any air should squeeze out.
Assuming that the hot-end is thoroughly cleaned from other plastics, why wouldn’t the printed PET be food safe?
It’s a blanket statement as people who do not use it for food safe products will just “try it” without thinking. Not including food safe inspections
Because the process of fdm 3d printing creates tiny layer lines where harmful microorganisms can settle and reproduce
I believe it has to do with the surface finish/ the process leaving holes and gaps for bacteria to grow and fester
I’ve heard it’s due to the brass nozzles. From Wikipedia: “To enhance the machinability of brass, lead is often added in concentrations of around 2%.”
The print itself is also not print safe without post-processing. The layer lines are perfect for bacteria, mold, and contaminants to get trapped.
Until fairly recently, the brass used in plumbing parts was almost always 9 – 10% lead.
Source: I spent several months working in a Watts foundry 12 years ago. That’s “fairly recently”, right? When I was there, they were working on developing lead-free brass that would work with their production process. Apparently increased shrinkage of the metal was one of the primary issues. I suspect that by now they’ve figured it out.
Or stainless
You can make a bra out of this stuff? Excellent.
IIRC food safety is a combination of what other have also commented on before me like shape of the object (requires post processing to get rid of gaps and hole where microorganisms could multiply) but more predominantly its a chemical safety issue. leeching of contaminants, additives and de-polymerization byproducts is the main concern. while PET recycling is great reprocessing the material the easy way (purely mechanical as opposed to chemical re-polymerization) usually includes more impurities into the material. to get around the impurity problem some bottle manufacturer make bottle out of multiple layers of PET with the innermost layer allways being pure PET and only the outer layers made of recycled material. so using bottles as a feedstock might not be food safe in the first place. in addition to that PET is prone to hydro- and thermolysis specially at higher temperatures. manufacturer usually need to dry PET thoroughly and work with higher mechanical pressure and lower temperatures to avoid further problems. 3d printers on the other hand do exactly the opposite high temperature to avoid having to use higher pressure.
TLDR: thermal processing of partially “wet” PET at high temperatures required for printing will lead to polymer degradation which is chemically not food safe.
I’m more worried about the process of 3D printing leaving microplastics than microorganisms or lead-y tips. Plastic bottles are clearly one solid piece of plastic but 3D prints you can see strands of plastic especially between islands and anywhere else the printer makes non-printing moves and who knows if it’s going to flake off.
Turn little bottles in for deposit = $profit$
MVP comment
Mini bottles of soft drink to go with the mini bottles of alcohol – it’s a Barbie Booze up …
Since Coca-Cola, sprite and Fanta are all brands owned by “The Coca-Cola Company” my spider sense it tingling that this is a viral advertisement.
That’s what I thought when I saw this really “obvious surreptitious” thumbnail of the video.
When I saw an entire wall covered in sound deadening I immediately thought “this isn’t going to be about hacking”. More likely something that is entertaining but not informative.
I don’t thing I was that far wrong. It did have some hacking content but not any details that would be useful to hackers.
Mine too! I hate having to second-guess everything. I just wish that unlabeled advertising disguised as content were illegal: oh wait, it is.
https://www.ftc.gov/tips-advice/business-center/guidance/disclosures-101-social-media-influencers
If you live in the states, feel free to contact your gov’t representative.
An example of putting a lot of effort into something for a minimal yield.
Bit skeptical on this one, the print quality would suggest you get a very consistent width filament, which begs the question why are other at-home filament making machines so much more complex. Have to try it for myself and see if it’s really THAT easy.
that’s because hes pulling strips through a nozzle as opposed to pushing pellets/ground material through it. makes a huge different apparently….
I think that’s exactly right. By using uniform strips at a uniform speed you should get a uniform filament. Your just changing the shape of what you put in.
I suspect that overlapping the very end and applying heat and pressure would fuse them together for longer filiments.
Good Idea. However, doing this in a country where soda bottles are worth far more if you return them to the grocery store instead of doing this, the method will turn out to no avail.
I want to do this, but I wanted to check the exact width of the strip he is feeding in and the size of the hole drilled into the nozzle. These, along with temps used are rather important factors but I can’t seem to find them!
The width of the strip
= height of the washers totaled together on one bolt
…right?
It’s a neat trick to create small amounts of filament, and apparently it also circumvents all the typical issues that come with rPET, which I’ve spent the past year doing. I think I’ll build one of these for small scale illustration.
Important things to note when extending rPET via a traditional filament line: horizontal extrusion can only only if the distance between nozzle and water bath is less than an inch, the nozzle needs to be way above the melt temperature due to die drool, and the cooling water bath needs to be at 60°C otherwise it will become oval and start snaking
This is so bad for our planet. Microplastics , now nanoplastics, make their way to every part of the earth. It is impossible to filter.