We’ve often heard it said that springs come in in all shapes and sizes…except for the one you need. In light of this, the hardware hacker would do well to keep the tools and knowledge required to make a custom spring close at hand when building something that moves. Luckily, all it really take is some stiff metal wire, a rod, and patience.
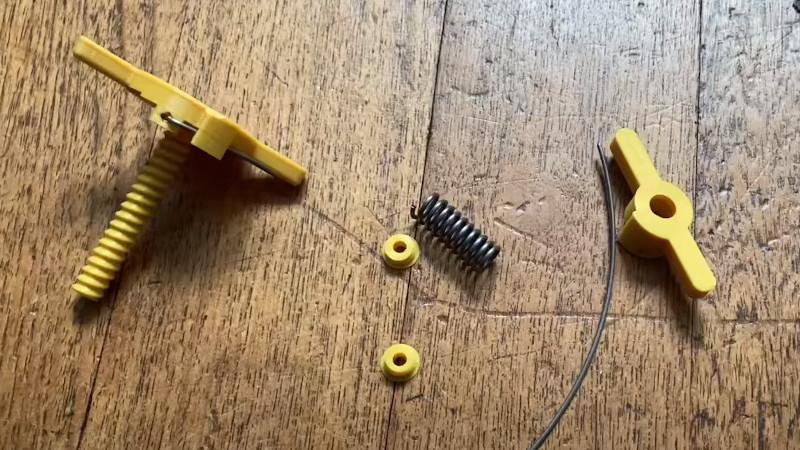
Unless you’ve got a 3D printer, that is. In which case, we’d suggest you print out this very clever “Spring Factory” designed by [Vincent Baillet]. The simple tool, consisting of just two parts, makes it easier and faster to make consistent DIY springs when compared to traditional methods. Rather than trying to eyeball the spacing of the coil as you wind the wire around the mandrel, this design does it for you.
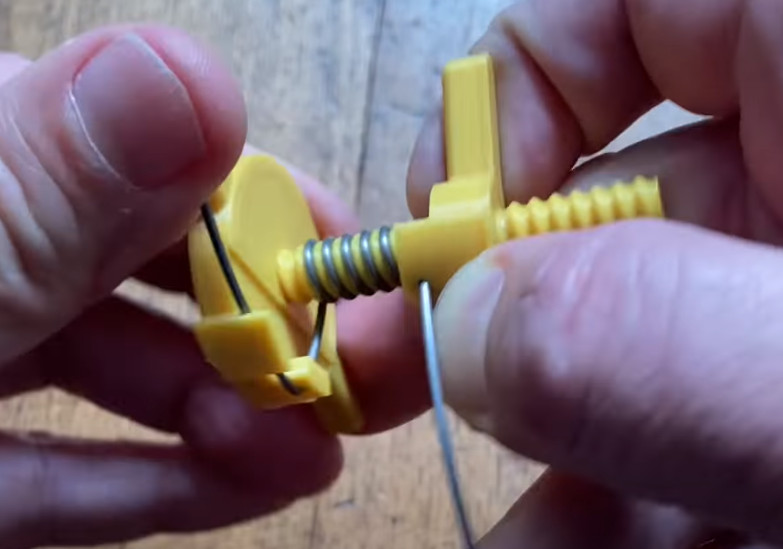 As seen in the video, springs made with this tool look very professional. Not only does the threaded mandrel keep the spacing between coils even, it also makes sure all the springs you produce are identical. This can be especially important with projects that need to use multiple matching springs. [Vincent] says his handy tool works with piano wire from 0.8 to 1.2 mm, and slightly thicker if plain steel.
Of course, the obvious flaw in a tool like this is that it can only be used to make springs of a specific diameter. Changing the length is easy enough, just use more or less wire. But to make a thinner or thicker spring, you’d need a different size of mandrel. It seems that [Vincent] has only released the gadget in this approximately 9 mm diameter so far, but here’s hoping a few more sizes get added to the mix before too long.
Looking for something a bit more advanced? This Arduino-powered wire bender is capable of making some very impressive custom springs, among other things.
Thanks to [Mario] for the tip.


Given how many springs I have turned out on the lathe over the years, and how many I have made up on commercial all-thread, I appreciate this design a lot. I have a spring winder (commercial for small production, based on a Hjorth) that is such a pain o set up, I have never used it. For 1000, it would be awesome, for one, I like this design. Easy to model up for other sizes, and the provided model can be scaled in slicing to a good extent.
A parametric version would be the best. OpenSCAD? Then you could set wire diameter, wind spacing, length, maybe even be able to define a number of tight winds at the ends.
Hi Mike,
I agree with you an openscad version would be much better. I’ve designed this tool because this was a cool idea and a great challenge. Now I need to learn Openscad and try to make an universal version of it… That’s gonna be my next step. :)
I took a run at an initial conversion to emulate this design in OpenSCAD
https://github.com/jshessen/SpringFactory
Cool! Thanks.
Seems like it could be scaled as needed on Cura (or slicer of choice) quite easily. For example, need a bigger diameter? Just scale X and Y and keep Z the same.
Only suggestion I have has to do with the beginning and end. On many “professional” springs the first two coils are in contact with each other making the ends nearly flat. It may be possible to change the pitch of the wind at the beginning of this tool to accomplish that, but getting the other end right would be challenging.
You’re right. The caps i provide are just a “quick and dirty” solution, but it may help.
I just use normal wire on a screw or bolt thread. Form the complete shape for compression or expansion springs including holding on loops. Heat it to a dim glowing red and drop it in a bucket of water.
By “normal wire” I mean ferric (iron) wire. Not copper wire like most hackers would think of when I say “normal wire”.
I’ve been trying to think up ways to use springs ever since this danced across the algorithm
I am thinking of using this to make custom camera shutters, these use a ton of springs.
Looks like it might be useful for making small-value coils.
But for a real spring don’t you need to heat it before you release tension?
You could use plain copper wire or better still enameled copper wire (magnet wire) if you just want the electrical component coils and this should work fine.
If you want to “make” springs then that’s not quite what’s happening here.
They’re using piano wire which is “spring steel” to prevent the piano from de-tuning too quickly.
So it’s already spring steel and you bending it past its yield point to form a new shape. This actually weakens it a bit but it’s fine to do with any gauge of metal that we hackers call a “spring”.
If you were to use a common (low carbon) steel wire you could do the same and then heat it to a dull red glow and then drop it into a metal bucket of water to temper it (make it springy). There’s a bit of a black art to this but if your not healing till it glows bright yellow then you should be OK. Overheating it makes it brittle and it snaps forming sharp points or edges.
If you don’t heat it enough then it wont get “springy”. Most of the black art is about what temperature your taking it to and how quickly you cool it. So just a dull red glow is fine and you kinda stuck with a fast cool down with a bucket of water but it’s much safer handling doing it this way rather than burning some part of your body with red hot metal.