Depending on what you build, you may or may not run into a lot of inductors. If you need small value coils, it is easy to make good-looking coils, and [JohnAudioTech] shows you how. Of course, doing the winding itself isn’t that hard, but you do need to know how to estimate the number of turns you need and how to validate the coil by measurement.
[John] uses a variety of techniques to estimate and measure his coils ranging from math to using an oscilloscope. He even uses an old-fashioned nomogram from a Radio Shack databook circa 1972.
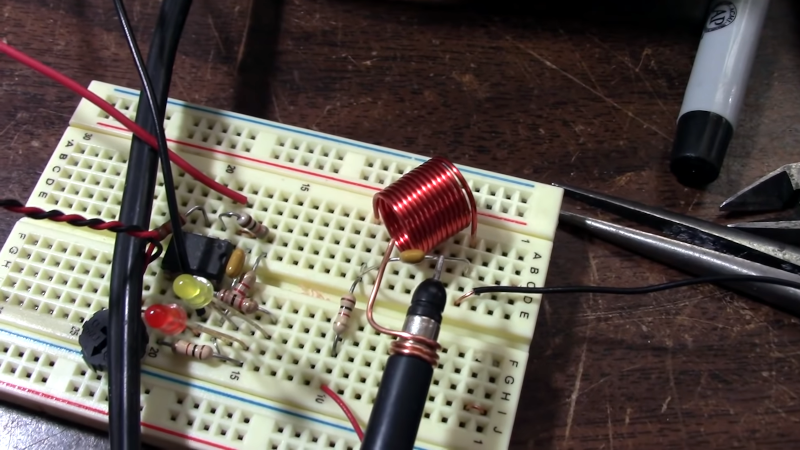
In fact, we get the idea that [John] really misses Radio Shack. In addition to the book, we noted guest appearances from a Radio Shack calculator and a caliper. We were a bit surprised that he didn’t use a Radio Shack pen as a coil form.
Traditionally, if you wanted to keep your coils from moving much, you’d paint them with “coil dope” or “Q dope” which doesn’t interfere much with the coil’s desirable characteristics. You can buy it, still, but it is also fairly easy to make by dissolving styrofoam packing peanuts.
If you need a variable inductor, you can make those, too. If, however, you are making a lot of inductors, consider automation.


If you want nice even spacing, wind your coil around a fine pitched bolt, using the thread as a guide, by rotating it off like a nut, you’ll get a coil matching the thread spacing. By stretching and squeezing the coil after soldering it in place, you can tweak the value.
I would use a bolt or screw with trapezoidal threads, as used in cheaper CNC machines. Normal ones can be poorly made which would damage the enamel.
Or maybe use a nylon bolt?
Some nylon bolts have sharp edges from the molding process. For example cheaper bolts that hold a toilet seat to a bowl. I would rather wrap the coil on the drill bit, and then spread it gently, with a toothpick, ice scream stick or credit card edge.
Nylon is still softer than the enamel on the wire. Of course you can always print a coil winder for a super precise coil winding. I’d be more worried about dissolving the enamel with home made coil dope. Superglue or clear nail polish are less likely to dissolve the enamel. If you are leaving a winding core in the coil, test its reactance first. stock a cup of water in the microwave (to protect the MW oven) and the core (not in the water) and nuke for 30-45 seconds. if the core heats up it is not suitable as a coil form. this is an old ham radio trick, and yes, I am an old ham,,,
I’ve wound a LOT of air-core inductors while developing various RF projects, and they were never wound with spacing. I wound them on drill bit shanks – there’s usually a wide variety of fairly closely-spaced bits around most shops, so getting the desired turns-to-diameter ratio is pretty easy. Of course, coils were often spread for tuning once in the circuit, especially if it was a bandpass filter. There was more wiggle room in high-pass and low-pass filters so I could often get away with using the inductors as they were wound, without spaces between the turns. Some inductors weren’t “wound” per se – they were half-turn inductors that could be tuned either by heating the solder joints and increasing or decreasing the height above the board, or by pinching them. These would often be part of parallel-resonant circuits with ceramic capacitors physically located directly between the pads for the inductor leads.
Nice to vertically clamp nut in vise. Use a 6 inch or longer bolt run all the way in and back it out
as your feeding the enameled wire. Used that method to make open air coils for a crystal radio
with a 4 inch PVC male threaded
coupler with a piece of pipe extending from the inside so as to wind the wire and slide it away from the threads as it came off. Worked great. Used hot glue and plastic strips to maintain coil shape.
I had a Radio Shack P-Box kit (mentioned here: https://hackaday.com/2018/12/14/retrotechtacular-remembering-radio-shack-p-box-kits/ ) – the coil for the short-wave receiver is wound on an AA battery, meaning it’s a consistent size wherever in the world the kit was sold.
Thank youfor the memory jog! I built some of the P-box kits back in the 1970s. I hadn’t thought of them in decades.
If you’re dissolving Styrofoam, be even more careful than you would be with the solvent used. Doing it releases the blowing agent, which can be quite nasty and is usually an unknown.
Didn’t someone design a 3D-printable wire bending machine? Can’t it be programmed to make perfect coils?
Not everyone has a 3D printer. Besides, people used to do it by hand. I even have a book that shows, how to wind different types of coils. Recently I was working on a project that requires some 470nH and 270nH coils. I was going to make PCB ones, but in the end I switched to air core type, wound on drills for consistent diameter.
there are more people with 3D printers than you may realize, as they are as inexpensive as $150 US on one major mail order retailer, and there is also a proliferation of 3D printing services all over the globe due to the cost of the printers dropping creating a market for home businesses
Back in the day, winding a coil meant building a custom slot car motor.
No doubt true. For a very narrow definition of “the day”
I remember Radio Shack ink pens being triangular shaped
I know there is a guy out there who has made a device to re-wind Bulova Accutron coils to work at proper frequency for modern coin cells- but I don’t know his name. Now those are small coils!
I miss Radio Shack too. There were several within a couple of miles of where I live. It was nice to be able to run out and get a couple of 2N3904s or whatever on a Saturday afternoon and get a spur of the moment project done before Sunday night. Now you have to take your chance ordering stuff from Amazon or eBay snd hope it isn’t fake. Or you can bite the bullet and order from Digikey, Mouser, etc.
There is a Micro Center about 35 miles from where I live and a few years ago they added a wall of parts much like Radio Shack had. That is about the only remaining on-demand walk-in place to get an electronic component. Micro Center tends to be a little more maker / Arduino focused, but they do have resistors, caps and semiconductor assortments.