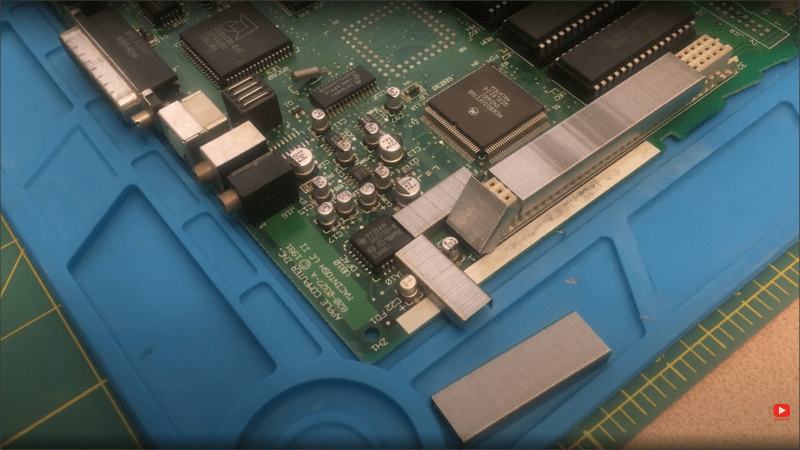
[Marcio Teixeira] needed to recap an old Apple Macintosh motherboard, and came across a simple hack to use common paper staples as a temporary heat shield (video, embedded below) during hot air rework. The problem with hot air rework is minimizing collateral damage; you’re wielding air at a temperature hot enough to melt solder, and it can be take quite a lot of experience to figure out how best to protect the more delicate parts from being damaged. Larger items take longer to heat due to their thermal mass but smaller parts can be very quickly damaged from excess heat, whilst trying to remove a nearby target.
The sharp edges of plastic connectors are particularly prone, and good protection is paramount. Sticky tapes made from polyimide (Kapton), PET, as well as metallic options (aluminium tape is useful) are often used to temporarily mask off areas in danger of getting such collateral overheat. But they can cause other problems. Kapton tape, whilst great at withstanding the heat, tends to distort and buckle up a little when under the blast of the rework pencil. Not to mention that some brands of tape leave a nasty sticky transfer residue all over the board when exposed to heat, which needs additional cleanup.
Maybe a box or two of staples might be worth adding to one’s bag of tricks, after all more options is always good. If you’re less interesting in hacking with a hot air work station and much more in hacking a hot air rework station, here you go, and whilst we’re on reworking duff computers, here’s what happens when a Hackaday writer tries his hand at fixing his son’s Xbox.


good idea, I’ve been using self-adhesive aluminium foil for years to protect the surrounding parts, which is otherwise used for air conditioning
Would that be efficient? Shiny metals are good at insulating if heat transfer is by radiation, not convection or conduction…
works a treat, especially in the context of a hot air rework station – same thing as kapton tape, it’s primarily shielding from the hot air flow.
No. No. No. He’s doing it wrong. The best way to remove the old caps is by rotating them with tweezers while pushing, not pulling. That way the pads survive but the pins are just pulled out of the caps. Then you clean up with flux and a regular soldering iron.
I have’nt made a video, but curious marc did.
There is no need for a hot air station in this endeavour. It damages more than it fixes.
sorry. it was mr. Carlsons lab. her eis his demo: https://youtu.be/X8N9O3a9jiM
I couldn’t find a CuriousMarc video about this, but trawling youtube revealed:
Electrolytic Capacitor Removal NO Desoldering Required [Mr Carlson’s Lab]
https://www.youtube.com/watch?v=X8N9O3a9jiM
Note that Mr Carlson warns about the risk of ripping the pads off if electrolyte leakage has damaged the board. Maybe there’s a place for hot air after all (seemed to work just fine for Marcio Teixeira…)
i have done this at least on 20 boards and as long as you push the capacitor against the pcb while turning, no pad has ever lifted. and i had very rotten boards indeed. pushing is the key. hot air will speeden up the acidic reactions on the remaining copper. i would strongly advice against using heat on that spot before cleaning the board.
I’ve see that technique before but it does apply a lot of lateral force to the pads. Effectively the pads are being used as a vice, and you are relying on the capacitor being weaker than them for the pins to come out. It’s usually fine, but not always.
Hot air is a decent method. You can also get special bits for soldering irons that are a U shape, designed for this kind of thing. Or just use two irons. Much, much less risk of damaging the pads that way as there is no force applied to them.
In my experience it is usually the solder that gives up and the pin pulls away from the pads. I have yet to see the pins pull out of the capacitor.
This is what I actually do altough I know almost certainly that either the pad survives because it has not leaked or it needs rework because it did anyway. I used to do that kind of shielding but the ol’ dentist method is quicker and usually less stressful. YMMV
The glue that holds all the staples together must be some pretty high temperature stuff.
It is not holded by glue usually there is still thin layer of metal. Basically they are not cut all the way.
I’m guessing there’s enough thermal mass there to stop them getting overly hot before the component let’s loose. I wouldn’t trust them for anything where you have to heat for longer as you’ll probably be left with a whole lot of loose staples going everywhere
Usually, staples are not cut all the way thorough. So they hold on that last thin piece of metal (at leas the ones in Europe do).
I use ceramic fiber pads like those for glass fusing. They shield *perfectly* from heat, can be reused, cut any shape you want, come in any size you want and are rather cheap, although not as much as aluminum. Only drawback is that they might leave a bit of fibers or dust behind, (but you have a dry air can nearby, right ?
Just use kapton tape
Kapton can *withstand* heat, but how well is it in preventing heat transfer?
(I have plenty) but where am I going to buy Kapton tape lets say on a Sunday evening
There’s no such thing as thermal mass. Unless I’ve completely missed my physic degree. What this does is to limit the flow of hot air on the components, thus reducing the thermal power transferred to them and the air pressure. Some material have a higher thermal conductivity than other, and components made with more conductive material will transfer the power faster to their neighbor material, like the copper traces. Some components are more likely to have a higher conductivity (ratio of metal pad vs ceramic or plastic) and will likely transfer the power faster to their metallic traces. But they would stay here if the operator wasn’t using a positive hot wind to move them by mere air pressure.
Thermal mass is a concept that multiplies mass by how much energy it takes to raise that mass by a unit of temperature. A bunch of staples will conduct heat well enough to be roughly the same temperature and will soak up radiated heat and re-radiate it faster than the components near them. There will also be shielding because half of the radiated heat is outward.
See also, the bus bar technique of soldering.
Note his homage to the film “Office Space” with the Red Swingline stapler at the start of the video.
I mean, I guess if Kapton tape isn’t available…..
S’funny, nobody mentions how useful staples are when used in place of jumper wires on a breadboard, they look neat too. Am I doing it wrong?