Wireshark HTTPS Decryption

If you’ve done any network programming or hacking, you’ve probably used Wireshark. If you haven’t, then you certainly should. Wireshark lets you capture and analyze data flowing over a network — think of it as an oscilloscope for network traffic. However, by design, HTTPS traffic doesn’t give up its contents. Sure, you can see the packets, but you can’t read them — that’s one of the purposes of HTTPS is to prevent people snooping on your traffic from reading your data. But what if you are debugging your own code? You know what is supposed to be in the packet, but things aren’t working for some reason. Can you decrypt your own HTTPS traffic? The answer is yes and [rl1987] shows you how.

Don’t worry, though. This doesn’t let you snoop on anyone’s information. You need to share a key between the target browser or application and Wireshark. The method depends on the target applications like a browser writing out information about its keys. Chrome, Firefox, and other software that uses NSS/OpenSSL libraries will recognize an SSLKEYLOGFILE environment variable that will cause them to produce the correct output to a file you specify.

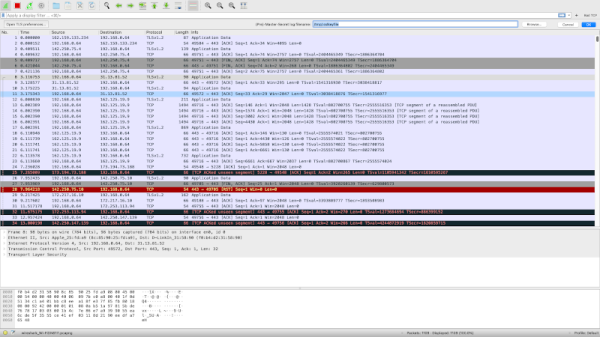
How you set this depends on your operating system, and that’s the bulk of the post is describing how to get the environment variable set on different operating systems. Wireshark understands the file created, so if you point it to the same file you are in business.

Of course, this also lets you creep on data the browser and plugins are sending which could be a good thing if you want to know what Google, Apple, or whoever is sending back to their home base using encrypted traffic.

Wireshark and helpers can do lots of things, even Bluetooth. If you just need to replay network data and not necessarily analyze it, you can do that, too.

Quick Hacks: Using Staples When Recapping Motherboards

[Marcio Teixeira] needed to recap an old Apple Macintosh motherboard, and came across a simple hack to use common paper staples as a temporary heat shield (video, embedded below) during hot air rework. The problem with hot air rework is minimizing collateral damage; you’re wielding air at a temperature hot enough to melt solder, and it can be take quite a lot of experience to figure out how best to protect the more delicate parts from being damaged. Larger items take longer to heat due to their thermal mass but smaller parts can be very quickly damaged from excess heat, whilst trying to remove a nearby target.

The sharp edges of plastic connectors are particularly prone, and good protection is paramount. Sticky tapes made from polyimide (Kapton), PET, as well as metallic options (aluminium tape is useful) are often used to temporarily mask off areas in danger of getting such collateral overheat. But they can cause other problems. Kapton tape, whilst great at withstanding the heat, tends to distort and buckle up a little when under the blast of the rework pencil. Not to mention that some brands of tape leave a nasty sticky transfer residue all over the board when exposed to heat, which needs additional cleanup.

Maybe a box or two of staples might be worth adding to one’s bag of tricks, after all more options is always good. If you’re less interesting in hacking with a hot air work station and much more in hacking a hot air rework station, here you go, and whilst we’re on reworking duff computers, here’s what happens when a Hackaday writer tries his hand at fixing his son’s Xbox.

Continue reading “Quick Hacks: Using Staples When Recapping Motherboards”

NVIDIA Unveils Jetson AGX Orin Developer Kit

When you think of high-performance computing powered by NVIDIA hardware, you probably think of applications leveraging the capabilities of the company’s graphics cards. In many cases, you’d be right. But naturally there are situations where the traditional combination of x86 computer and bolt-on GPU simply isn’t going to cut it; try packing a modern gaming computer onto a quadcopter and let us know how it goes.

For these so-called “edge computing” situations, NVIDIA offers the Jetson line of ARM single-board computers which include a scaled-down GPU that gives them vastly improved performance for machine learning applications than something like the Raspberry Pi. Today during their annual GPU Technology Conference (GTC), NVIDIA announced the immediate availability of the Jetson AGX Orin Developer Kit, which the company promises can deliver “server-class AI performance” in a package small enough for use in IoT or robotics.

As with the earlier Jetsons, the palm-sized development kit acts as a sort of breakout board for the far smaller module slotted into it. This gives developers access to the full suite of the connectivity and I/O options offered by the Jetson module in a desktop-friendly form that makes prototyping the software side of things much easier. Once the code is working as intended, you can simply pop the Jetson module out of the development kit and install it in your final hardware.

NVIDIA is offering the Orin module in a range of configurations, depending on your computational needs and budget. At the high end is the AGX Orin 64 GB at $1599 USD; which offers a 12-core ARM Cortex-A78AE processor, 32 GB of DDR5 RAM, 64 GB of onboard flash, and a Ampere GPU with 2048 CUDA cores and 64 Tensor cores, which all told enables it to perform an incredible 275 trillion operations per second (TOPS).

At the other end of the spectrum is the Orin NX 8 GB, a SO-DIMM module that delivers 70 TOPS for $399. It’s worth noting that even this low-end flavor of the Orin is capable of more than double the operations per second as 2018’s Jetson AGX Xavier, which until now was the most powerful entry in the product line.

The Jetson AGX Orin Developer Kit is available for $1,999 USD, and includes the AGX Orin 64 GB module. Interestingly, NVIDIA says the onboard software is able to emulate any of of the lower tier modules, so you won’t necessarily have to swap out the internal modules if your final hardware will end up using one of the cheaper modules. Of course the inverse of that is even folks who only planned on using the more budget-friendly units either have to shell out for an expensive dev kit, or try to spin their own breakout board.

While the $50 USD Jetson Nano is far more likely to be on the workbench of the average Hackaday reader, we have to admit that the specs of these new Orin modules are very exciting. Then again, we’ve covered several projects that used the previously top-of-the-line Jetson Xavier, so we don’t doubt one of you is already reaching for their wallet to pick up this latest entry into NVIDIA’s line of diminutive powerhouses.

Absolem Is A Rabbit Hole Keyboard Build

This is usually how it happens — [mrzealot] had been using some awful chiclet-style keyboard without much of a care, and topping out at 50-60 WPM using an enhanced hunt-and-peck method. But he really wanted back-lighting, and so got his first taste of the mech life with a Master Keys Pro S. Hooked, [mrzealot] started researching and building his endgame keyboard, as you do once bitten. It looked as though his type would have as few keys as possible, and thumb keys laid out in arcs.

And so the cardboard prototyping began, with real switches and keycaps and a split design. After getting tired of adjusting the halves’ position on the desk, [mrzealot] threw that plan out the window and started scheming to build a monoblock split. He had a steel switch plate cut for this prototype, and used cardboard for the bottom layer, complete with a little hatch to access the Pro Micro’s reset button.

Now satisfied with the 36-key layout, it was time to go wireless with a Feather nRF52 Bluefruit LE. This is where things get serious and final, with a laser-cut layered oak case and thick, blank, PBT keycaps.

Under all that plastic lies a range of actuation force levels on the key caps that (in our opinion) range from heavy to really heavy — 62 gram switches on the pinkies and ring fingers, 65 g on the middle, 67 g on the index fingers, and a whopping 78 g for the thumb clusters.

We just love the way this ended up looking, and are pretty jealous of that neoprene layer on the bottom. Beauty aside, there is some real utility here to be shared. In designing the layout, [mrzealot] created a keyboard generator called ergogen that will get you closer to your endgame without the need for CAD skills, just YAML.

Those of you who read Hackaday closely may recognize the term ‘ergogen’ from [Matthew Carlson]’s coverage of [Ben Vallack]’s guide to creating a low-profile keyboard. This is something else in the same vein.

Thanks for the tip, [HBBisenieks].

Tune Your Dish Antenna Like A Pro

It’s a problem we all have at one time or another: your five-meter radio astronomy dish gets out of calibration and you don’t have a ridiculously expensive microwave holography rig on hand to diagnose it. OK, maybe this isn’t your problem, but when [Joe Martin]’s parabolic antenna got out of whack, he set out to diagnose and repair it, and then wrote up how he did it. You can download the PDF from his radio astronomy articles collection.

At the heart of the measurement rig is a laser rangefinder connected to a Porcupine Labs interface that passes the data on to a Pi 4. This is placed on the end of a two-degree-of-freedom servo gimbal that scans over the surface of the dish, measuring its shape. After measuring and math, [Joe] found out that it’s a little bit long here and short there, he attached two cables with turnbuckles to the front of the dish and pulled it back into shape — the sort of thing that you should probably only do if you’ve got a measurement rig already set up.

The Fluke rangefinder and Porcupine labs interface combo is pretty sweet, but it comes with a fairly hefty price tag. (Nothing compared to a professional dish measurement rig, we presume.) We’ve seen a few attempt at hacking into el-cheapo laser rangefinders, but other than [iliasam]’s heroic effort where he ended up writing his own firmware, it doesn’t seem like there are any successes. A shame, because applications like [Joe]’s prove that there’s a need for one. Let us know if there’s anything we missed?

Thanks [Ethan] for the tip!

Old Printer Becomes Direct Laser Lithography Machine

What does it take to make your own integrated circuits at home? It’s a question that relatively few intrepid hackers have tried to answer, and the answer is usually something along the lines of “a lot of second-hand equipment.” But it doesn’t all have to be cast-offs from a semiconductor fab, as [Zachary Tong] shows us with his homebrew direct laser lithography setup.

Most of us are familiar with masked photolithography thanks to the age-old process of making PCBs using photoresist — a copper-clad board is treated with a photopolymer, a mask containing the traces to be etched is applied, and the board is exposed to UV light, which selectively hardens the resist layer before etching. [Zach] explores a variation on that theme — maskless photolithography — as well as scaling it down considerably with this rig. An optical bench focuses and directs a UV laser into a galvanometer that was salvaged from an old laser printer. The galvo controls the position of the collimated laser beam very precisely before focusing it on a microscope that greatly narrows its field. The laser dances over the surface of a silicon wafer covered with photoresist, where it etches away the resist, making the silicon ready for etching and further processing.

Being made as it is from salvaged components, aluminum extrusion, and 3D-printed parts, [Zach]’s setup is far from optimal. But he was able to get some pretty impressive results, with features down to 7 microns. There’s plenty of room for optimization, of course, including better galvanometers and a less ad hoc optical setup, but we’re keen to see where this goes. [Zach] says one of his goals is homebrew microelectromechanical systems (MEMS), so we’re looking forward to that.

Continue reading “Old Printer Becomes Direct Laser Lithography Machine”

The New-Phone Blues: A Reminder That Hackers Shouldn’t Settle

For all the convenience and indispensability of having access to the sum total of human knowledge in the palm of your hand, the actual process of acquiring and configuring a smartphone can be an incredibly frustrating experience. Standing in those endless queues at the cell phone store, jumping through the administrative hoops, and staring in sticker shock at a device that’s likely to end its life dunked in a toilet all contribute to the frustration.

But for my money, the real trouble starts once you get past all that stuff and start trying to set up the new phone just right. Sure, most phone manufacturers make it fairly easy to clone your old phone onto the new one, but there are always hiccups. And for something that gets as tightly integrated into the workflows of your daily life as cell phones do, that can be a real bummer. Especially when you find out that your shiny new phone can’t do something you absolutely depend on.

Continue reading “The New-Phone Blues: A Reminder That Hackers Shouldn’t Settle”