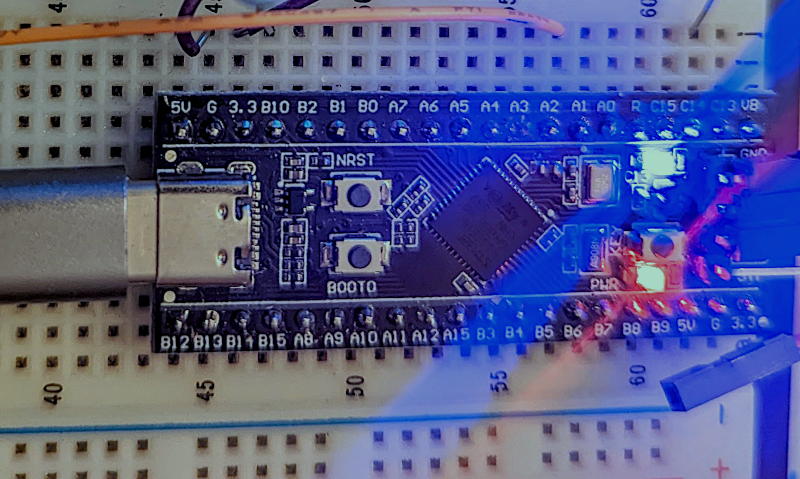
We see tons of projects with the infamous “Blue Pill” STM32 boards. They are cheap and plentiful and have a lot of great features, or at least they were before the chip shortage. I recently picked up a “Black Pill”, which is very similar but has an even more powerful processor. For a few bucks, you get an ARM CPU that can run at 100 MHz (but with USB, probably 96 MHz). There’s 512 kB of flash and 128 kB of RAM. There’s a USB type C port, and even a button and an LED onboard. The thing fits on a breadboard and you can program it with a cheap STLink dongle which costs about $10.
Of course, you then have to consider the software. The STM32Cube stuff is a lot to set up and learn but it does let you do just about anything you can imagine. Then there is the STM32Duino plug-in that lets you use it as a beefy Arduino. That works and is easy enough to set up. However, there’s also Mbed. The only problem is that Mbed doesn’t work right out of the box. Turns out, though, it isn’t that hard to set up. I’ll show you how easy it is to get things going and, next time, I’ll show you a practical example of a USB peripheral that uses the mBed RTOS features.
First Steps
Obviously, you are going to need a Black Pill. There are at least two choices but for as cheap as they are there is little reason not to get the STM32F411 version that has more memory. The DIP form factor will fit in whatever breadboard you happen to have and a USB C cable will power the board so unless you are driving a lot of external circuitry, you probably don’t need an external supply.
Unlike some boards, though, the USB port won’t help you for programming unless you burn in a bootloader. In theory, the board can do DFU if you hold down the BOOT0 button during reset. However, my board would only enter DFU mode on occasion. Reading the Internet that sounds like a common problem. The trick seems to be to unplug the USB and replug it instead of using the reset button. Press BOOT0 while plugging in the board. After a few seconds, release the BOOT0 button. That makes it a little more reliable. Then you need a DFU flash program to program a .bin file to write to alt 0 of the DFU device at location 0x08000000. All that and you still don’t get debugging.
Luckily, an STLink v2 dongle that goes from USB to a 10-pin connector is very inexpensive — $10 or less. This will let you do programming and debugging. However, there is also a trace feature that these dongles don’t support.
You can get along fine without tracing, but it is handy that you can do “printf-style” output via a feature called SWO (serial wire output) and not have to use the USB port as a serial port. If you want SWO, you’ll either need a more expensive version of STLink (with the bigger connector) or there is, of course, a hack. You can also use other similar probes like the Blackmagic probe. In some cases, you can also use semihosting, but it is better to either get the right probe, hack the SWO output, or just use the debugger. Of course, if you are setting up the USB serial port — easy enough to do — then you can use it with no problems.
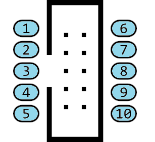 The STLink dongle I used has 10 pins. Unfortunately, not all of the clones have the same pinout. The four pins on the Blackpill, starting at the left while looking at the connector are: 3.3 V, SWDIO, SWCLK, and Ground. If you don’t mind getting power from the USB port, you only need the last three pins.
Usually, these clone adapters have a pinout on the case. For mine, the three wires I needed were on pins 6, 7, and 8. If you do draw 3.3 V from the device, be careful. Drawing too much current or shorting the power line will kill the dongle.
Another issue with the clones is that they often have out-of-date firmware loaded. You can get the official STM32CubeProgrammer that knows how to update them. Just remember to unplug the device after you update and refresh the list of programmers after you plug it back in.
Software
As I mentioned, there are lots of options and plenty of toolsets. I generally like the Mbed tools. When we first looked at Mbed, it was sort of an Arduino-like ecosystem. The IDE was online, but you could go offline with a few options. However, since then it has grown and now has a variety of tools and even a full-blown operating system if you want it. There is a way to select “bare metal” mode if you are trying to build something simple, but with something like the Black Pill, you have plenty of memory and so pushing a lot of code to it isn’t really a problem. Even without bare metal mode, the linker tries to remove things you aren’t using, so it isn’t so bad.
The bad news, though, is that the ecosystem doesn’t directly support the Black Pill. It does, however, support a Nucleo board with the same CPU. That will work and for simple tests, it isn’t bad. Sure, the pin names are wrong but you can just specify the real names like PC_13 instead of LED1. However, the real bad news is that target board has no USB support. If you try to use USB drivers, you will simply halt because the system assumes you don’t have the hardware to handle it.
There’s good news and bad news. The good news is that there is a user-contributed setup for the Black Pill. It has a more stable clock reference, allows USB, and has correct pin definitions. The not-so-great news is that it only seems to work on the Mbed IDE running locally. That’s not so bad since I wanted to use something local anyway. If you use a different toolset, you might find yourself on your own to get the targets defined. PlatformIO also seems to work as it did for the Blue Pill.
Let’s Go!
Once you have everything assembled, it is pretty easy to get a program running. Next time, I’ll show you some more fun with USB, but for now, let’s do a simple LED flasher with some output on a USB serial port. For example, you can run the “Blinky” sample in an online emulator. The problem is that printf doesn’t go anywhere useful on our board.
No problem:
#include "mbed.h"
#include "USBSerial.h"

DigitalOut led(LED1);
USBSerial usbSerial(false); // don't wait for connection

int main() {
   usbSerial.connect();  // set up serial port
   while (1) {
     led = !led;
    usbSerial.printf("Blink! LED is now %d\n", led.read());
    ThisThread::sleep_for(500ms);
    }
}
It is that simple. Just set up a project as described in the Black Pill configuration. That is:
- Create a new project in Mbed IDE.
- Right-click on the program’s root folder and in the popup window select Add library…
- Enter
https://os.mbed.com/users/hudakz/code/BLACKPILL_Custom_Targetand click on the Next button. - Open the drop-list and select default then click Finish.
- Open the BLACKPILL_Custom_Target folder and drag the TARGET_BLACKPILL_F411CE folder to the project root folder.
- Drag custom_targets.json from the BLACKPILL_Custom_Target folder into the root folder.
- Delete the BLACKPILL_Custom_Target folder from your project.
- Open the Target drop-list and click on the button with a “chip” icon on it.
- Open the USB device drop-list and select your STM32 ST-Link programmer (or the DFU device if you are going that route).
- Select BLACKPILL_F411CE as the target.
- Click on the Save All button.
If you are using the STLink, you can simply click the run button or the debug button to get started. If you selected DFU, the IDE will tell you where it left the .bin file. That’s what you’ll need to feed your DFU programmer. If you use Linux, the dfu-util line will look like:
dfu-util -d 0483:df11 -a 0 -s 0x80000000:leave -D blackpill-program.bin
About the Example
The default constructor for USBSerial causes the program to hang until you actually open the serial port which may or may not be a behavior you want. However, with the Black Pill and my setup, it didn’t reliably enumerate the serial port using the default constructor anyway.
In the simulator, they use the wait_ms function to pause, but I change it to the more modern ThisThread::sleep_for. The truth is, the above program has a full-blown RTOS with scheduled prioritized tasks and a variety of synchronization methods ranging from mailboxes to mutexes. There are also drivers for USB devices of all kinds, CAN bus, file systems, and lots more. We aren’t using any of those things right now, but they’re there. We still have a single thread and can work with it using methods like sleep_for.
Plain Old Printf
If you prefer to just have printf and the other console I/O go to the USB port by default, you can add the following code, assuming you also have the usbSerial object visible to this code.
namespace mbed
{
   FileHandle *mbed_override_console(int fd)
   {
   return &usbSerial;
   }
}
Then you can use printf instead of usbSerial.printf and the result will be the same. There’s only one catch. If you use the default USBSerial constructor, your program will hang until the USB port connects. But if you set the first constructor argument to false, that won’t happen. What will happen is when your program attempts to write output and nothing is there the stdio library will helpfully decide you don’t need to try any further so nothing will appear. To solve that, you need to periodically call clearerr(stdout) or on any other handle that you might use. There are other alternatives. For example, you can avoid calling things like printf when usbSerial::connected() returns false. Or, call clearerr when you detect the port going from not connected to connected. If you are interested, I’ve left another example on GitHub to get you started.
Next Steps
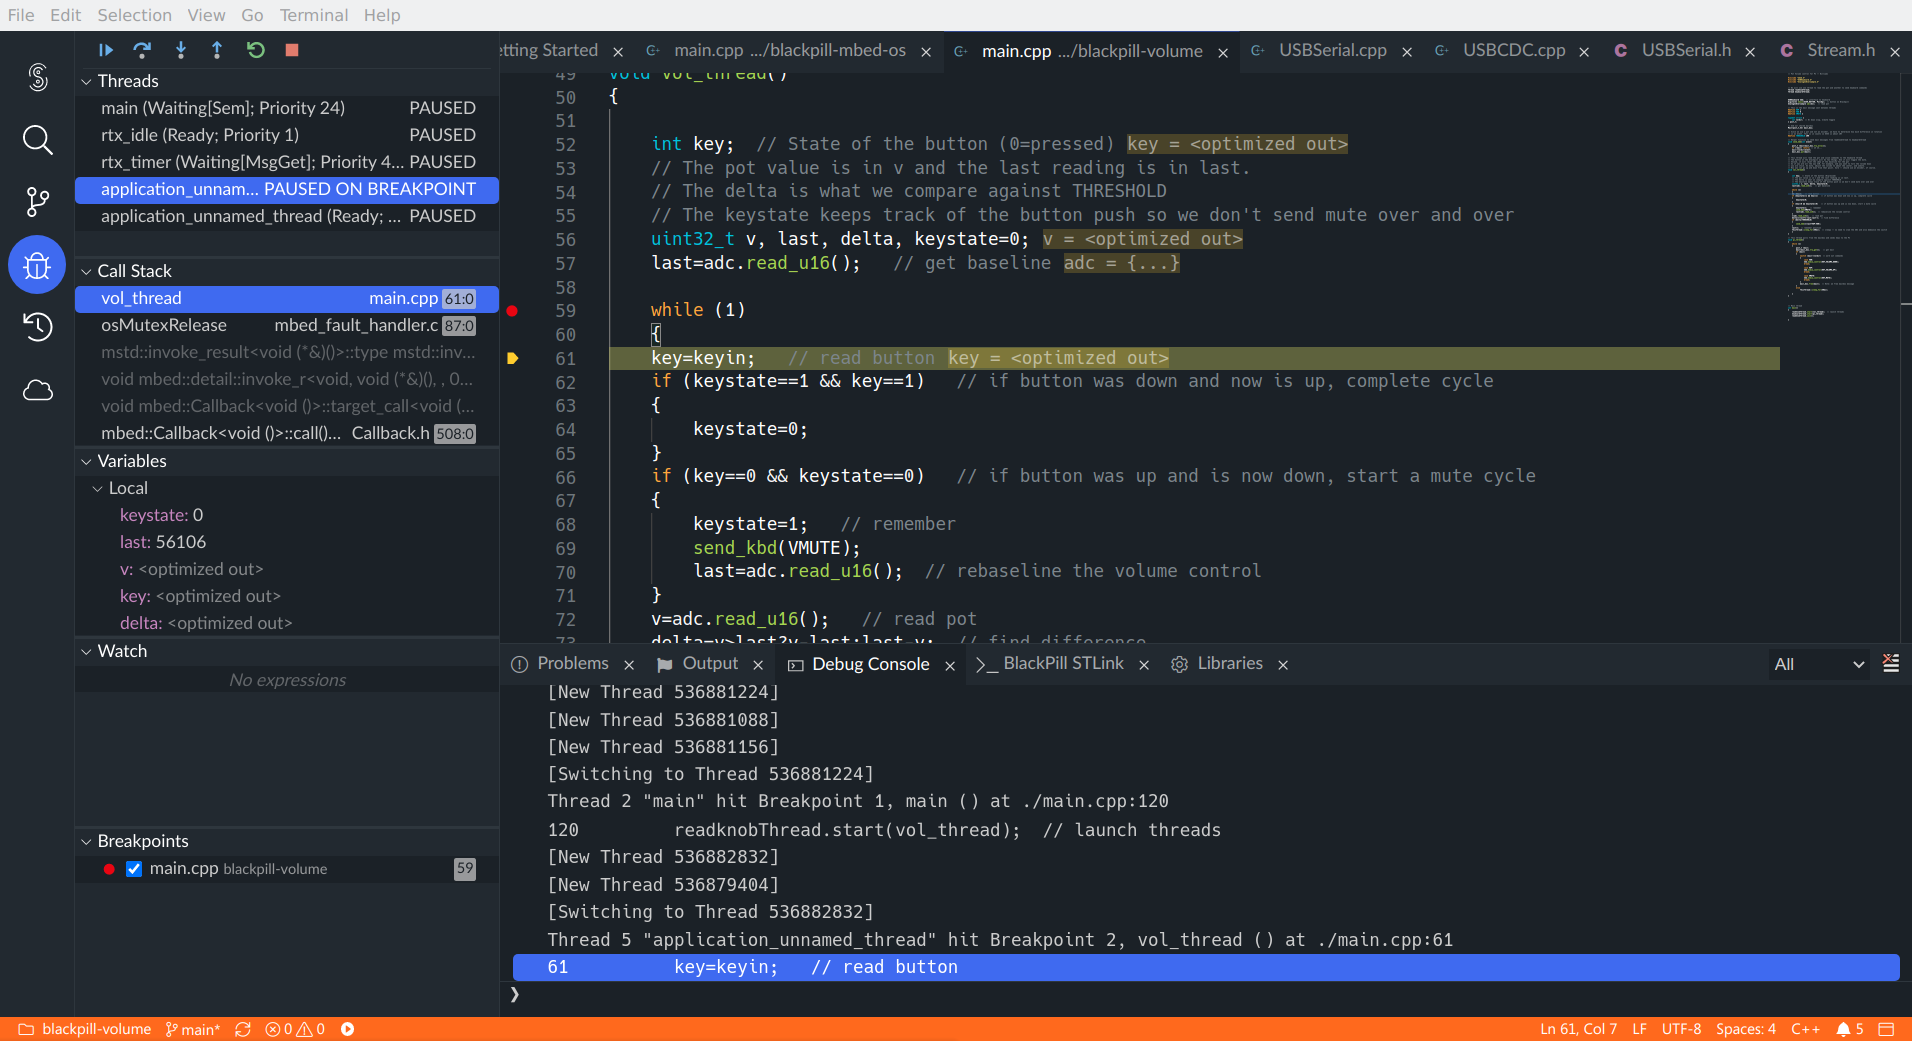
You can easily run the code through the debugger, which is quite nice. Of course, there are plenty of other debugging options since, at the core, it is basically a gdb server talking to hardware over the STLink connection.
Next time, though, we’ll turn the Black Pill into a fake USB keyboard and use it to send volume control commands to a PC that correspond to motion on a potentiometer connected to an analog input. Along the way, we’ll create some threads and make them cooperate.


It seems to me the Blue Pill / Black Pill boards have pretty-much merged these days – if you can get one. I have a small herd of them. The newer boards (even if a couple years old) are blue or black, and all have the STM32F103C8T6L chip on them. All the boards work with the Arduino IDE and the STM32Duino core.[1][2] Unfortunately the STM32F103C8 chips are unobtanium now, with no end in sight. The STM32F103C8 chip price is crazy high compared to what it used to be. Anyway, that doesn’t matter with endless lead times.[3] We’ll probably never see the STM32F103C8 series in the wild again, unless China clones them.
* References:
1. Arduino for STM32
https://www.stm32duino.com/
2. STM32duino
https://github.com/stm32duino
3. STM32F103C8T6 @ Digi-Key
https://www.digikey.com/en/products/detail/stmicroelectronics/STM32F103C8T6/1646338
Those are still “bluepills” with the F103 on them, regardless of the pcb colour. The “blackpill” has a F411, as the article makes abundantly clear.
And for several years now China *has* been cloning the F103. You basically haven’t been able to get a genuine ST part on a bluepill since well before the supply crisis. Funnily enough some of the clones are only detectable because they fix some of the genuine chip’s errata!
Interesting thanks!
Those aren’t black pill boards. Black Pill is a design by WeAct with better documentation, an “original” manufacturer, an F4x1 instead of F103.
fuzix is better
http://fuzix.org/ doesn’t saying anything about ARM devices …
I’ve been using the STM32 Black Pills for more than a year now after I kept hitting “walls” with the limitations of the Arduino ATMega chips on Arduino UNO boards.
Having all that RAM, Flash and CPU speed of the Black Pills is awesome – and switching to ARM based CPU is always a step in the right direction.
I did start with a couple of STM32 Blue Pills but the STM32F103* CPUs they use had some nasty I2C issues in silicon so not easily fixed by software. However, the Black Pills use the newer, more capable STM32F4* CPUs which don’t have the same I2C issues – and given Black Pills are so cheap now there’s no need to use Blue Pills anymore.
I would recommend people ensure that they get the genuine “WeAct V3.x” Black Pill boards.
For software development I ended up using Platform IO (a Visual Code plugin) with the Arduino framework mainly because it meant most of my existing Arduino based software projects could be simply recompiled without much change to run on the Black Pill.
Digikey is out of stock and is showing obsolete
AliExpress has them but delivery from China can take a while as I discovered.
They seem a bit more expensive compared to when I ordered them a few months back – maybe affected by the the CPU shortage – maybe the auto makers are using these in place of some more powerful chips they can’t source?
It looks like DigiKey have some Black Pill stock:
https://www.digikey.com/en/products/detail/dfrobot/DFR0864/14824968
https://www.digikey.com/en/products/detail/canaduino/26430/15760538
The WeAct Studio website has AliExpress links for their genuine boards, which use genuine STM32F411s. They seem to have quite a bit of pride in their design and they’re serious about counterfeiting – they also list a bunch of links to counterfeit boards to NOT buy. My university capstone project team is using 411s. We actually found it far cheaper to order Black Pills from AliExpress and cannibalize chips from them than to order STM32s from DigiKey. The shipping is a bit slow but it seems pretty reliable and I’ve definitely seen worse from AliExpress.
love the black pill now that the blue pill is so expensive, but I do miss the dual ADC’s
Who is still using the archaic C printf when the fmt library works a treat! Mbed is fully C++: Embrace it and don;t stay stuck in the previous millennium.
I saw cout being shifted left hello world times and I got out of there! I’m old enough not to object to a printf for debugging even if I probably wouldn’t use it in production code for something this small. Besides, the real point isn’t printf, it is getting stdout to work which you need regardless of how you write to stdout!
This! Exactly, Al… Left shifting indeed! I have been writing code for 39 years now, and professionally (or at least paid, haha) for 29, and I will only use that silly C++ I/O redirect syntax under extreme duress. Every programming language I use (Matlab FTW!) has a printf or equivalent. It reads the same in every language. I have never been able to embrace the C++ style because I can’t pronounce it in my head… It’s like trying to grok math equations when you don’t know the Greek alphabet.
What is wrong with printf()? Or you are just trolling?
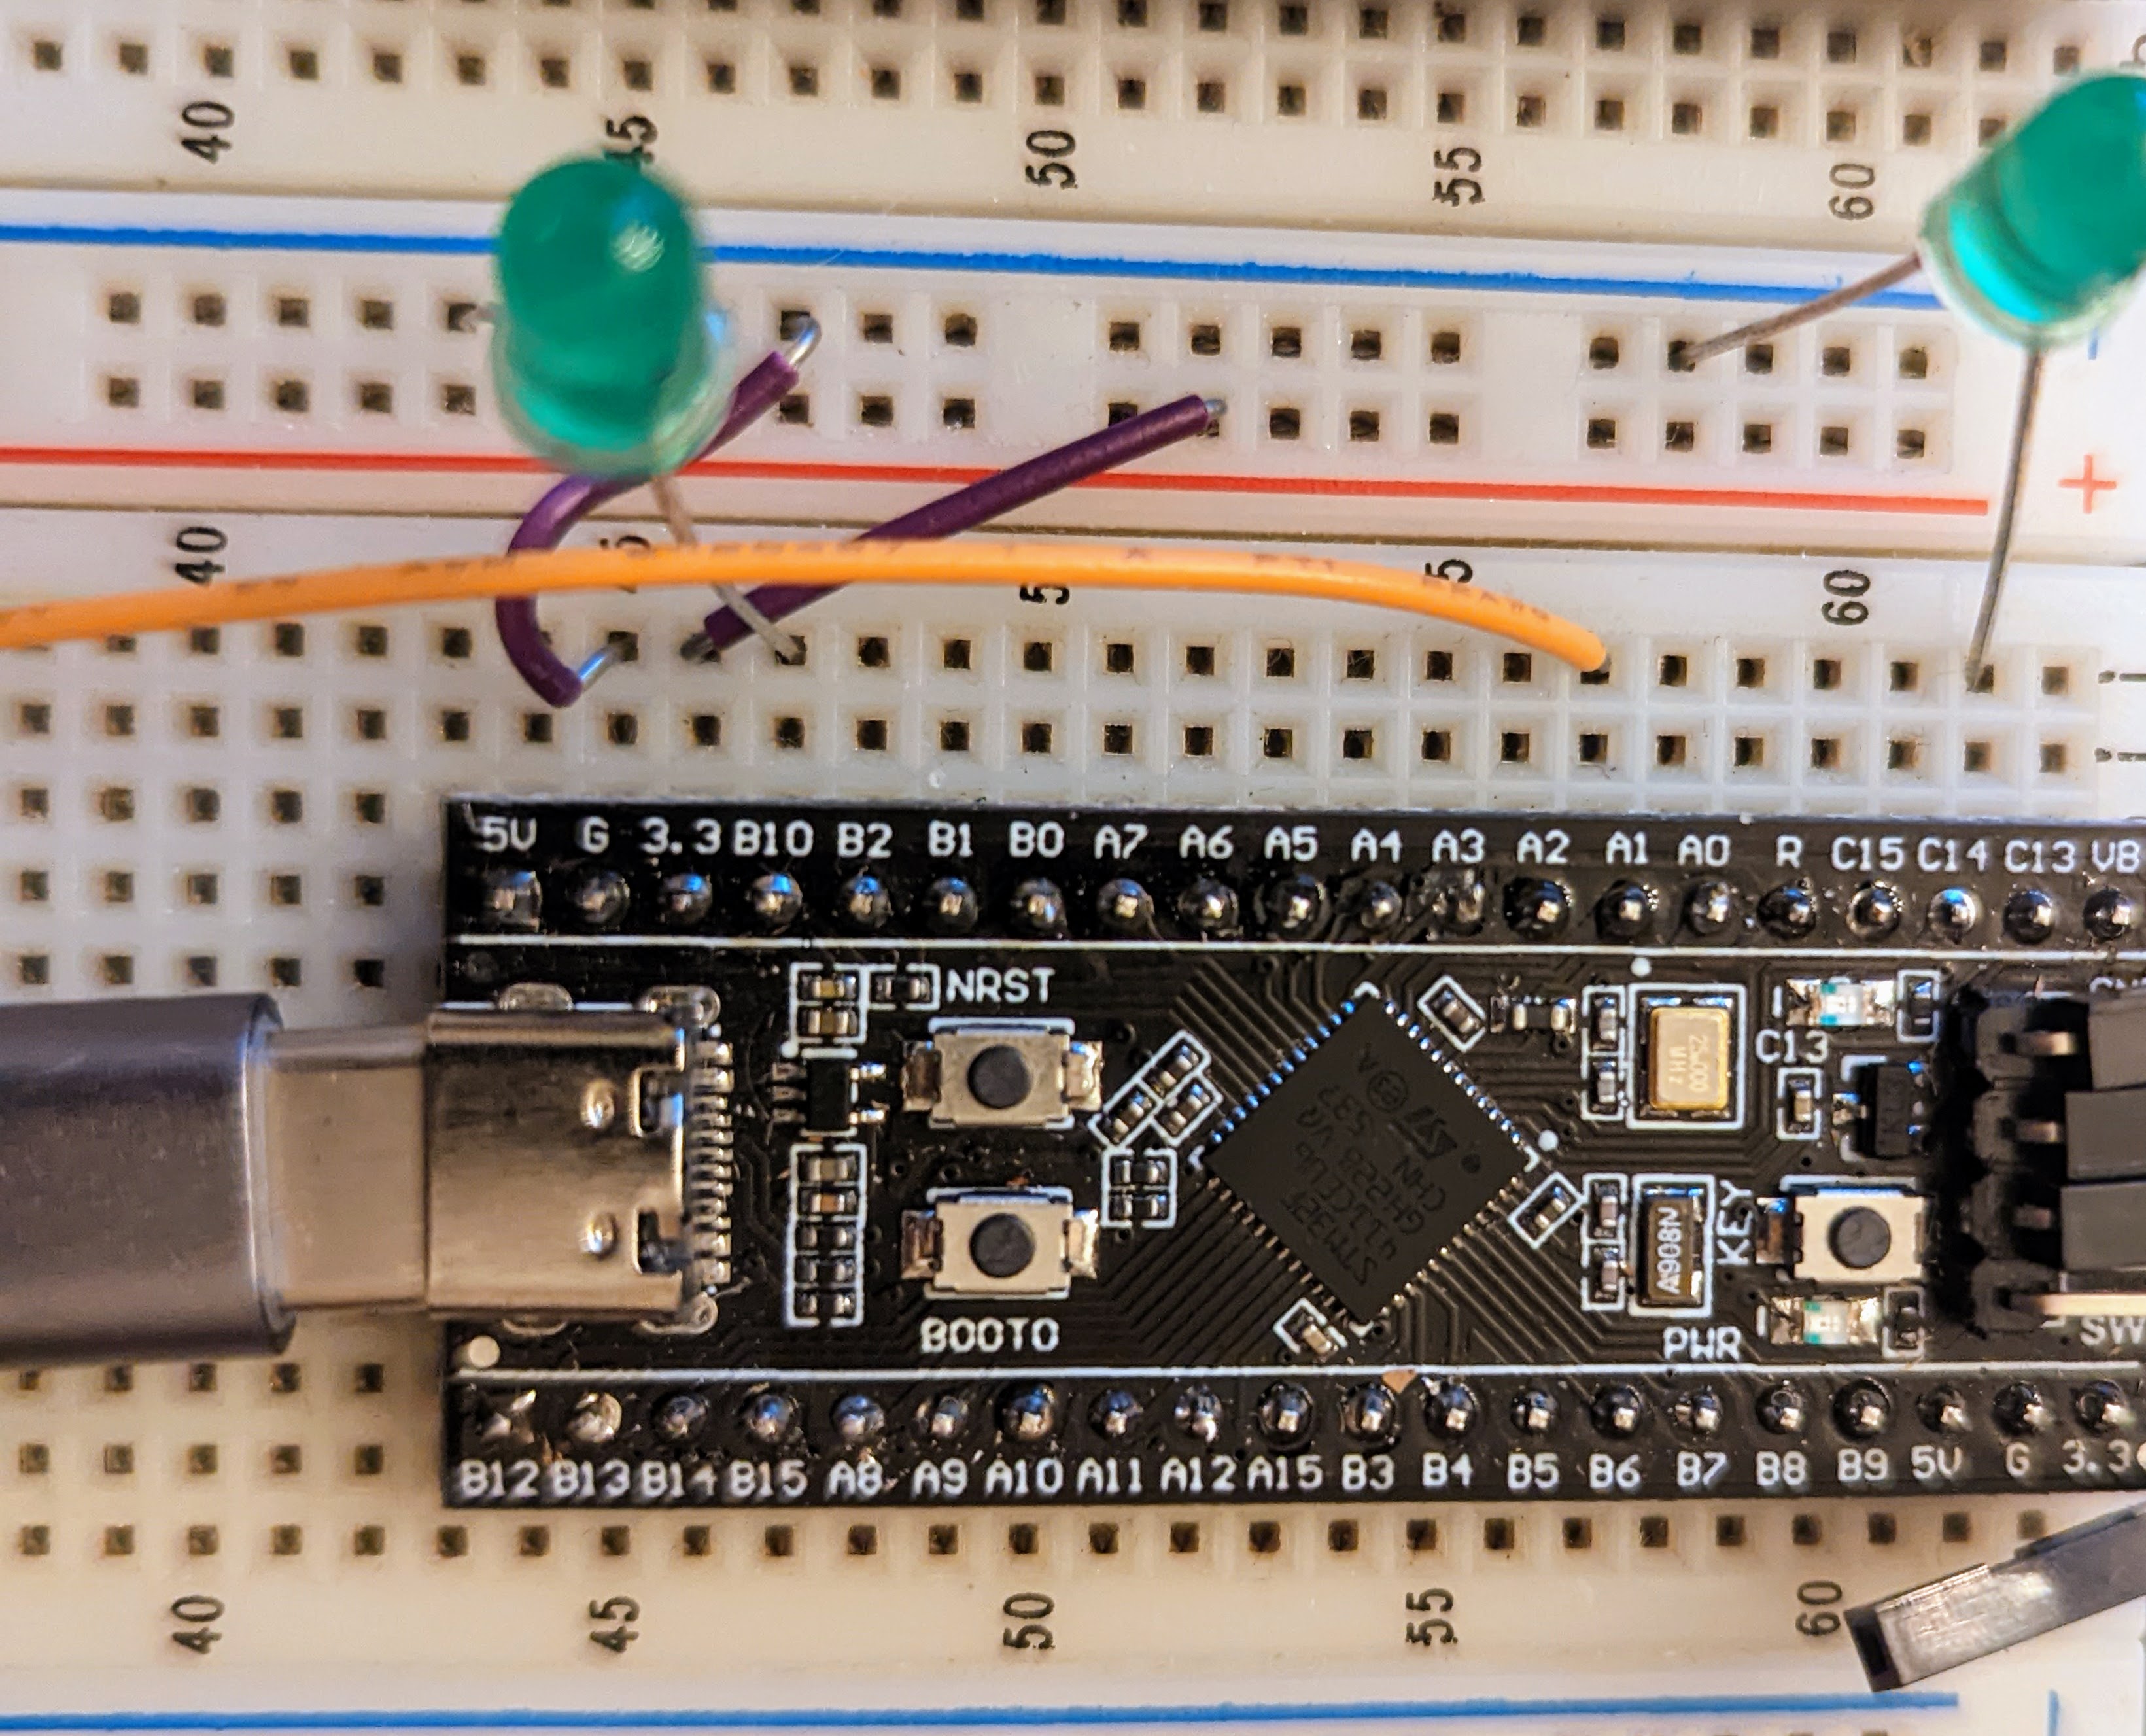
My OCD: That crooked USB connector is driving me crazy. It does not line up with the holes on the bread board.
I was too lazy to unplug the other end of it and the LEDs were playing havoc with the camera.
It’s required for every HAD article to include something to trigger OCD folks. It drives up engagement. :-)
WARNING: There is a mandatory “smoke prevention” gotcha when upgrading from Blue Pill to Black Pill:
On the Blue Pill there are 2 Ground pins (G G) next to each other on one corner of the board. On the Black Pill this has been changed to a 5V a ground pin (5V G) next to each other instead – so check before inserting your black pill into an environment that used to use a blue pill!
“The STM32Cube stuff is a lot to set up and learn but it does let you do just about anything you can imagine.”
Yeah, it used to be a lot to set up, but ST has STM32CubeIDE now, it’s a prepackaged eclipse with the target selector with all of ST’s catalog, the pin and clock mux/config GUI and code generator, … All the STM32cube stuff, accessible from and integrated with eclipse.
There’s no toolchain setup whatsoever, start it, select your (ST only) MCU or devboard and start coding.
GDB is fully integrated, a few programmers are supported, … everything is done as far as setup goes.
I’ve been using it for a few years on ST and random “china special” devboards, never looked back.
As for the learning, I didn’t find it so, functions are self explanatory enough that you can write “HAL_”, “UART_”, … and let the auto complete take the wheel.
And there’s ST training material and example c ode for every peripheral.
Also, the hardware abstraction layer is apparently standardized and some manufacturers have libs for their sensors using it. It’s no arduino, but it’s also much more flexible.
The thing is great, I think more people should try it.
https://www.st.com/en/development-tools/stm32cubeide.html
I find that autocomplete is the _only_ way to figure out what the function syntax is — the official manual has no table of contents and scrolling through it is just awful. Other than that yeah, their HAL library does its job.
If you don’t want to use some proprietary eclipse fork, Clion+OpenOCD+Stm32CubeMX is a pretty nice stack (although Clion is proprietary too). STM32CubeMX is a standalone Java applet that does all the automatic code generation for you, and then you can use your IDE of choice. Clion even includes a plugin that integrates with it. OpenOCD works with various STM32 programmers out of the box, and you get all your click-to-set-breakpoint debugging in the IDE.
As a bonus, the same Clion+OpenOCD combo works great with Rust on the same STM32 chips.
Got a WeAct Blackpill board, I got into troubles with the bootloader, which is a proprietary fork of an open source project:
http://www.zoobab.com/stm32f401-devboard
https://hardwareliberopinerolo.github.io/site/blackpill/
I have not looked at the situation till recently if it has evolved.
In case anyone cares, I started a port of ESPHome to stm32, with the intention of it being a “port expander” for an esp8266 or esp32. It might also be possible to use an Ethernet connection with the right drivers, although this is just speculation.
The stm32 runs esphome, and exposes the remote protobuf api over a uart. The esp32/8266 has an api client built in and reflects the stm32’s entities as it’s own, to any network-based clients such as home assistant.
If interested, check out to stm32 and apiclient branches of https://GitHub.com/RoganDawes/esphome
They are quite far behind mainline, and need to be updated to reflect significant changes to both the API and the multi-architecture code. But still potentially interesting, I think.
Thanks for the article Al. I somehow missed the blue/black pill train and have been needing something like this run through to figure out what’s what. I think I will stick with my old crop of “works fine to run servos and blink LEDs” Arduinos and bare Atmel chips, and throw Teensies or Pis when I need more muscle. I am glad I am not the only one who runs into annoying problem after problem when I am just trying to play around with something fun. I have to overcome nonsense like that “just one catch” all week at work, would rather not spend my hobby time on getting the bootloader to run or debug statements to show up when I am just trying to get my robot to drive at the correct speed. I create enough problems on my own. But, big thanks to the heroes who do overcome all this nonsense, write down how they did it for all of google to see, and contribute back to the codebase for the rest of us lazy bums so that eventually it really will “just work” when we open our latest shipment direct from China and plug in the USB cable.
Is the blackpill still not working with low ambient temperatures? I have one here and heard from others where you need to preheat the chip or it will not work.
The STM32CubeIDE is not bad, but i don’t like eclipse, and the build environment is just Make underneath it all. I opted for a path less travelled and use CMAKE to compile my STM32 libraries and code and use VSCode as my IDE. I don’t use platformio because all that is is repackaged Arduino with debugging (if you pay for it).
The black pill is my goto micro for my EFI project. altho it is missing CAN. I plan to use an ESP32 as a coprocessor for more IO and added CAN/WIFI/Bluetooth functionality. My project can be found here https://github.com/FL0WL0W/EFIGenie and my GitHub includes example projects compiled for the blue and black pill
If your using an ESP32 why would you even bother using the STM part? ESP32 is lower cost, faster and has more of everything.