[Thomas “Mel” Maillioux] is no stranger to the custom mechanical keyboard game — and faced with having to return to the office, they decided to whip up a sweet little macropad to both commemorate the occasion and make work a bit easier.
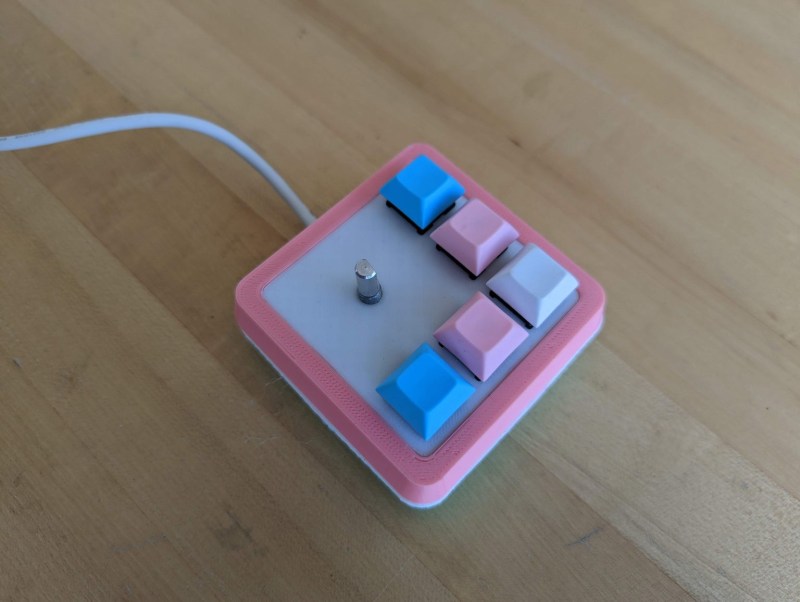
 This cotton candy-colored block of beauty was designed to pay homage to [Mel]’s favorite joystick, the TRS-80 self-centering number with the single red, square button, and it looks fantastic. They started this journey by studying the key legends on their laptop to determine which macros might serve them best, based on which legends were the most worn.
Fortunately, all the macros they wanted to use — lock the workstation, save the current, active file, minimize/restore all windows, snap windows to the right or left, and volume control — are all macro’d already within Windows, so that made things rather easy.
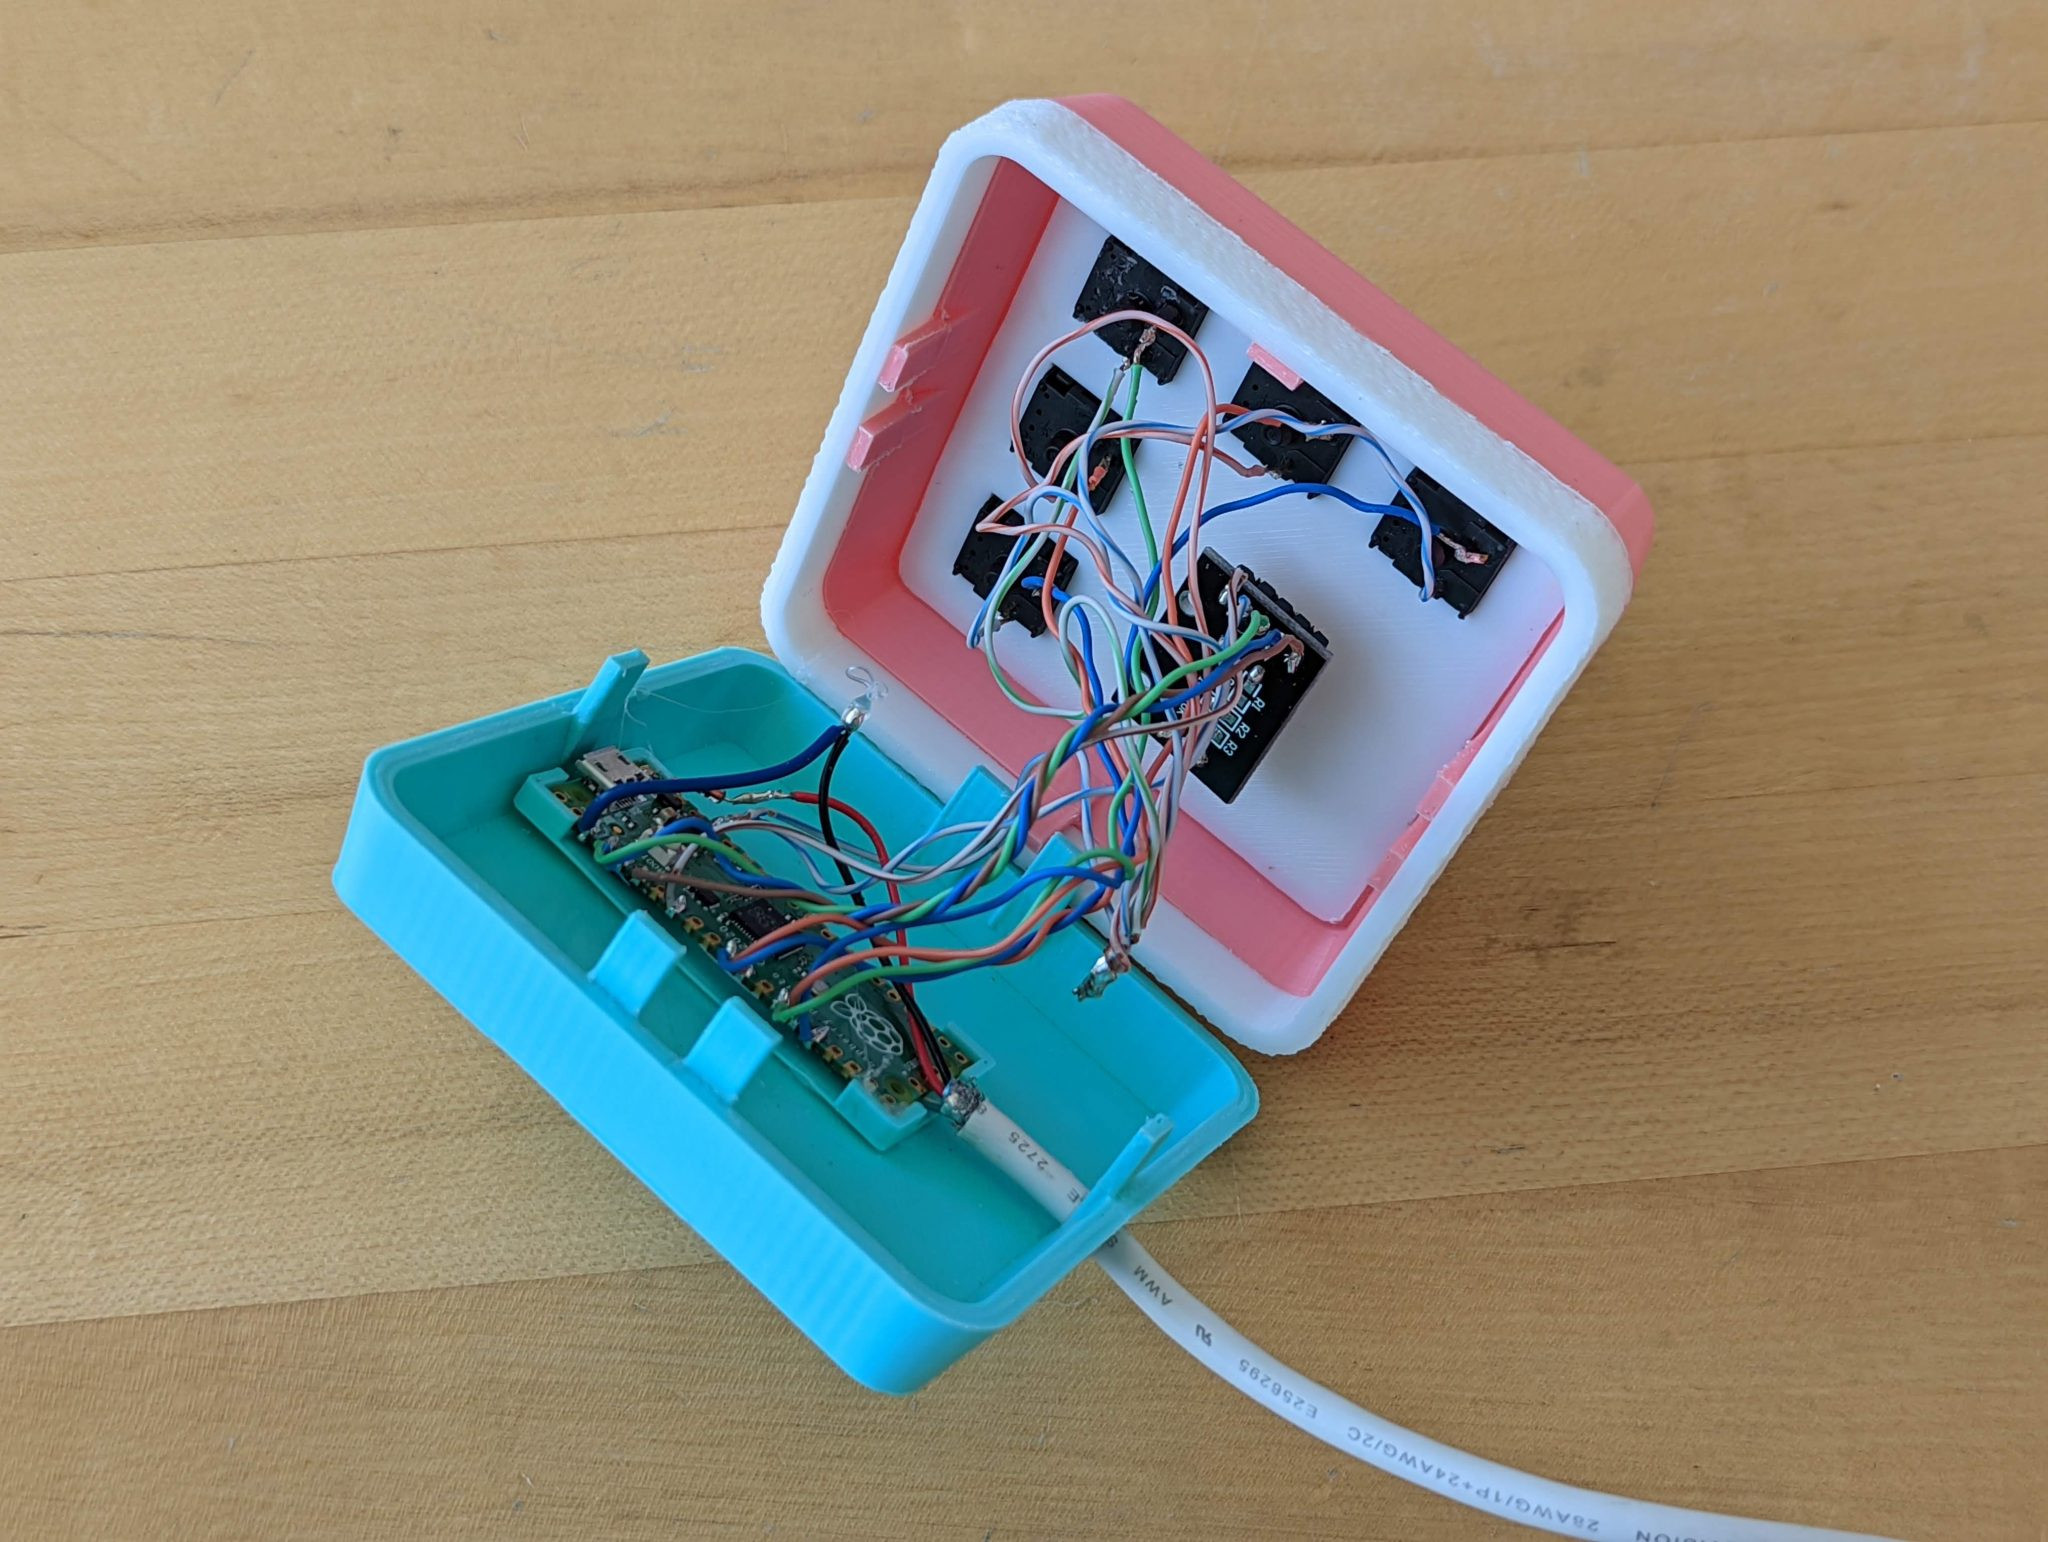
Hardware-wise, it doesn’t get much easier than a Raspberry Pi Pico, some mechanical switches, an old USB cable, and donor CAT5 pairs so it looks pretty inside and out. Plus, the handy rotary encoder volume knob will mute and un-mute when pressed. We think the snap-fit enclosure looks great, and it needs no supports to boot. If you want to make your own, be sure to check out the repo.
Okay, we lied: macro pad making does get easier, provided you have access to a 3D-printer.
Via MKKC Discord


My mama told me not to say anything if I had nothing good to say. No comment.
Let me guess, you’ve haven’t spoken eachother in years.
> Cotton candy colored
Suuure, couldn’t be anything else:)
that has total “Sapho and her friend” vibes. I loled.
The creator’s article claimed it was a coincidence that it came out in the “non-binary flag colors”, so it may not be intentional. That, or they do a bit of trolling. Regardless, they seem cool about it.
That’s not enby, that’s trans flag colors. :D Transition back into the office indeed.
I love the color scheme. I should really try something like this.
“… Eases TRANSition Back To Office” I see what you did there (and I like it), UwU.
Trans pride! 🥰🏳️⚧️
It’s nice to see another trans expansive human in this space.
heh, I like the pun in the title, that’s sweet
Love the çolor scheme on it
I think this is a case where an Arduino would have been a better fit, where you can emulate a HID keyboard and gets tonnes of I/O.
Whilst the outside looks nice, the inside is a rats nest. At the very least it needs some hot glue, heat shrink or electrical tape – it’s a short waiting to happen otherwise. Also suggest to print a knob for the variable.
Also on the GitHub we get STLs only.
Hey, thanks for your comment! Yeah, the inside of the pad is a rat’s nest – you should have seen it *before* I braided some of the cables together, it was even worse!
I opened up the key pad this morning to answer another commenter’s question about the test pads on the back of the Pico, so I will add some electrical tape and a few dots of hot glue for insulation as you suggested.
Also, the code for the key pad is available under “Pico macro keyboard code (switches, rotary click, volume control).py” in the GitHub repo! It’s probably a mess, but it’s a functional mess!
Creator: pls fix the stl base bottom file, it has DEFECTS
There is nothing SNAP.
See the pictures close up.
See the top / bootom parts fingers, nothing locks the parts in place.
No good
Hi there! Locking parts is an interesting suggestion, and I will definitely consider it if I do a version 2. At the moment though I have no plans for it but you’re welcome to tweak the design for yourself based on the STL files in the GitHub repo and the embedded Fusion360 exploded view in my write-up!
The code for the keyboard is available in the GitHub repo under “Pico macro keyboard code (switches, rotary click, volume control).py”. It might not be very well commented, but it’s a good place to start!
I’m not going back to office ;) I’m not sure what the use is of a keypad like this, it will move your hand away from mouse or keyboard slowing down your work. Turning this into foot paddles might be a thing.
Many applications, including office auto save documents so no save current file necessary :) But it’s a nice build!
Foot pedal macro pad, you say…Now that’s an interesting idea! I’ll have to explore it sometime. Thanks for your suggestion!
First off, it’s 41, and second…Bruh.
Also, that statistic is for those who have attempted, which seems a little low, if I’m being honest.
could have used Transistors to make even more puns
and some transparent material 😏
That’s trans-sisters for ya! :D
I don’t understand how data is getting back to the computer?
The USB port isn’t connected. Is this Bluetooth?
USB D+ and D- are available through test points on the bottom of the board.
TP2 USB DM
TP3 USB DP
I didn’t know they carried data. This is a game changer for me.
Is DP data positive?
Hi there! Thanks for your comments.
Yes, these two test points do carry data! It’s mentioned in the Pi Pico datasheet, sections 2.1 and 2.2. It IS a game changer!
I reopened the macro key pad to double check before answering your question this morning: TP2 is the USB DM (negative) and TP3 is the USB DP (positive). The green data wire in the USB cable for the key pad is soldered to TP3, and the white data wire is soldered to TP2.
Thank you for the reply.
I wonder why the made data -ve be DM.
I just love the possibility of not having to use the USB port, I’ve had way too many snap off and totally ruins my day. Plus it gets rid of carrying around another cord.
I saw the code but couldn’t figure out how to change how you make the functions. I only have dealt with arduinos coding so am hoping to learn the code later.
Many thanks for the reply. Great project.
So… what pronouns does Mel use? I see he/him but I also see they/them… Also, trans pride 🏳️⚧️🏳️⚧️🏳️⚧️🏳️⚧️🏳️⚧️😍😊
Good job, it looks awesome
It looks like the one occurrence of “he” may have been a mistake, I believe “they/them” is correct for the hacker as they identify as non-binary.
As for the hack itself, I dig it! Unfortunately the only PLA I have available right now is black and a temperature-sensitive spool that changes from pink to creamsicle orange when exposed to body heat, though now that I think of it that would look cool too.
Fixed, thank you for catching that.
[Ellie] caught it, but thanks for fixing it!
Hi there! Heat sensitive PLAs would definitely be fun to experiment with – please report back if you give it a shot!
I actually made some safety whistles out of it as gifts for friends and family last year, it’s interesting to see it go from pink all over to orange where the fingers grip it and the lips cover it. As a keyboard I can see it showing off the most used keys much faster than the usual plastic wear patterns we end up with on normal keyboards. I don’t have time for another project just now, but if I get around to making keycaps at some point I’ll definitely let you know! :-)
The transition back to office may be a difficult journey, with joys and pitfalls, maybe some gatekeeping too… but it always starts at coming out of home :).
Adorable project!