Typically, when we talk about wind tunnels, we think of the big facilities in use by the aerospace and motorsports industries. However, there’s nothing stopping you building a wind tunnel of your very own, and it may even be easier than you think! [Jude Pullen] has whipped up just such a design with DIY in mind.
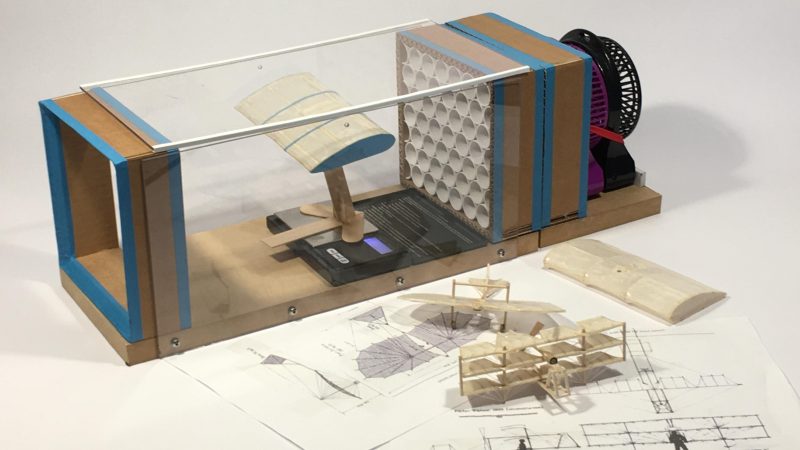
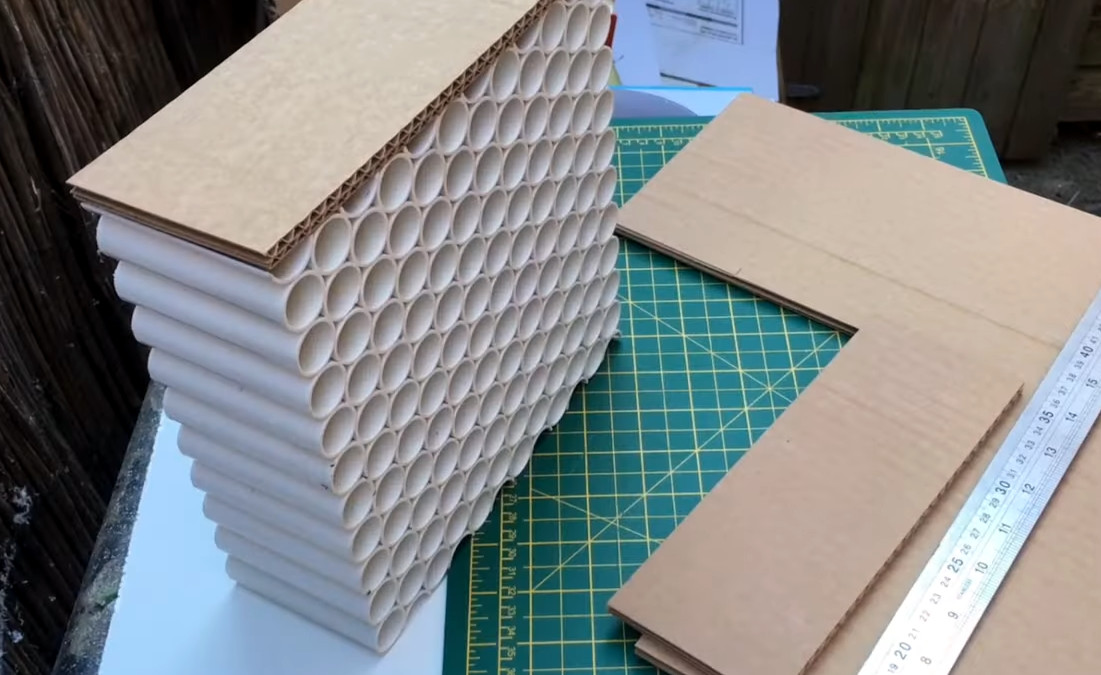
Intended for high school Design & Technology (D&T) classes, it uses relatively simple materials construction techniques. The airflow straightener is built out of PVC pipes, and the end boxes built out of cardboard. The transparent walls for observation are created out of acrylic, while a simple fan provides the necessary flow. The desk-sized wind tunnel can then be instrumented with a manometer, tachometer, and anemometer to measure pressure, fan speed, and wind speed. [Jude] also explores experiments that can be run in the wind tunnel, such as working with a small balsa wood glider and measuring the lift it generates with a scale.
 [Jude] has a very pragmatic and real-world understanding of such projects, too. He notes the difference between making things to measure, and making them to fit, and highlights the values of both approaches. It’s a much more holistic approach than simply berating students to “do it right” or “do it better” when making things in a D&T class.
Use of a basic wind tunnel is often not taught to engineering students until at least the second or third year of an engineering degree, after all the boring math and static analysis has been dealt with. However, there’s no reason high school physics students can’t understand the physics involved, and they’re more than capable of undertaking such a build. Starting such education early often nets huge benefits for individuals and their eventual careers.
Once you’ve got yourself a wind tunnel, you might want to start thinking about some flow visualization, which gets really exciting.


I’m surprised to see the fan at the intake end, where all its turbulence has to be dealt with by the straightener. I thought it was standard practice to put the fan sucking from the other end, so the straightener just deals with incoming room air which is much calmer.
while an axial fan has better suction than forward pressure if ducted without stators (there’s some interesting projects in the 3D printer space to this end), it’s also in less need of a tight seal around the fan blades in forward draft (easier to push an unconfined airstream than pull one). a simple cage like the fans shown is difficult to get a good ‘seal’ around to prevent parasitic bypass in the corners, and this is built to the lowest price-of-entry, which includes “not needing to modify the draft fans”. if modding the fans were more-in-scope for the project, a downstream fan would probably make sense
Regardless of what is the “best” way to do this, the proof would be in the pudding, which would be pictures of smoke trails through the chamber. There is no evidence given, that this thing is useful at all, even as a demonstration tool. Without a way of observing the airflow, I’m not sure what the students would get out of this.
I’m sure many of the students could produce a vape to show the airstream!
B^)
I looked into air (and water) tunnels some time ago. My take away was that it is not feasible to DIY a tunnel that would reproduce any full scale phenomena.
The Reynolds number (RE) scales linearly in size and velocity, that is to reduce the model size 10x you would have to increase the velocity 10x.
In air, to simulate a car moving at 100 km/h you would need air moving at 1000 km/h … which comes close to the speed of sound.
I thought that water tunnels might be an alternative. At 1:10 scale the fluid properties roughly “cancel” each other out so you would be able to simulate a full scale car going 100 km/h in air with a 1:10 model going 100 km/h in water.
Alone from the size of the machinery necessary to move that mich air (or water) I concluded that this is out of reach even for serious DIY endeavours.
Thanks for the education – I wasn’t sure how modeling in water compared with air, and TBH, I have no feel for Reynolds numbers. Just the same, this is meant to be a demonstration and inspiration. But without any visible indication of what’s going on, I don’t see a lot of potential for inspiration.
Its got a scale, that is a fair bit of information you can gather with random wing shapes, and pin/glue/tape a few bits of thread to the test part you will see the airflow. At least if the thread is light enough for the airspeed and has good enough contrast to the test part.
Couldn’t disagree more. I actually happen to teach this course at the high school level here in the US and I’m currently using a part of this very lab series. The wind tunnel is for more than just smoke/visualization of turbulence.
Before I get to all that, lets go ahead and point out the obvious, these classes aren’t taking place in well-funded lab space, its generally just a repurposed classroom with a fraction of what you “need” to accomplish the task. Thats okay. There are decades of labs/projects that can be repurposed with minor modern upgrades. This wind tunnel looks a lot like the 1960s Era Bob Smith metric glider lab series with some improvements. I use every resource I can to make cheap test equipment. You’ll find classics built from Popular Science/Mechanics series all over my classroom. You’ll also find really old lab equipment that’s been sitting in warehouses that I’m refurbishing bc it’s free and still works. Creativity is key, and it’s okay to model it for students that are probably going to face a world full of scarcity.
Smoke trails are generally not very practical for the classroom environment for a number of reasons, not to mention they are very hard to see in general classroom lighting. You can work around most of these issues, but the juice just isn’t worth the squeeze in my opinion.
A lot of science can be possible using just the scales. The kids are doing more than just recording observations, which is what smoke/visualization is accomplishing, but if visualization is all you care about, do it the original way…break out thread/yarn. A little superglue and a couple dozen pieces of hi-vis thread and you’ve got everything you need for that.
Yes, that’s fine – I thought about using thread after I mentioned smoke. But my point is, what is supposed to be the take-away if there is nothing to observe?
“You’ll find classics built from Popular Science/Mechanics series all over my classroom.”
I an a science teacher and was wondering if these Popular Science/Mechanic projects are all collected some place or publication?
I guess we just have different goals here. I don’t deny that a lot of the effects “scale down” well enough to be educational. My goal was more along the line of verifying the results of CFD simulations were it would be important to correlate the results of the scale “simulations” to full scale models.
We built one of these for my school aged child. Much larger and included as simple lever arrangement that would show a crude representation of lift generated by the wing in the chamber. That way they could compare wing shape and attack angle efficiency. It was a lot of fun. I used a large 36″ exhaust fan I had and we included a reducer to about a 12″ tunnel.
If you look at some the Pitsco kits, or the old Bob Smith reprints of the Balsa Glider labs, they give plans for making a wind tunnel. They place a box fan at the intake, that’s probably at least a tangential inspiration for this design layout.
I’d agree. Sucking and blowing are not opposites. Blowing has particles, and so, has direction, sucking not. You can’t direct a stream of suck through the the air. As a result a section that sucks air, is more likely to be higher in uniformity.
This is the principle that propels those old pop boat toys.
“You cannot direct a stream of suck.” I’ve been looking for a concise way of saying this. +1
When I worked at NCAR, I saw their 1 meter diameter wind tunnel, (not in use at the time). It was used for testing nacelles mounted on research aircraft.
I also saw a much larger wind tunnel (not in use) on the property of Dulles Airport.
FAA owned?
I’d like to urge critics to take a look at the Wright brother’s 1901 wind tunnel. Yes, this is is a very crude wind tunnel and likely can be significantly improved. I’d use plastic soda straws for the air flow alignment, but that’s only because they’re cheap and all the same length when you take them out of the box.
My initial reaction to this was “Mehh” but I completely agree with Jude Pullen after watching the video. My initial lukewarm response was simply how basic it is. But when I listened to the statement of purpose I was saying, “Yeah!!!” It’s a practical, low cost version of the wind tunnel that got humans in the air.
I think joss sticks in the tubes would likely provide effective smoke trails. Another option is Schlieren imaging which would provide more detailed images of flow and greatly assist with refinement of the build.
Please go to wright-brothers.org and look at the photos of the 1901 wind tunnel replica. This is fundamentally the same, just different materials.
A basically similar designs appeared in the Estes model rocketry magazine, decades ago. It was somewhat larger, plywood, and used a squirrel cage blower not only for greater velocity but because, theoretically, the turbulence from that was easier to damp out than from fan blades.
Wow! I turned up the party late here, so many useful and interesting comments – thanks to those who posted – really appreciate the feedback.
Where to begin. OK, so there is a lot of what about this being ‘better’, and I get it, but the brief is about doing things on a budget. It shocked me to learn that in some schools, there is less than £1/$1 per child per year for Design Class. So this project is not able to ‘afford’ smoke machines and the like. Also, as one commenter pointed out, you could use e-cigarettes, or joss sticks, but it’s not that worth it.
However, the ‘suck’ vs ‘blow’ debate is a really interesting one. I actually gave this a test and put the fan at the front – yes you get a more stable flow, but it’s also about one 5th of the flow rate on the flow meter – which renders it useless. I also (just for fun) connected up my vacuum cleaners, to make the point that ‘flow’ and ‘pressure’ are two separate things to be aware of. Fans have a lot of flow, but not that much pressure, vacuum cleaners are the opposite, so this also ‘failed’ to use useful.
In the instructable I did also add a note that strong could be used, and when I worked at Dyson, many small pieces of cotton thread were placed on air-moving devices, and this is the simplest way (as opposed to smoke – also a problem in schools) to do it, so thanks for the comments on this also.
Hope this does not come off as ‘defensive’ – I 100% get this is not a NASA-test-rig, but it’s trying to get something for £20. If you are interested I have some other projects with a similar ‘constraint’ and it’s quite interesting to see what you can and can’t do for say £100 max.
If nothing else, gives you a newfound respect for teachers…and the ones who go the extra mile. Hope this helps, and please keep sharing tips, comments and suggestions – all are welcome =)
Update – I tested the ‘blow’ vs ‘suck’ question. Results are in:
https://www.instructables.com/DIY-Wind-Tunnel-3/ (scroll to end)