You can find a lot of strange things inside IC packages. For example, the Dallas DS12885 and DS12887 real time clock “chips” were available in a large package with an internal battery. The problem, of course, is that batteries die. [New Old Computer Show] wanted to restore a machine that used one of these devices and was able to repair the device. You can see two videos below. In the first video, he replaces both the battery and adds an external oscillator which would be necessary for the DS12885. However, he actually had the DS12887, which has an internal oscillator, something the second video explains.
The repair used a PCB he ordered from Tindie. However, the board is only part of the problem. You also need to disconnect the dead battery which requires a Dremel and a steady hand.
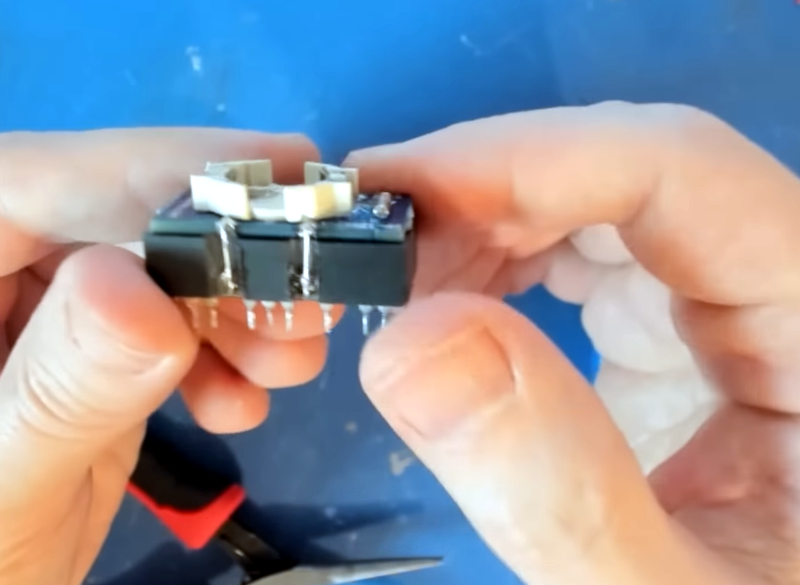
The board fits on top of the IC — technically, it is more of a module than an IC — and solders to some contacts exposed by the Dremel surgery. It looks like a hack, but then that’s the way we like it.
In the second video, he uses clear nail polish to protect the exposed wires. Someone in the comments mentioned liquid electrical tape, but we might have been tempted to just coat it with hot glue or — if we didn’t want to take it apart — epoxy.


I did this some years back just with a carving knife since my Dremel had broken, sloppily soldered a couple wires and a cr2032 holder. Rather…inconvenient when it’s still soldered to the board lol.
I also did this for years to revive printers used in pasteurizers that must log temperature every 5 minutes for a 30 minutes cycle. The original battery lasted in some cases nearly 20 years! I also like the look of these hacks. Plus , it makes you look like a genius when you tell management that you can revive that dead chip and they don’t have to spend 15-20k to buy an up to date machine because support has been dropped by the manufacturer long ago and the chip itself is no longer produced and any remaining stock has the same issue this one has, its battery finally gave out.
these Dallas clock chips are still made, though. there’s no need to perform surgery on one to fake being a hero.
https://www.digikey.com/en/products/detail/analog-devices-inc-maxim-integrated/DS12887/956874
“to fake being a hero” where TF ist that kind of attitude coming from?!
Even if they are still made:
1 – Is it cheaper to piggy back a battery on an otherwise working clock?
2 – If you piggy back a battery, you know you’ll never need to change the clock again, just the battery that you can get from your local supermarket, no tools required, 30 seconds job, so long term maintenance win.
Case in point, this is probably why ST created the TIMEKEEPER/ZEROPOWER SRAM chips with detachable battery+crystal in the form of a “SNAPHAT”.
Here’s my video from two years ago: https://youtu.be/xwVfI_W58tk
On his original video, I commented that the “third-party site” is Peter Wendt’s page – the first published modification of the Dallas RTC modules: http://www.mcamafia.de/mcapage0/dsrework.htm
PS/2 systems with a Dallas module (Model 25, 286, 30 286, 35SX, 40SX, 55SX, 55LS, and 65SX) and any microchannel clones cannot use replacement RTCs with a ‘C’ in the part number (i.e. ‘DS12C887’) because that signifies a Y2K-fixed module that correctly rolls over the “Century Byte” register being at offset 32h. IBM moved the “Century Byte” register to offset 37h on the PS/2s (both ISA and MCA).
This is the main issue for most Sun Microsystems computers. I have repaired many SPARCStation 5, 10 and 20’s utilizing this method.
I remember doing this with the one SPARCstation that I had in the early 2000s.
These Dallas parts were 10 year time bombs ticking away in many instruments.
A common problem in Tektronix equipment of the era.
For the Dallas chips that don’t use have a RTC, you can sometimes replace them with an FRAM on a SMD to DIP adapter (It would be a drop-in replacement if they still made the DIP FRAM chips…)
I did it with my Tek SG5030 leveled sinewave generator tjat had two of them.
Apparently it also works on the Tek 2400 series scopes that use a Dallas chip too.
I also tried making my own replacement with the RTC, but the secret sauce chip is not freely available and expensive when you do find them.
One day I’ll revisit it to see if a micro can do the job. I’ve got Tek TDS784D and a TDS794D that will need new batteries soon.
I will never design one of those into a product. I became responsible for a legacy product that used one of those Dallas parts, and it was a constant reliability trouble spot. My preference is an RTC chip and a socketed coin cell. Less expensive, fully replaceable battery and only a slight increase in PCB area for significantly incresed reliability. When I redesigned the product, I eliminated the Dallas module.
I liked and appreciated the video. However, I don’t understand why one would risk a vintage motherboard by unsoldering the defective part and then soldering this hack back into place.
A far better approach, in my opinion, would be to remove the Dallas part and replace it with a decent dip socket. Then, whether your solution is a hacked module or a brand new part, replacement is simply a matter of plugging it in. Future replacement presents no risk to the motherboard at all.
If the leads of the hacked dallas part are too coated or mangled to plug easily into a socket, I would solder the hacked module to a dip header… and plug the assembly into the socket.
I just refurbished an old gambling machine. One of these timekeeper-chips was I side the machine. 30 years after the manufacturing of the machine the internal battery was drained. I was able to dreml the DIL-casing of the chip down to the battery and solder a fresh CR2032 battery to the blank contacts. After a few reboots of the machine it worked again.
Dunno why people want to cut up a Dallas chip to add a CR2032. The chips are still made and on the market plus there are modern replacements.
Not all of the part numbers are still made, especially the timekeeper ones, and if you do manage to get one with a recent datecode, they can be VERY expensive…
Check Mouser and Digikey, I’ve seen prices in excess of $100 per part….
Some of these models (such as those used in the Sun5) have a unique ID burned in to NVRAM, which is used for licensing/ID purposes.
That said, this guy has done the hack the hard and messy way by grinding the side. These ICs have the battery laid on top of the IC inside the package. Grind about 0.5mm off the /end/ of the IC and the battery terminals are presented to you, sticking out, at a decent size. Dead easy to solder a CR2032 holder (or similar) there.
I remember being fascinated as a kid by so-called “NVRAM” (Non-Volatile RAM) and thinking it was super high-tech, not realising that it was basically just battery-backed-up and often one of these Dallas DS1287, DS12887, or similar chips with an embedded long-life battery.
Decades later I, like many others, have come across these repair resources and refined the process of modifying and adapting these chips, and here’s my explanation and demonstration of the same thing from the perspective of the IBM PS/1 Model 2011 PC from 1990: https://youtu.be/k_n7FxaBlq8
This is an ongoing project, as I go about trying to demonstrate a series of repairs and upgrades (and soon, hopefully, some hacks).
Nice hack, but I wonder how hard it would be to replace the battery with a supercap and something to charge it when the host system is on.
I’ve also done this a few times and documented it too (video) https://www.youtube.com/watch?v=qUNdTUPj_us
(gallery)
https://imgur.com/gallery/Xzllw
Isn’t it risky to leave the drained battery inside? Very often old batteries release corrosive substances, and destroy surrounding tracks and components. So the battery left inside will maybe someday also release unwanted corrosive chemical?
As others have noted, this is decidedly “old news” and something that somebody with older Sun systems had to get used to doing. One of the issues was that the device (Dallas, later ST) contained the system’s MAC address (which, IIRC, applied to all NICs in the box) and while it was easy enough to find a model-specific NVRAM dump on the Internet one had to patch it if there was any possibility of more than one system of the same type on the same Ethernet segment.
Once one did have the right image, it was a fairly easy job to key it in using Sun’s OpenBoot commands- although these tended to be unintuitive to those unused to Forth. I’d note at this point that substantially the same code ended up in some Macs and at least some PPC-based IBM systems, before finally riding off into the sunset as part of the OLPC; however its legacy survives as the ARM DeviceTree (credit to Mitch Bradley for his hard work over the years).