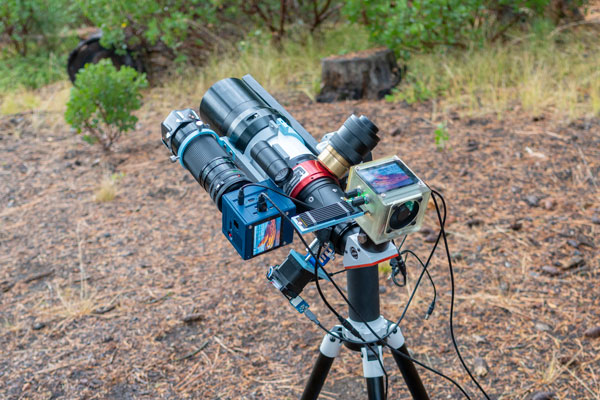
Ever since an impromptu build completed during a two-week COVID-19 quarantine back in 2020, [Will Whang] has been steadily improving his Raspberry Pi solar photography setup. It integrates a lot of cool stuff: multiple sensors, high bandwidth storage, and some serious hardware. This is no junk drawer build either, the current version uses a $2000 USD solar telescope (an LS60M with 200mm lens) and a commercial AZ-GTi mount.
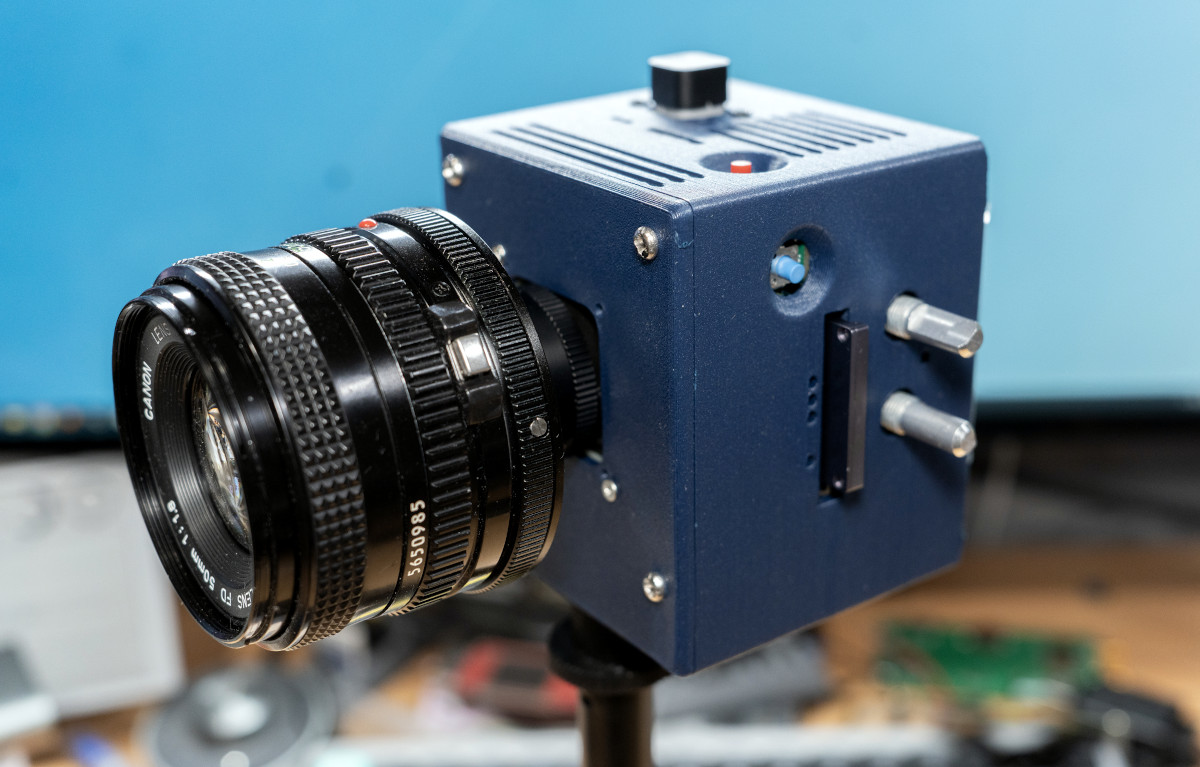 He also moved up somewhat with the imaging devices from the Raspberry Pi camera module he started with to two imaging sensors of his own: the OneInchEye and the StarlightEye, both fully open source. These two sensors feed data into the Raspberry Pi 4 Compute Module, which dumps the raw images into storage.
Because solar imaging is all about capturing a larger number of images, and then processing and picking the sharpest ones, you need speed. Far more than writing to an SD Card. So, the solution [Will] came up with was to build a rather complex system that uses a CF Express to NVME adapter that can keep up, but can be quickly swapped out.
Unfortunately, all of this hard work proved to be in vain when the eclipse came, and it was cloudy in [Wills] area. But there is always another interesting solar event around the corner, and it isn’t going anywhere for a few million years. [Will] is already looking at how to upgrade the system again with the new possibilities the Raspberry Pi 5 offers.


Of all the interesting things about this, “uses a raspberry pi” was the thing to highlight in the headline?
“Built From”. Who woulda thought you could build all that from an RPi? Yes. Very tiring and makes my back ache.
All that money and time, and it looks no different than if I took my phone and took a video.
There are already news of people “whipping” out their cell phones without a solar filter to take pictures of the eclipse and ending up with damage to their camera. Also his setup is on a nice steady tripod for a no-shake video and there is no annoying audio from people talking nearby. I think this a great build and has a wider range of capabilities in image capture and processing (which is what solar and astrophotography is about) than a cellphone has. This is a build for some serious science not social media snaps.
The youtube video on this page is not the only or the most impressive result; look at the stuff on the linked webpage. There’s some full-disc shots that are better than what most people including myself could get with a regular camera and a long lens, much less a phone.
I get that you’re a photography enthusiast, but you still don’t need to put a four megabyte 10 Mpix image for your title image. Most people only have 2 Mpix monitors, and most people can’t physically see that much better from a typical viewing distance anyhow. I got a flashback to 56k modem times watching that thing roll onto the screen.
Or at least encode it using progressive scanning, so the image appears at once and then gets sharper as it downloads more data.
It can help if the interesting bit you’d want as a photo is on a corner.
And I suppose fun might have been the driving factor for the author to build this. :)
I didn’t quite understand – would you elaborate?
I think I am the one who misunderstood: my bad!
I thought you were saying that there was no point in capturing such high-resolution photos at all. So I thought that even if the photos were captured large, the interesting area could be smaller if the photo is cropped.
But you were only referring putting such photos straight as the cover image on a website. I understand and agree: thumbnails are here for that purpose.
As a side note: if the image you’re displaying is not 1:1 with the pixels on your monitor, the actual “resolving power” of the image becomes about 0.7 – 0.9 times your monitor resolution, depending on the anti-aliasing and resampling algorithm used by your web browser.
So a 1080p monitor is really showing you between 750 – 790 lines of actual detail when the image is resampled to fit, in order to avoid moire effects. That’s another reason why using overly large images for web pages is pointless – the image would be sharper if it was small enough to fit without resampling. On better monitors, it wouldn’t fill the entire screen, but hey you have to trade off somewhere.
You think photographers are unlikely to buy 4k monitors or something? Plus, it takes way less time to load on a modern connection than a fullscreen image used to on dial-up.
Most people don’t have 4k monitors, no matter what you seem to think. The number is growing but slowly. Even if they did, they aren’t viewing the image at full size by default, so this fails in that point as well. Even if they were, a massive number of people don’t have connections over 10MBit, let alone whatever you are thinking of. In summary, no, that’s stupid.
I have a 100 MB line – but that doesn’t help because the connection to the server is slow coming from somewhere overseas.
What makes you think that “most people” are the target? For a page that’s specifically meant for photography enthusiasts or photographers who want to see lots of pictures of the tools for and results of imaging the sun with complex, expensive, partly-homemade technology?
I agree that it’s not good practice to make bloated pages, but the images load after the rest of the page is already displayed, so it’s not like you can’t immediately begin reading. That’s what I would have done last year when I was still on DSL. I could point out that there’s over 100MB of content on that page, and if any image deserves to be full-resolution it’s the title image! If you want to cut the size, replace some of the others with thumbnails. Are there better ways to code a page? Sure. But I am just happy it’s not using eye-searing colors, tiny font, and confusing layout. Or blink and marquee tags…
As for 4k monitors, anyone editing photos or videos may like a color-accurate wide gamut monitor, preferably with high resolution so they are more able to edit at 1:1. If they’re professional, that’s just an expense that may pay off fairly soon and last a fair length of time. If they’re a hobbyist, it still probably won’t be the largest expense they’ll be faced with in photography. Two years ago, I paid $270 for a monitor like that, and I am under the impression the current price would be closer to $200 for any of the various monitors which use the same core hardware as what’s in mine. I do hope you aren’t planning to reiterate that “most people” won’t spend that much, because “most people” also aren’t going to spend the modern cost of other photography gear, nor the cost of the things in this post. They’ll use a cell phone if they’ve got one.
There’s diminishing returns with bloating up webpages with huge images. A quick back of the envelope calculation gives your average person a vision of about 0.25 mm per pixel or roughly 100 DPI over 3 ft of distance to your monitor. For my 27″ monitor that comes out as 2000 pixels wide, which is pretty close to standard 1080p resolution. Five times as many pixels doesn’t make the image much sharper, because I wouldn’t see it – it just makes the website five times slower to load.
Sorry, that was 24″ not 27″. The highest resolution monitor in 24″ size I would buy is 2560 × 1440 (QHD). Buying a 4K monitor would be a waste of money, since I’d have to hunch over my desk to see the extra resolution. Coincidentally, there’s very few high resolution monitors even made in 24″ size that I could buy – and I don’t want a bigger monitor because it would take up too much space on my desk.
Well, if you were like a lot of modern photographers, you might be willing to clear some room on your desk and sit close to a 28″ panel in order to more easily view your camera’s output. It happens that the preview in a very popular editing software is only correct when viewing at native / 100% with no scaling, so it helps if you can see more than a small portion of your image at that scale, even if you don’t look at individual pixels generally.
In a work environment, even one unrelated to photography, it’s recognized that physically large monitors can be a benefit to productivity for some jobs. E.G. 34 inch 3440×1440 ultrawide monitors for GIS and drafting work.
That said, I have a 15.6″ laptop which I chose to get with a 4k screen because the 1080p option was known to have poor quality. As it happens, I can tell the difference, so I can conclude my eyes are doing better than 1080p at least at the distances a laptop is generally used.
Naturally. At typical laptop distances and sizes, which is like reading a newspaper, your eyes will easily discern 300 DPI, or roughly 4K resolution. For desktop monitors and televisions, the extra pixels are wasted unless you have a gargantuan screen.
Web pages (in my mind) should show a lower res image, and then link to higher res if you want to go there :) . Like the NASA site. My two cents…
Also the lowest res monitor I would buy at this time is 2K (QHD). Minimum display size for me is 32″ for a desktop. No real reason (for me) to go smaller. Not that expensive if not needing the max hz like the gaming crowd wants to have.
I for my part appreciate that the creator put in the time and effort to thoroughly document his project, and published it as a blog post instead of a YouTube video.
Yes, smaller images and/or better compression would benefit load times of the website. But that’s quite the nitpick to spend that many words on 🙄
It might seem like a small problem to complain about, but it’s part of the reason why software and websites keep bloating and bloating every year. People just don’t care, or even understand that they should care.
I might forgot to change the export resolution, this is the first time I use github to host the image instead of Imgur so…. yeah, will update that later.
I see why it looks nice on my 5K monitor though.
I find it interesting he had to make swappable cards. Not that it isn’t a good idea, just curious as to how much he needs to capture. If my hand wave math works out, at 300MB/s he can take close to 2 hours of footage with a single 2TB NVMe, which cost about $40 when you go shopping. (I know that’s not the amount he is capturing, just the maximum he could expect with SD; and he didn’t say SD wouldn’t work for the capture, just make transferring it laborious).
Just as he says technology moves on, and QLC flash is shaking up storage.
Mostly transfer the data out of RPI like a homing pigeon carrying sd card is faster then internet.
For the 2TB NVMe though, those low cost QLC can’t sustain 400MBytes/s write after you pass the SLC caching. SD couldn’t work because both speed and expensive card only gives you 300MByte/s
FWIW there’s still plenty of TLC out there. But it might be closer to $80 for that capacity, which is price parity I suppose. Wonder if you could set a 4T QLC to run as if it was a smaller lower-depth one.
Nice to have a focus (pun intended). I tend to jump around from project to project and once in a while, I might actually complete one! :) Looks like an interesting project.
I can understand that SD cards are not for ‘continuous’ writes and slow. Need other flash media like portable SSD or as above NVME. The ‘usual’ problem with RPIs is to find the ones that the RPI doesn’t choke on power wise. Hopefully the RPI-5 will solve that problem.
How do you even buy one of those IMX283 or IMX585 imaging sensors? Can’t find a single source selling them, yet he has even managed to design his own boards with those components!
How can one acquire IMX283 or IMX585 imaging sensors? It’s quite a challenge to find a reliable source selling these sensors, yet the individual has successfully designed their own boards incorporating these components!
It seems like bare IMX283 modules are available on aliexpress for a really good price, but not IMX585.