Open Source Ear Monitoring Platform Listens To Your Ears

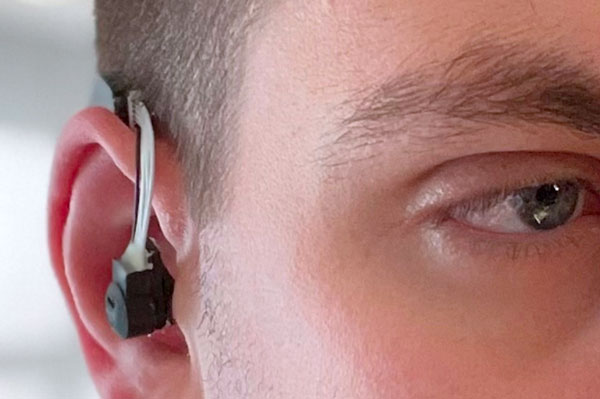
All sorts of exciting things happen in your ears, and now there is a good open source way to monitor them. Open Earable is a new project from a group of researchers and companies that monitors and records what is going on in your ear.

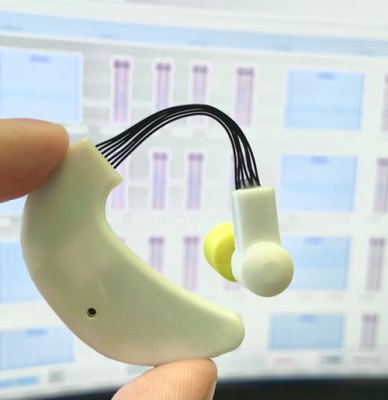
The project is designed as an easy-to-build, cheap way for audiologists and others to capture data about what is happening inside and around the ear. It’s a clip-on device that looks like a small hearing aid but has a six-degree Inertial Measurement Unit (IMU) and several other sensors to measure things around your ear and inside the ear canal. A pressure and temperature sensor measures the air pressure and temperature just inside the ear canal, and a small speaker can squirt sound right in there.

A button on the outside allows the user to control the device, and it can play back or record sound to the internal SD card memory. These are all controlled by an Arduino that includes Bluetooth Low Energy. The existing design only allows you to play a stored WAV file, not streaming audio. That’s a solvable problem, though, so it could also be turned into a set of hacker headphones.

Joking aside, this looks like an exciting research project and a useful tool for researchers. The GitHub repository for version 1.3 of the project lays it all out, including a full BoM and code, and the STL files for the case and PCB designs are in the Resources section of the site.

[Updated 18/10/2023 to correct IMU to Measurement, not Management. Intertial management needs a different set of devices]

Noble Graphs: Displaying Data With Neon Like Its 1972

In the days before every piece of equipment was an internet-connected box with an OLED display, engineers had to be a bit more creative with how they chose to communicate information to the user. Indicator lights, analog meters, and even Nixie tubes are just a few of the many methods employed, and are still in use today. There are, however, some more obscure (and arguably way cooler) indicators that have been lost to time.

[Aart Schipper] unearthed one such device while rummaging around in his father’s shed: a pair of Burroughs Bar Graph Glow-Transfer Displays. These marvelous glowing rectangles each have two bars (think the left and right signals on an audio meter, which is incidentally what they were often used for), each with 201 neon segments. Why 201, you may ask? The first segment on each bar is always illuminated, acting as a “pilot light” of sorts. This leaves 200 controllable segments per channel. Each segment is used to “ignite” its neighboring segment, something the manufacturer refers to as the “Glow-Transfer Principle.” By clever use of a three-phase clock and some comparators, each bar is controlled by one analog signal, keeping the wire count reasonably low.

Don’t get us wrong, the warm, comforting glow of Nixie tubes will always have a special place in our hearts, but neon bar graphs are just hard to beat. The two do have a similar aesthetic though, so here’s hoping we see them used together in a project soon.

Thanks to [Jan] for the tip!

Ready For The Rapture: This Wind-Up Cassette Player Can Play Anywhere

As useful as electronics are, the need to have some source of power for them can be a bit of an issue, especially for small, portable devices. One of the most low-tech but universally applicable source is human mechanical power, as demonstrated by the rugged 1980s-era Messenger II tape player in a recent [TechMoan] video. Without beating around the bush, this is indeed a device created by an evangelical organization (GRN) that missionaries would take with them to wherever their mission took them. Naturally this put the availability of power from a wall outlet in question, especially in the 1980s when this tape player was produced. Continue reading “Ready For The Rapture: This Wind-Up Cassette Player Can Play Anywhere”

Full Self-Driving, On A Budget

Self-driving is currently the Holy Grail in the automotive world, with a number of companies racing to build general-purpose autonomous vehicles that can get from point A to point B with no user input. While no one has brought one to market yet, at least one has promised this feature and had customers pay for it, but continually moved the goalposts for delivery due to how challenging this problem turns out to be. But it doesn’t need to be that hard or expensive to solve, at least in some situations.

The situation in question is driving on a single stretch of highway, and only focuses on steering, so it doesn’t handle the accelerator or brake pedal input. The highway is driven normally, using a webcam to take images of the route and an Arduino to capture data about the steering angle. The idea here is that with enough training the Arduino could eventually steer the car. But first some math needs to happen on the training data since the steering wheel is almost always not turning the car, so the Arduino knows that actual steering events aren’t just statistical anomalies. After the training, the system does a surprisingly good job at “driving” based on this data, and does it on a budget not much larger than laptop, microcontroller, and webcam.

Admittedly, this project was a proof-of-concept to investigate machine learning, neural networks, and other statistical algorithms used in these sorts of systems, and doesn’t actually drive any cars on any roadways. Even the creator says he wouldn’t trust it himself, but that he was pleasantly surprised by the results of such a simple system. It could also be expanded out to handle brake and accelerator pedals with separate neural networks as well. It’s not our first budget-friendly self-driving system, either. This one makes it happen with the enormous computing resources of a single Android smartphone.

Continue reading “Full Self-Driving, On A Budget”

Can An 8-Bit Light Gun Work On A Modern TV?

It’s an accepted part of retro gaming lore, that 8-bit consoles perform best when used with an original CRT TV. One of the reason for this is usually cited as being because the frame buffer and scaler circuit necessary for driving an LCD panel induces a delay not present on the original, and in particular this makes playing games which relied on a light gun impossible to play. It’s a subject [Nicole Branagan] takes a look at, and asks whether there are any ways to use a classic light gun with a modern TV.

Along the way we’re treated to an in-depth look at the tech behind light gun games, how the gun contained a photodiode which on the NES was triggered by the brief showing of a frame with a white square where the target would sit, and on the Sega consoles by a white screen with an on-board timer counting the screen position at which the gun was aimed.

The conclusion is that the delay means you won’t be playing Duck Hunt or Hogan’s Alley on your 4K TV, but interestingly, all is not lost. There are modified versions of the games that take account of the delay, or an interesting lightgun emulator using a WiiMote. We’d be happy at playing either way, just as long as we can take pot-shots at the annoying Duck Hunt dog.

Light gun image: Evan-Amos, Public domain.

Linux Fu: Deep Git Rebasing

If you spend much time helping people with word processor programs, you’ll find that many people don’t really use much of the product. They type, change fonts, save, and print. But cross-references? Indexing? Largely, those parts of the program go unused. I’ve noticed the same thing with Git. We all use it constantly. But do we? You clone a repo. Work on it. Maybe switch branches and create a pull request. That’s about 80% of what you want to do under normal circumstances. But what if you want to do something out of the ordinary? Git is very flexible, but you do have to know the magic incantations.

For example, suppose you mess up a commit message — we never do that, of course, but just pretend. Or you accidentally added a file you didn’t want in the commit. Git has some very useful ways to deal with situations like this, especially the interactive rebase.

Continue reading “Linux Fu: Deep Git Rebasing”

Silicon Photolithography The PCB Way

[ProjectsInFlight] has been doing some fantastic work documenting his DIY semiconductor fab lately. Next up: exploring down-and-dirty photolithography methods.

If you’ve been following along with this series — and why wouldn’t you? — you’ll recall [ProjectsInFlight]’s earlier experiments, like creating oxide layers on silicon chips with a homebrew tube furnace and exploring etchants that can selectively remove them. But just blasting away the oxide layer indiscriminately isn’t really something you need to do when etching the fine features needed to fabricate a working circuit. The trouble is, most of the common photoresist solutions used by commercial fabs are unobtainium for hobbyists, leading to a search for a suitable substitute.

Surprisingly, PCB photoresist film seemed to work quite well, but not without a lot of optimization by [ProjectsInFlight] to stick it to the silicon using a regular laminator. Also in need of a lot of tweaking was the use of a laser printer to create masks for the photolithography process on ordinary transparency film, including the surprisingly effective method of improving the opacity of prints with acetone vapor. There were also extensive experiments to determine the best exposure conditions, a workable development process, and the right etchants to use. Watch the video below for a deep dive into all those topics as well as the results, which are pretty good.

There’s a lot to be said for the methodical approach that [ProjectsInFlight] is taking here. Every process is explored exhaustively, with a variety of conditions tested before settling on what works best. It’s also nice to see that pretty much all of this has been accomplished with the most basic of materials, all of which are easily sourced and pretty cheap to boot. We’re looking forward to more of the same here, as well as to see what others do with this valuable groundwork.

Continue reading “Silicon Photolithography The PCB Way”