We’ve seen a lot of PCIe hacks on Hackaday, and a fair few of them boil down to hackers pulling PCIe somewhere it wasn’t meant to be. Today, we routinely can find PCIe x1, x2 and x4 links sitting around in our tech, thanks to the proliferation of things like NVMe SSDs, and powerful cheap SoCs that make PCIe appear at your fingertips.
In the PCIe For Hackers series, we’ve talked about PCIe and how cool it is, all the benefits it has for hackers, gave you layout and interconnection rules, and even went into things like PCIe switches and bifurcation. However, there’s one topic we didn’t touch much upon, and that’s external PCIe links.
Today, I’d like to tell you about OCuLink – a standard that hackers might not yet know as an option whenever we need to pull PCIe outside of your project box, currently becoming all that more popular in eGPU space. Essentially, OCuLink is to PCIe is what eSATA is to SATA, and if you want to do an eGPU or an external “PCIe socket”, OCuLink could work wonders for you.
Respectable Capabilities
Just like any high-speed standard, PCIe has some tight requirements when things get fast. Even though PCIe is known to be not as sensitive to lower-quality links due to its link training and generation downgrade abilities, at higher link speeds, even through-hole vs SMD sockets can make a difference. So, if you want to go high-throughput, you want proper cabling and connectors, intended for out-of-chassis use – and OCuLink gives you all of this, at a low price.
OCuLink is pretty unprecedented when it comes to officially supported hardware for pulling PCIe links externally. There’s Thunderbolt, sure, but it has to convert PCIe into packets on a Thunderbolt link, so you can’t do a no-nonsense direct wireup and need proprietary tech, making you spend $100 or upwards on each end of the link. Your SoC likely doesn’t have Thunderbolt support, and that’s a good thing given just how much of a walled garden it still is.
OCuLink can give you a 4x or 8x PCIe link using 4i and 8i options respectively, with cheap connectors, reliable cables, plus, a lively and growing ecosystem. It is also a good demonstration of what you need to pull PCIe outside of comfortable enclosures it typically inhabits, and, it’s a reasonably open standard for all it provides. Let’s dig in!
Accessible Mechanics
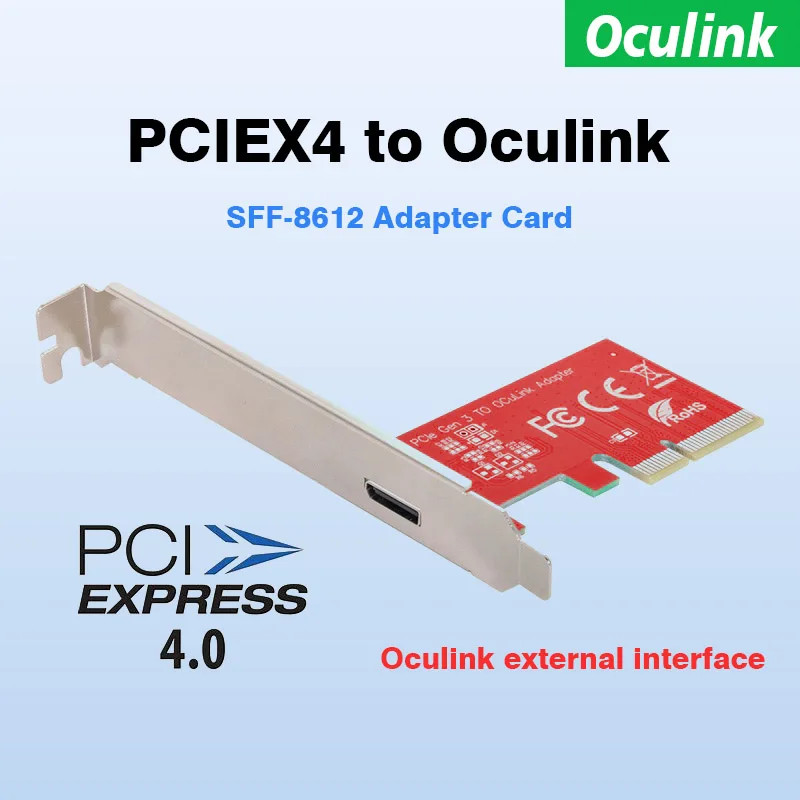
First of all, what you want for such a standard is a well-defined pinout, a friendly connector, and abundance of connectors and cables in the real world. OCuLink hits all of these points, and, there’s a trove of hardware on places like Aliexpress and Amazon. If you have an M.2 M-key socket with a 4x link free, you can easily pull it out of your device through an OCuLink cable – there are $20 M.2 cards with OCuLink sockets on them. The same goes for desktop PCIe slots – there’s no shortage of cheap adapters.
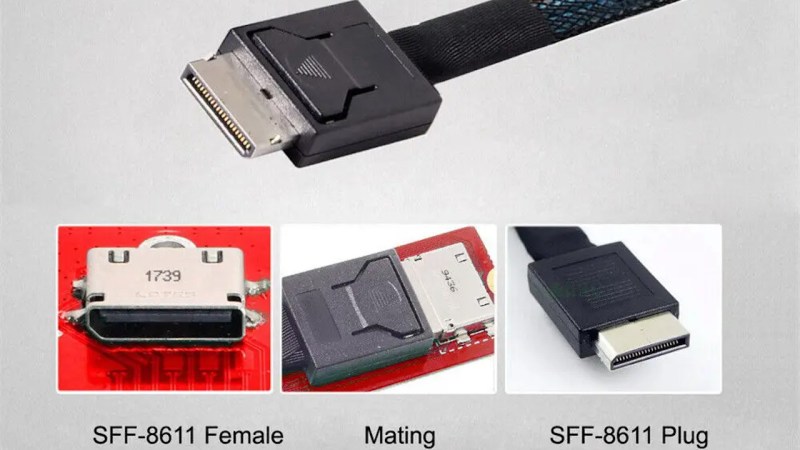
From the looks of it, you wouldn’t want to crimp your own OCuLink cable – and you don’t have to. There’s cables easily available online, too, in different lengths and link widths – SFF-8611 and SFF-8612 are good keywords for anything OCuLink. They’re seriously cheap, you can get one for $10-$20. The cables are quite a bit more stiff than USB-C Thunderbolt-capable cables. Nevertheless, they’re easy to use, and there are even latching connectors in case you don’t want sudden disconnect.
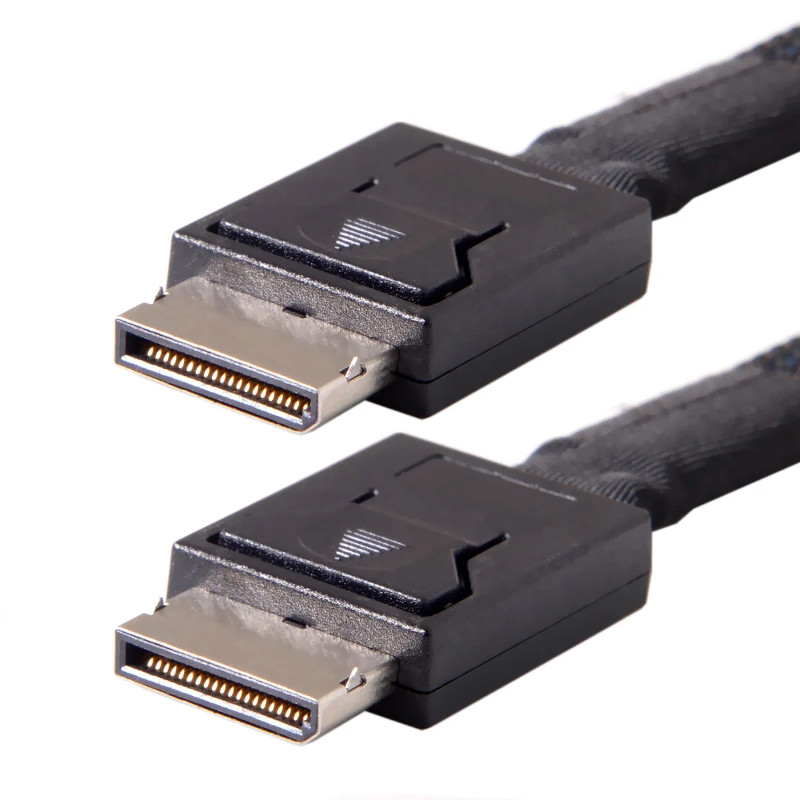
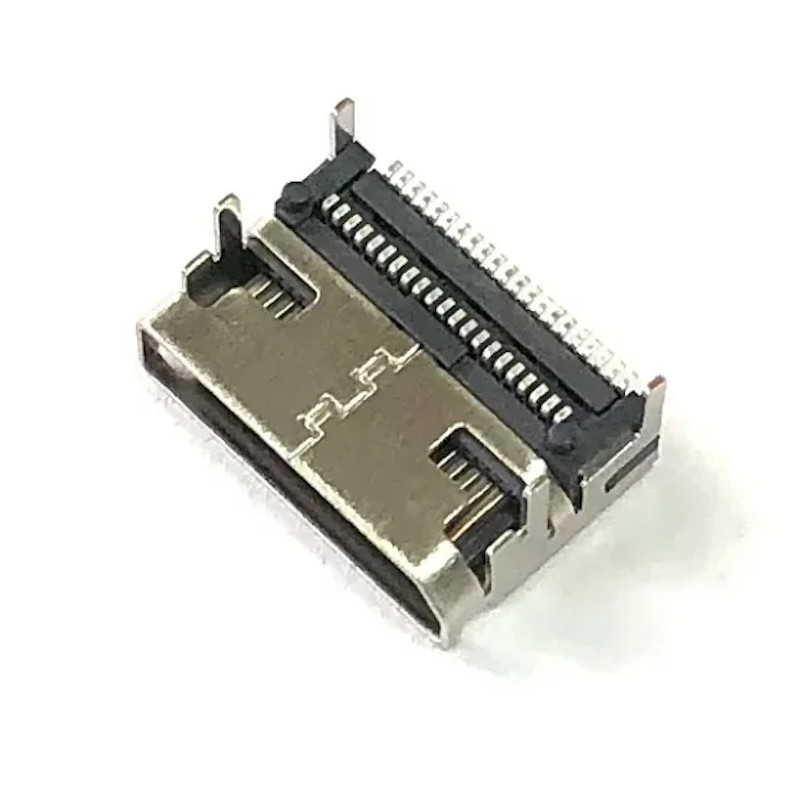

OCuLink connectors look a bit like DisplayPort, and, they’re easy to find online. Just like USB-C, they have two sides, top and bottom, and the pin pitch makes it a requirement to do a two-row connector. You won’t see a SMD + THT version like we often get with USB-C sockets, sadly – you’ll have to do “pads under the package” stenciling and reflow. That said, it’s well within the range of a standard hot air gun and a bit of paste, or maybe even just iron-tinned pads and some flux!
Some Extra Circuitry
There are no power rails in the OCuLink pinout, which makes sense – that would’ve been an entire rabbit hole, given how varied PCIe devices can be. You’ll want to take care of power separately, and the same might just be the case for the REFCLK clock pair – it’s not included in the standard pinout. It’s possible to get REFCLK through OCuLink cables, and there are pinouts that use VSP pins for clock, so if your downstream device can’t recover clock from PCIe data, that’s what you might end up doing.
If you want to pull PCIe over a longer distance and make it more hotplug-friendly, you will also want a PCIe retimer. It will recondition your PCIe signal, helping it recover from any losses caused by the cable and the connectors involved. Often, a retimer will also provide some ESD protection as a bonus – if you want to do hotplug, remember that PCIe goes directly to a CPU/chipset/SoC as a rule and it usually has less strong ESD diodes, which makes it a pretty ESD-sensitive part of a system!

There’s also documentation from PCI-SIG themselves that you might be able to find online if you want it; on the practical side, there are many community-aggregated resources. Plus, people are doing DIY OCuLink adapters more and more, and the pictured adapter is open-source, even! I hope that, whoever reads this, takes care to open-source their projects – reference designs are always useful and allow everyone to build increasingly cool things!
Ever Growing And Worth Knowing
In production, OCuLink has been used a lot in modern servers, where it’s not uncommon to want PCIe half a meter away from the chipset, wired up to something like a bay full of NVMe drives. As tech trickles down, it’s also gaining more adoption in laptop space! Currently, it’s being used by eGPU tinkerers, with people adding OCuLink sockets to devices like GPD mini laptops, or full laptops like the Lenovo Thinkbook, with the latter sporting a third-party adapter option that hijacks a Logitech receiver socket Lenovo added in.
You can still put PCIe over USB3, HDMI and USB-C cables – that’s what we used to do before OCuLink! And, if you want a reference for how to do it right, taught by a modern-day ecosystem that does high-bandwidth connection without breaking a sweat, the list of OCuLink projects is only becoming larger – which is why you deserve knowing about it as an option.


“eSATA is to SATA”
never used?
well, not that aspect in particular =D playing with eSATA-intended tech has been fun for me tho, as long as you buy the intended cables/adapters!
I use it for hot-plugging rotating backup drives to my NAS.
But yeah, I’d agree it’s not used much.
oculink is not the only connector / cable for PCIe – slimsas and MCIO are also used in servers and various adapters
Also “might just be the case for the REFCLK clock pair – it’s not included in the standard pinout” – what standard? If you look into SFF-9402 Page 18 – REFCLK is A12 / A13
As the article mentions, those pins are actually VSP, but some connectors shove REFCLK down it. The linked PDF from Amphenol shows A12/A13 as VSP, but the document you’re looking at shows them as REFCLK. Hence the text.
“VSP” means “vendor-specific pin.” They’re the sideband pins that are in all of the SAS-y type connectors (MiniSAS, MiniSAS-HD, OCuLink, etc.). By *spec* those need to be wired as differential pairs for the cable, although what the root host does is a different story. But, of course, as with all of the SAS-y type cables (and USB Type C for that matter!), you need to make sure that the cable you’re *using* actually is intended for that.
Especially if you buy surplus stuff on eBay there are plenty of cables that look exactly like spec cables, but they’re vendor-specific without sidebands even wired.
Which will result in you being *very* frustrated after smashing one open to find that those pins aren’t wired.
I bought a simpler m.2-to-pcie riser/adapter before; it just had a ribbon cable a few inches long. I didn’t end up using it, because the nuc I was going to use decided it didn’t want to cooperate. This looks pretty neat by comparison! Modern motherboards often don’t allocate lanes and speeds between pcie slots and m.2 slots the way you end up wanting them to. And if you build a computer for a gamer you may find that modern GPU’s are awkward to work around physically. Of course, I wouldn’t want to run an optical version of this a hundred feet away and then need to run a hundred feet of displayport cable back, but I might run something else at that distance if I was given the option. More interchangeable pcie stuff is bound to help flexibility even if there’s a number of things that just start from m.2.
Just this week I had a NUC8 that didn’t like any of my NVMe to PCIe adapters for GPU. It would run on the Thunderbolt, but that isn’t ideal for a project running on a battery. Shame it’s a proprietary Intel click BIOS, not likely we will see much community support for BIOS Hacking.
Any information about pcie to pcie between motherboards I remember there was some PCI bridges in some servers that joined multiple computers with a faster bus then Ethernet.
You’d run into cable length/timing issues pretty fast with a direct pci-pci between computers.
ethernet with Remote Direct Memory Access over Converged Ethernet (RoCE) is what that use case is for. benefits of the ethernet error check/re-transmit and 400Gbps is enough for most use cases!
with RoCE you can directly address pci devices from another computer (mostly used for converged arrays of NVMe drives).
adapters aren’t cheap, but try the older ConnectX adapters on eBay if you want to play with the standard.
When I saw it used it was usually board to board as in a shared backplane where one CPU card was PCI master on the backplane. But didn’t see any documentation and have been searching.
“You’d run into cable length/timing issues pretty fast with a direct pci-pci between computers.”
PCIe-to-PCIe? Not really. PCIe’s very forgiving since it’s packet based with decent embedded error recovery. The cheapy bitcoin miner stuff threw a PCIe lane over USB type C and it works fine. Heck, I’ve done PCIe through ePCIe (the Mini-SAS/iPass connectors) then split to SATA connectors/cables and it’s fine.
PCI/PCI (no “e”) is way harder since it’s a bus, obviously, but that’s eons ago now.
Not even remotely the case.
We are talking about chassis to chassis PCIe fabric.
PCIe 5 is more forgiving than 4, but still limited to 2-3m.
We aren’t talking about simply adding an extra box to store more PCIe stuff for 1 server anymore.
We are talking about a box of GPUs attached to a rack mounted PCIe switch so each device can be given to a different machine on demand.
Not X devices to 1 machine.
X devices to Y machines.
That kind of switch.
Couple options here, but one could argue getting a Thunderbolt network might be easier for the end user (it is broken on current Windows, maybe Linux works?)
https://www.quora.com/I-want-to-connect-two-PCs-via-PCI-Express-v4-What-do-I-need-to-do-I-dont-mind-writing-my-own-driver-for-data-transfer-if-it-is-going-to-have-2GB-sec-transfer-rate-and-300ns-latency
Oh hey. SCSI’s back!
At least that’s what this feels like.
What about SlimSAS? I use that for PCIe Gen 4. Readily available cables and adaptors on Amazon and eBay.
For instance:
https://www.ebay.com/itm/285092502338?chn=ps&var=586946881914&_trkparms=ispr%3D1&amdata=enc%3A1SGmGgSO5Sze7IFAMVItlCQ74&norover=1&mkevt=1&mkrid=711-117182-37290-0&mkcid=2&mkscid=101&itemid=586946881914_285092502338&targetid=1585159290171&device=c&mktype=pla&googleloc=9007240&poi=&campaignid=19894961968&mkgroupid=148855406073&rlsatarget=aud-1412318123216:pla-1585159290171&abcId=9307911&merchantid=118852697&gclid=Cj0KCQiAyeWrBhDDARIsAGP1mWT-aY1vnsA4o-YGyRj-NJlETLtXhU_bj1317ol5DvGahCA6vZ_Dh7MaAuYREALw_wcB
Not sure if it is any cheaper than Oculink, and there are cables converting SlimSAS to Oculink.
I say that because it is $10 cheaper than your link to get a complete kit of M.2 -> Oculink -> PCIe x16 Breakout.
However if you wanted to bifurcate an x16 slot a SlimSAS breakout and SlimSAS to Oculink cables might be cheapest. Depends on the day/deal and if you can get an x16 adapter with dual 8i and then get an 8i to dual Oculink 4i breakouts.
At the very end of the day its not cheap, I spent ~$40 on a Lenovo P520C motherboard with 48 lanes: two x16 , one x8 and two NVMe slots all running to LGA2066 CPU, you could easily spend twice that on adapters.
Thanks for that link to the slim x8 breakout, somebody should do a run at PCB house 😆, at least the SMD parts run through.
I forgot to say, we also need a simple x16 to 4x oculink x4 breakout, would be neat for EG my P520C motherboard (48 PCIe lanes from CPU for $50 in a MicroATX board, 2x NVMe, 2x x16, one x8. At least the 2 x16 will do bifurcation, not sure about the x8)
Hmmm, interesting.
I’m currently running an RTX9070Ti GPU in an Akitio Node eGPU enclosure connected to my Dell Precision laptop via Thunderbolt.
I wonder if there’s some way to hack in an OCuLink connection to remove the Thunderbolt bottleneck?
I wonder if I could modify the dock I use to avoid hacking at the laptop?…..
You will need an oculink at the laptop side, and you will need somewhere to connect it, such as a spare M.2 NVMe slot. There are some slim adapters to oculink, probably not for your model specifically.
https://www.aliexpress.us/item/3256805986122789.html
Not sure at the end of the day whether it will be worth the trouble, I don’t think it gains much unless your Thunderbolt controller is on an x2 PCIe link (annoyingly difficult to tell without the schematics or block diagram showing the thunderbolt controller used)
Hello,
i read the posts about all the PCI-E/ oculink-projects and adapters.
I appreciate your astonishing work. much of the information i can use in my own projects.
I want to design an adapter from m.2 to OCUlink, but differing from all the existing ones for my needs it should have a cable between the m.2-card and the OCUlink-connector board.
I have on single board adapter here, where the m.2 and oculink are on the same little m.2 board.
As i not found a schematic how to route the lines between the m.2 pci and the oculink-connector, i tried to reverse engineer the adapter. Sadly this is not really easy possible due to the layers.
So i want ask the people here if somebody can provide me the following information, best with a schematic.
All questions refer to a OCUlink X4 connection.
circuits beween
m.2 M/B keyed (NVME) slot and an OCUlink-connector
m.2 A/E keyed (WIFI/USB) slot and an OUClink-connector
m.2 M/B keyed (NVME) slot and a mini-PCI-E-slot
m.2 A/E keyed (WIFI/USB) slot and a mini-PCI-E-slot
If somebody have this information and could share it, i sincerly share the tested and working results later.
I am 100% ok with PCI 3.0 no need of pci 4/5.
although i am aware that the A/E-slots often have different PCI-Lanes active and additional USB-Pins. my goal are mainly the PCI-connections. so it would be nice to have the full information for the A/E-slots and if, which pins are to avoid/cover for correct PCI-work unseen the fact that wether the specific slot provides the signals by the manufacturer or not.
Regards Michael