PCIe For Hackers: External PCIe And OCuLink

We’ve seen a lot of PCIe hacks on Hackaday, and a fair few of them boil down to hackers pulling PCIe somewhere it wasn’t meant to be. Today, we routinely can find PCIe x1, x2 and x4 links sitting around in our tech, thanks to the proliferation of things like NVMe SSDs, and powerful cheap SoCs that make PCIe appear at your fingertips.

In the PCIe For Hackers series, we’ve talked about PCIe and how cool it is, all the benefits it has for hackers, gave you layout and interconnection rules, and even went into things like PCIe switches and bifurcation. However, there’s one topic we didn’t touch much upon, and that’s external PCIe links.

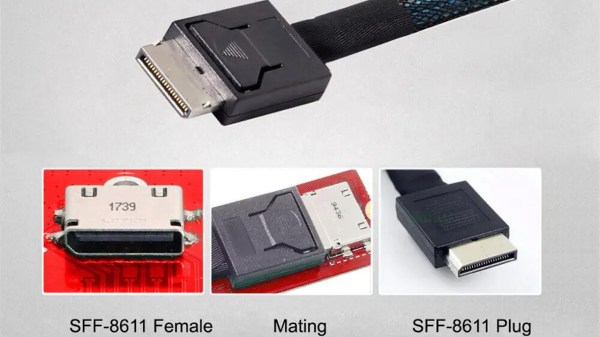
Today, I’d like to tell you about OCuLink – a standard that hackers might not yet know as an option whenever we need to pull PCIe outside of your project box, currently becoming all that more popular in eGPU space. Essentially, OCuLink is to PCIe is what eSATA is to SATA, and if you want to do an eGPU or an external “PCIe socket”, OCuLink could work wonders for you.

Respectable Capabilities

Just like any high-speed standard, PCIe has some tight requirements when things get fast. Even though PCIe is known to be not as sensitive to lower-quality links due to its link training and generation downgrade abilities, at higher link speeds, even through-hole vs SMD sockets can make a difference. So, if you want to go high-throughput, you want proper cabling and connectors, intended for out-of-chassis use – and OCuLink gives you all of this, at a low price.

Continue reading “PCIe For Hackers: External PCIe And OCuLink”

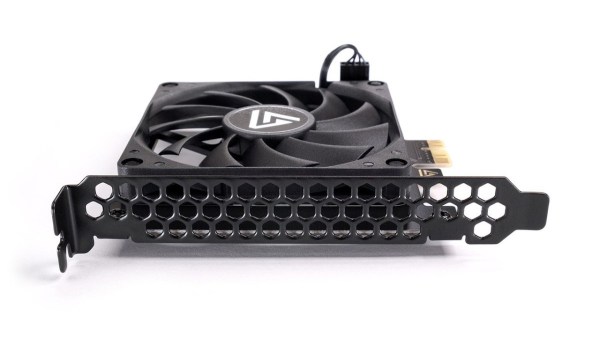
Picture of the PCIce card with a fan attached

Server Network Cards Made Extra Cool

Using cheap and powerful server expansion cards in your desktop builds is a tempting option for many hackers. Of course, they don’t always fit mechanically or work perfectly; for instance, some server-purpose cards are designed for intense amounts of cooling that servers come with, and will overheat inside a relatively calm desktop case. Having encountered such a network card, [Chris] has developed and brought us the PCIce – a PCIe card that’s a holder and a controller for a 80mm fan.

The card gets fan 12V from the PCIe slot, and there’s an ATTiny to control the fan’s speed, letting you cycle through speeds with a single button press and displaying the current speed through LEDs. There’s a great amount of polish put into this card – from making it mechanically feature-complete with all the fancy fasteners, to longevity-oriented firmware that even makes sure to notice if the EEPROM-stored settings ever get corrupted. At the moment, the schematics and the ATTiny firmware are open-source, [Chris] has promised to publish hardware files after polishing them, and has also manufactured a batch of PCIce cards for sale.

When it comes to making use of cheap server-purpose cards, a cooling solution is good to see – we’ve generally seen adapters from proprietary form-factors, like this FlexLOM adapter from [TobleMiner] to make use of cheap high-throughput network cards with slightly differing mechanical dimensions and pinouts. Every batch of decommissioned server cards has some potential with only a slight hitch or two, and it’s reassuring to see hackers make their eBay finds really work for them.

PCIe For Hackers: Extracting The Most

So, you now know the basics of approaching PCIe, and perhaps you have a PCIe-related goal in mind. Maybe you want to equip a single-board computer of yours with a bunch of cheap yet powerful PCIe WiFi cards for wardriving, perhaps add a second NVMe SSD to your laptop instead of that Ethernet controller you never use, or maybe, add a full-size GPU to your Raspberry Pi 4 through a nifty adapter. Whatever you want to do – let’s make sure there isn’t an area of PCIe that you aren’t familiar of.

Splitting A PCIe Port

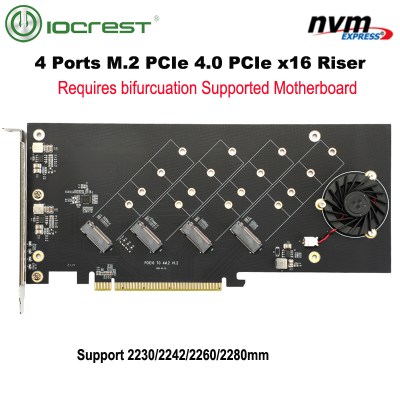
You might have heard the term “bifurcation” if you’ve been around PCIe, especially in mining or PC tinkering communities. This is splitting a PCIe slot into multiple PCIe links, and as you can imagine, it’s quite tasty of a feature for hackers; you don’t need any extra hardware, really, all you need is to add a buffer for REFCLK. See, it’s still needed by every single extra port you get – but you can’t physically just pull the same clock diffpair to all the slots at once, since that will result in stubs and, consequently, signal reflections; a REFCLK buffer chip takes the clock from the host and produces a number of identical copies of the REFCLK signal that you then pull standalone. You might have seen x16 to four NVMe slot cards online – invariably, somewhere in the corner of the card, you can spot the REFCLK buffer chip. In a perfect scenario, this is all you need to get more PCIe out of your PCIe.
Continue reading “PCIe For Hackers: Extracting The Most”

PCIe For Hackers: Link Anatomy

Last time, we looked over diffpairs, their basics, routing rules and the notorious tolerances of PCIe when it comes to diffpairs. Now, let’s take a look at the exact signals that make PCIe tick, as well as give you an overview of which sockets you can get PCIe on.

I separate PCIe sockets into two categories – desktop sockets, which are the usual 1x, 16x, or perhaps x4 PCIe sockets we see on desktop motherboards — and mobile sockets: mPCIe and M.2. There are also sockets like ExpressCard that are still found on some older laptops, but they have definitely fallen out of relevance. On mobile, M.2 is the way forward when it comes to PCIe – if you’re interested, I’ve written a short series talking about everything M.2 before.

On these sockets, most signals will be optional and some signals will be socket-specific, but there are some signals required in any PCIe device. Of course, the first group of required signals is the PCIe diffpairs themselves.

Continue reading “PCIe For Hackers: Link Anatomy”

PCIe For Hackers: The Diffpair Prelude

PCIe, also known as PCI-Express, is a highly powerful interface. So let’s see what it takes to hack on something that powerful. PCIe is be a bit intimidating at first, however it is reasonably simple to start building PCIe stuff, and the interface is quite resilient for hobbyist-level technology. There will come a time when we want to use a PCIe chip in our designs, or perhaps, make use of the PCIe connection available on a certain Compute Module, and it’s good to make sure that we’re ready for that.

PCIe is everywhere now. Every modern computer has a bunch of PCIe devices performing crucial functions, and even iPhones use PCIe internally to connect the CPU with the flash and WiFi chips. You can get all kinds of PCIe devices: Ethernet controllers, high-throughput WiFi cards, graphics, and all the cheap NVMe drives that gladly provide you with heaps of storage when connected over PCIe. If you’re hacking on a laptop or a single-board computer and you’d like to add a PCIe device, you can get some PCIe from one of the PCIe-carrying sockets, or just tap into an existing PCIe link if there’s no socket to connect to. It’s been two decades since we’ve started getting PCIe devices – now, PCIe is on its 5.0 revision, and it’s clear that it’s here to stay.

Continue reading “PCIe For Hackers: The Diffpair Prelude”

Raspberry Pi Grants Remote Access Via PCIe (Sort Of)

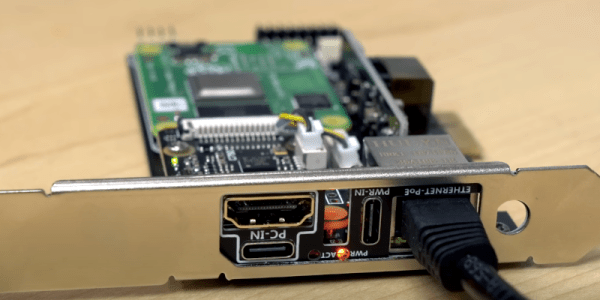
[Jeff] found a Raspberry Pi — well, the compute module version, anyway — in an odd place: on a PCI Express card. Why would you plug a Raspberry Pi into a PC? Well, you aren’t exactly. The card uses the PCI Express connector as a way to mount in the computer and connect to the PC’s ground. The Pi exposes its own network cable and is powered by PoE or a USB C cable. So what does it do? It offers remote keyboard, video, and mouse (KVM) services. The trick is you can then get to the PC remotely even if you need to access, say, the BIOS setup screen or troubleshoot an OS that won’t boot.

This isn’t a new idea. In fact, we’ve seen the underlying Pi-KVM software before, so if you don’t mind figuring out your mounting options for a Raspberry Pi, you probably don’t need this board. Good thing too. Judging by the comments, they are hard to actually buy — perhaps, due to the chip shortage.

Continue reading “Raspberry Pi Grants Remote Access Via PCIe (Sort Of)”

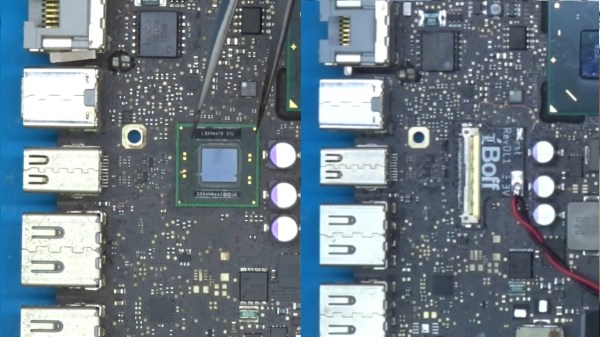
On the left, the Thunderbolt chip as mounted on the motherboard originally. On the right, the shim installed in place of a Thunderbolt BGA chip, with the IPEX connector soldered on

Macbook Gets NVMe SSD With Help Of A BGA-Imitating PCB

Recently, we stumbled upon a video by [iBoff], adding an M.2 NVMe port to a 2011-2013 MacBook. Apple laptops never came with proper M.2 ports, especially the A1278 – so what’s up? The trick is – desoldering a PCIe-connected Thunderbolt controller, then soldering a BGA-like interposer PCB in place of where the chip was, and pulling a cable assembly from there to the drive bay, where a custom adapter PCB awaits. That adapter even lets you expose the PCIe link as a full-sized PCIe 4x slot, in case you want to connect an external GPU instead of the NVMe SSD!

The process is well-documented in the video, serving as an instruction manual for anyone attempting to install this specific mod, but also a collection of insights and ideas for anyone interested in imitating it. The interposer board ships with solder balls reballed onto it, so that it can be installed in the same way that a BGA chip would be – but the cable assembly connector isn’t installed onto the interposer, since it has to be soldered onto the mainboard with hot air, which would then melt the connector. The PCB that replaces the optical drive makes no compromises, either, tapping into the SATA connector pins and letting you add an extra 2.5mm SATA SSD.

Adding an NVMe drive is an underappreciated way to speed up your old laptop, and since they’re all PCIe under the hood, you can really get creative with the specific way you add it. You aren’t even limited to substituting obscure parts like Thunderbolt controllers – given a laptop with a discrete GPU and a CPU-integrated one, you could get rid of the discrete GPU and replace it with an adapter for one, or maybe even two NVMe drives, and all you need is a PCB that has the same footprint as your GPU. Sadly, the PCB files for this adapter don’t seem to be open-source, but developing a replacement for your own needs would be best started from scratch, either way.

We’ve seen such an adapter made for a Raspberry Pi 4 before, solderable in place of a QFN USB 3.0 controller chip and exposing the PCIe signals onto the USB 3 connector pins. However, this one takes it up a notch! Typically, without such an adapter, we have to carefully solder a properly shielded cable if we want to get a PCIe link from a board that never intended to expose one. What’s up with PCIe and why is it cool? We’ve talked about that in depth!

Continue reading “Macbook Gets NVMe SSD With Help Of A BGA-Imitating PCB”