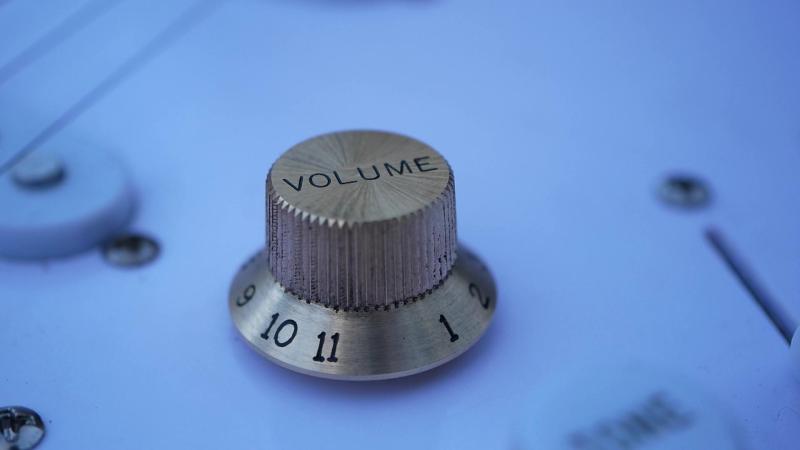
At the end of the day, all it takes to make a guitar go to eleven is a new knob. Making the knob is another thing — that takes a shop full of machine tools, the expertise to use them, and a whole bunch of time. Then again, if you’re pressed for time, it looks like a 3D printer will do nicely too.
While the 3D printing route is clearly the easier option, it sure seems as if [Chronova Engineering] is more about the journey than the destination. In need of some knob bling for an electric guitar, he takes us through the lengthy process (nicely summarized in the video below) of crafting one from a bar of solid brass. Like all good machining projects, this one starts with making the tools necessary to start the actual build; in this case, it’s a tool to cut the splines needing to mate with the splines on the guitar’s potentiometer shaft. That side quest alone represents probably a third of the total effort on this project, and results in a tool that’s used for all of about 30 seconds.
Aside from spline cutting, there are a ton of interesting machining tidbits on display here. We particularly liked the use of a shaping technique to form the knurling on the knob, as opposed to a standard rotary method, which would have been difficult given the taper on the knob body. Also worth noting are the grinding step that puts a visually interesting pattern on the knob’s top surface, as well as the pantograph used to etch the knob’s markings.
Congrats to [Chronova Engineering] for a great-looking build, and the deep dive into the machinist’s ways. If you’re still interested in custom brass knobs but don’t have a machine shop, we can help with that.


its sort of why my crunch box doesn’t have a stomp switch. why would i ever want to turn it off?
there are fender amps that have a small button,beside that button,it says MORE
It’s one louder.
Not to be that guy, but the “11” isn’t spaced same as other values on the knob. Also, it’s slanted. And the bottom of the 1’s don’t line up. I’d be so frustrated if I’d spent all that time and that’s what I ended up with.
…
OK, I guess I *am* that guy. :(
Nonetheless, I think it’s a really clever project, and I really enjoyed the video. Thanks!
*corrected for logarithmic scaling, and the not quite logarithmic taper (logarithmic pots are just two linear regimes).
The positioning and tilt of the 11 looks extremely deliberate to me.
This is pretty common in the model engineering and prototype machinist world, it’s just using the lathe as a shaper. All that’s necessary to cut metal like this is correct orientation of cutting geometry on any shape, and then movement in the correct direction. This is done all the time. There are several attachments famous model machinists came up with over the years like George H. Thomas to do exactly this kind of cutting, only he used it for cutting graduations on machinery hand wheels.
If you like ornate finishes like that on the end of the knob- they did this and still do all the time in watchmaking, usually on ratchet wheels (The gears that are directly connected to the watch spring barrel for winding it). If you would like to see a treatise on all the different finishes they came up with, and how to set that up on a lathe (its not hard), grab the book Antique Watch Restoration Volume 1 by Archie Perkins from the AWCI (American Watchmakers-Clockmakers Institute) webstore.
You really don’t even need a lathe to do those finishes, just something spinning the object and a wooden cup disc charged with some abrasive polish compound spinning on top as it rotates.
There’s a lot of variants of it. Not hard to learn
Nigel Tufnel’s guitar tech.
Just like in the movie _Spinal Tap_
Vintage tweed Fender guitar amps go to 12. Even better.