As hobbies go, stargazing has a pretty low barrier to entry. All you really need is a pair of Mark 1 eyeballs and maybe a little caffeine to help you stay up late enough. Astronomy, on the other hand, takes quite a bit more equipment, not least of which is a telescope and a way to get it pointed in the right direction at the right time, and to make up for the pesky fact that we’re on a moving, spinning ball of rock.
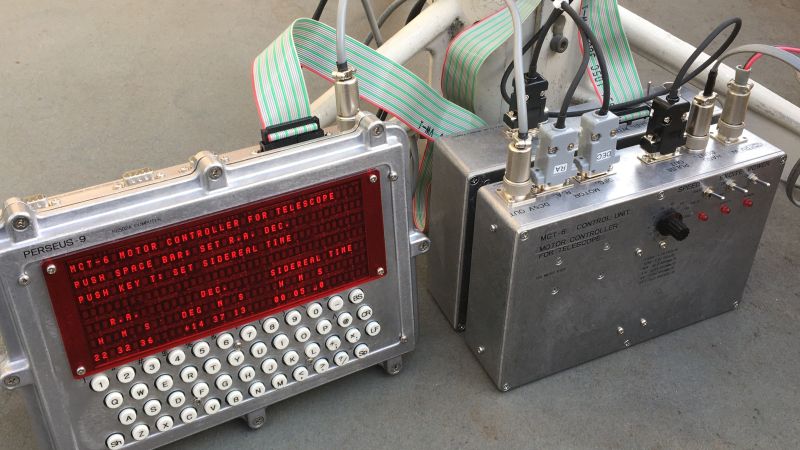
Yes, most of the equipment needed for real astronomy is commercially available, but [Mitsuru Yamada] decided to go his own way with this homebrew retro-style telescope motor controller. Dubbed MCT-6, the controller teams up with his dual-6502 PERSEUS-9 computer to keep his scope on target. There are a lot of literally moving parts to this build, including the equatorial mount which is made from machined aluminum and powered by a pair of off-the-shelf stepper-powered rotary stages for declination and right ascension. The controller that runs the motors is built completely from discrete 74HCxx logic chips that divide down a 7.0097-MHz crystal oscillator signal to drive the steppers precisely at one revolution per diurnal day. The pulse stream can also be sped up for rapid slewing, to aim the telescope at new targets using a hand controller.
As impressive as all this is, the real star (sorry) of the show here is the fit and finish. In typical [Yamada-san] fashion, the impeccably wire-wrapped mainboard fits in a robust die-cast aluminum case that fits the retro aesthetic of the whole project. The PERSEUS-9 is used mainly as a display and control terminal, running custom software to show where the telescope is pointed and calculate the coordinates of various heavenly bodies. As a bonus, the 40×7 alphanumeric red LED display should be easy on dark-adapted eyes.
Hats off to [Mitsuru Yamada] on another fabulous build. If you haven’t had enough of his build style yet, be sure to check out his PERSEUS-8 or even his foray into the analog world.


That portable computer is pretty unforgettable. Great to see it being used in the field
>> one revolution per diurnal day
Diurnal day? I couldn’t find a definition of that, but it implies solar day. Astronomers want sidereal day (23 h 56 min 4.0905 s), since that keeps you fixed on light-years distant objects.
I found that a bit of a head-scratcher as well. I did find this:
https://en.wikipedia.org/wiki/Diurnal_motion
But the other definitions of a “diurnal day” seems more solar day-ish…
Thank you. The R.A. axis of this equatorial mount tracks the diurnal motion of the fixed star (23 h 56 min 4 s / one revolution).
Points and respect awarded for wire wrap discrete logic design. It’s a refined art from a simpler time. Most of us would have done a PCB, but I still have some wire-wrapped projects from the old days, and my wire-wrap gun.
My prestripped wire wrap wire stash still comes in handy for green wire fixes on newfangled PCBs :)
When testing the operation of this equatorial mount, I had to modify it to shift all the bits in the 24-bit counter, but since it is wire-wrapping, I was able to modify it without any problems. I like this technique because it is easy to modify through experimentation, and the end result is a circuit board that is practical.
Absolutely stunning build!
This guy’s projects are awesome.
My compliments on a beautifully designed and executed computer, as well as the mount for the telescope. I love the use of the vintage dot-matrix LED displays for the display, it gives the machine a serious retro-feel that is also long-lived and not too finicky to drive (an example of difficulty being a Burrough’s self-scan alphanumeric display panel). The layout of the circuit boards is beautiful, and clearly well thought-out. Wirewrap is still one of my favorite prototyping methods behind only the insulation displacement prototyping method that uses wirewrap wire. It requires a bit more planning than wirewrap, but has a considerably lower profile making the resulting boards an easier fit into cabinets. That said, wirewrap done right is a beauty to behold, and is amazingly robust. I have some wirewrap boards that I made over 30 years ago that have been stored away in crates that aren’t airtight, having endured the jostling around of two moves, and the boards work just fine. I also love that you used vintage microprocessors, which require a bit more work than a Raspberry Pi or Arduino, but just add to the retro nature of the project. I’d have use a Motorola 6809 because I really like the instruction set, but the 6502 is actually tremendously powerful despite being a bit less orthogonal than the 6809. I’ve looked at some of your earlier projects, like the 6502-based “PC” with a LED & Switches console. Also a wonderful example of skill and design packed into a beautiful package. Your mechanical skills are really amazing, along with your electronics design skills. Thank you for exhibiting your projects. They are truly an inspiration, and perhaps will inspire some young folks to take up the passion of vintage computing through the use of vintage parts that give the true feeling of what it was like back in the good old days.
Thank you for your comment. I was also considering using the 6809 for a while because of its powerful processing. However, I felt that the seemingly irrational feature of the 6502, which does not release the address bus to high impedance when the CPU is stopped and continues to output the execution address, was instead suitable for a primitive manual DMA computer configuration. And the small number of machine instruction types made hand assembling easy. With this, I was able to develop the system software with only LEDs, switches, an instruction table, pencil and paper.
I also hope that my project will inspire you to think about the history of electronic technology over the decades and become interested in what is the basis of today’s state-of-the-art technology.