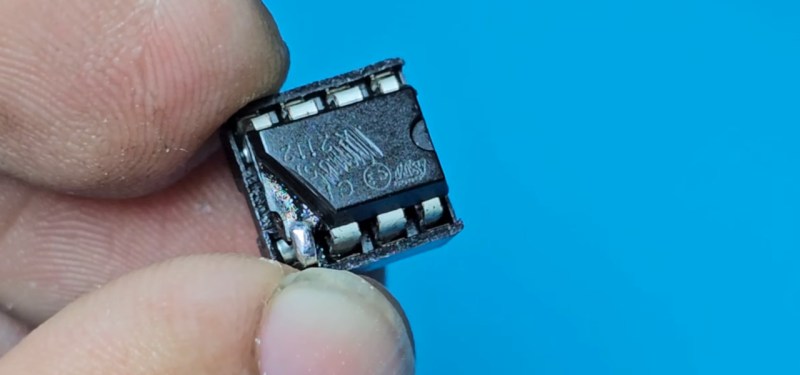
Who has not at some point in their lives experienced the horror of a pin on a DIP package breaking off? It’s generally game over, but what if you don’t have another chip handy to substitute? It’s time to carefully grind away some of the epoxy and solder on a new pin, as [Zafer Yildiz] has done in the video below the break.
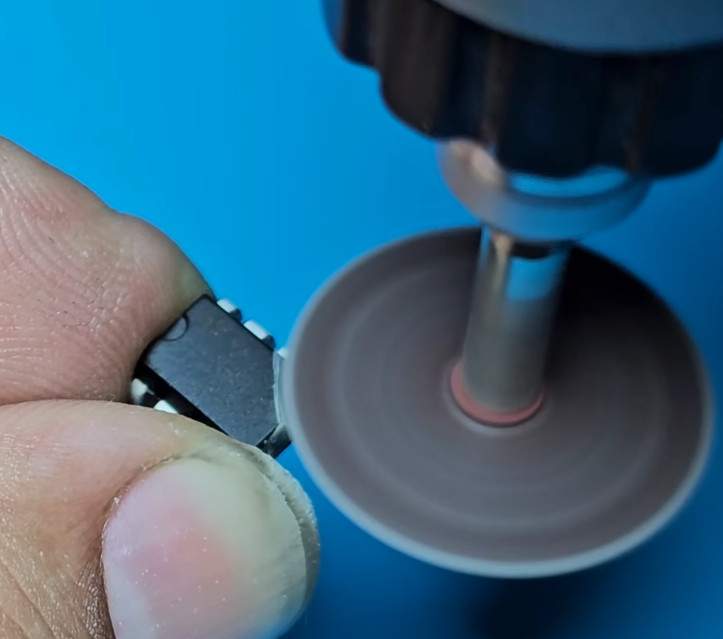 The technique relies on the pins continuing horizontally inside the package , such that they provide a flat surface. He’s grinding with the disk on a rotary tool, we have to say we’d use one of the more delicate grinding heads for something more akin to a miniature die grinder.
Once the flat metal surface is exposed, the chip is placed in a socket, and a new pin is cut from the leg of a TO-220 power device. This is carefully bent over, inserted in the socket, and soldered into place. The whole socket and chip arrangement is then used in place of the chip, making for something a little bulky but one infinitely preferable to having to junk the device.
There are many useful skills to be learned when it comes to reworking, and we’ve covered a few in our time. Most recently we saw a guide to lifting SMD pins.


This video and this guy, i won’t comment. I just want to say that having a rotating cutting/grinding disk next or even on top of your finger(s) is *probably* not a good idea… Use pliers or sth ffs!
Which is very good advice, especially for person efficient in catching flies – with a chopsticks ;)
That’s complete BS, if you are comfortable with a tool, you can use it at your own discretion. Burying everything under layers of safety measures is incapacitating your ability to do anything. And by all means not having some bruises on your hand is a sure sign of not trying hard enough.
how is not putting your fingers next to a spinning blade “incapacitating your ability to do anything”? Do you feel the same way about safety glasses?
Depending on the grinder, you’re actually safer without gloves as the skin will cut and tear, but gloves often don’t and they can pull your hand into larger grinders leading to them getting crushed.
Ultimately, it is all about risk assessment, and the people most familiar with the tools are usually the best ones to assess the risk.
It isn’t blade – just a small diameter, thin, grinding wheel, driven by low torque electric motor.
Using it as depicted in video above isn’t more unsafe than peeling potatoes(except when wheel disintergrate – better to use safety glases).
Worst case scenario: you will end up with shallow(think of papercuts) abrasions(but self cauterizing), stalled motor(potentially burned) and pieces of wheel flying around(more or less harmless inconvienience).
Been using VHM small(1/8″ shank)rotary files in the same manner(they will brake long before doing any real damage).
Don’t have guts to do it with a HSS 1/4″ shank(and bigger) ones, but often saw older T&D makers running them really close to eyes and fingers(chucked in rather beefy air grinders).
Guess what – nutting bad ever happen(except for hearing loss – but as I said before, those were older guys).
How do you feel about table saw blade guards and riving knives? Thought so.
I guess there’s one in every crowd. “I’ve been doing this for 20 years and it never happened to me”… until the day when it does.
Safety is not BS. If some work catches your attention negatively, you can bet there is something fishy in there. So do somenting. Also, “not having some bruises on your hand is a sure sign of not trying hard enough” … really? it’s the 21st century, nobody told you?
They are actually surprisingly slow at abrading non-rigid objects (like skin). You’ll usually just lose some epidermis before you pull away, maybe get a slightly-stinging cut that probably doesn’t even bleed. Not really a big deal
Pff. I could have done that to a 555…
(obligatory comment adapted slightly)
Neat hack. 40 years too late for me though. RIP, BBC micro ADFS ROM :-(
That was very common for me when I had to reuse the IC. It was easier to simply cut the legs to remove it from the old board and solder new legs.
I have a simlirar “hack” for somone who needs to use a SD card slot Simply use MicroSD card instead of Full SD and solder the MicroSD-2-SD Card Adapter on PCB.
Eehhh, in time those adapters stop working properly, doesn’t matter the producer.
I use that hack a fair bit. Cheap and easy to do.
Next hack : how to repair a TO-220 broken pin…
From what I can see on the video, it wasn’t necessary to grind the epoxy. A wire could have been made to make contact with the remaining of the pin and the solder all that to that same DIP adapter.
Am I missing something?
If you have a vent hood, consider end milling a cavity above the pin and then use fuming nitric in the cavity which will leave nice clean leadframe. Goes faster if you put the chip on a copper bar on a hot plate. Of course, if you don’t have a vent hood you should probably not be messing with fuming nitric.
A former supervisor and I tried to resurrect an old main board that was using an 8 pin chip with an internal battery as part of its BIOS. We had to cut into the sides of the chip to expose the points and solder on contacts for a coin cell battery.
It was for an old “wargaming” terminal that was used to create enemy contacts on radar and electronic warfare equipment for training purposes. The cool part was it didn’t have to be plugged into the equipment, it could broadcast that data to the ship, sub, or aircraft in question.
I cannot remember the name of the operating system, but it wasn’t Microsoft or Linux based, or if it was I didn’t recognize the version. I know it was early 90s so that family of terminals may have been its only iteration. We got it to boot, but there were other issues further down the line that would have required a great deal more time at the soldiering station.
I did this to rebuild 3 intentionally cut legs for the DVD controller chip on my Wii just a few days after I finally managed to get my hands on one.
The chip in question is 25×25 pins and it’s about the size of a dime!
Not my pics/post but here’s someone else who documented their journey doing this:
https://gbatemp.net/threads/cut-legs-on-chip.53402/post-685077
I chose to rebuild the legs rather than solder wires directly to the exposed pins. Less chance of mechanical stress failure that way…
In retrospect, it was a pretty ballsy move on my part considering I’d never attempted anything like it before, and it was on a console which was extremely hard to find in stores at the time. I was successful though! =D