In today’s value-engineered world, getting a decade of service out of a cordless tool is pretty impressive. By that point you’ve probably gotten your original investment back, and if the tool gives up the ghost, well, that’s what the e-waste bin is for. Not everyone likes to give up so easily, though, which results in clever repairs like the one that brought this cordless driver back to life.
The Black & Decker “Gyrodriver,” an interesting tool that is controlled with a twist of the wrist rather than the push of a button, worked well for [Petteri Aimonen] right up until the main planetary gear train started slipping thanks to stripped teeth on the plastic ring gear. Careful measurements of one of the planetary gears to determine parameters like the pitch and pressure angle of the teeth, along with the tooth count on both the planet gear and the stripped ring.
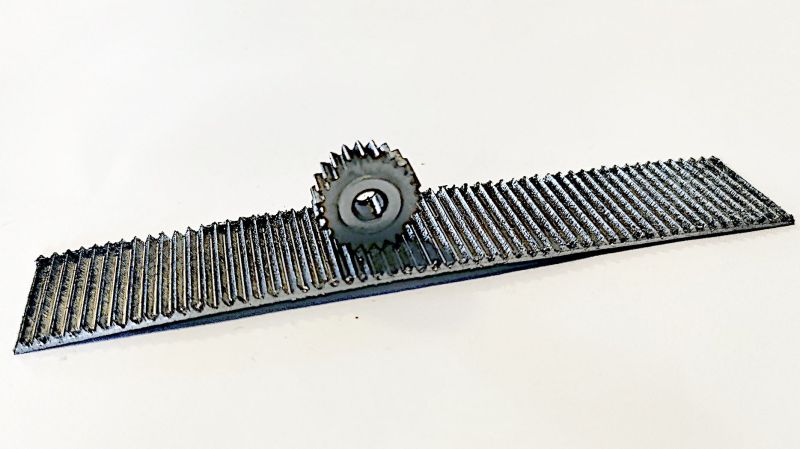
Here, most of us would have just 3D printed a replacement ring gear, but [Petteri] went a different way. He mentally rolled the ring gear out, envisioning it as a rack gear. To fabricate it, he simply ran a 60° V-bit across a sheet of steel plate, creating 56 parallel grooves with the correct pitch. Wrapping the grooved sheet around a round form created the ring gear while simultaneously closing the angle between teeth enough to match the measured 55° tooth angle in the original. [Petteri] says he soldered the two ends together to form the ring; it looks more like a weld in the photos, but whatever it was, the driver worked well after the old plastic teeth were milled out and the new ring gear was glued in place.
We think this is a really clever way to make gears, which seems like it would work well for both internal and external teeth. There are other ways to do it, of course, but this is one tip we’ll file away for a rainy day.


It looks like the joint was silver soldered – that’s a form of brazing.
From wikipedia:
https://en.wikipedia.org/wiki/Solder
https://en.wikipedia.org/wiki/Brazing#Silver_brazing
From the appearance, I’d say that silver alloy brazing was used.
I use silver soldering to fix the blade on my (very cheap) band saw when it breaks. I also use silver soldering to make small parts from steel stock, such as the springy frame of the pocket eyeglass clip I made a couple of weeks ago. Silver soldering also works on other metals, such as the brass I used in a horizontal thread spool adapter I recently made.
You can see the thread spool adapter and the eyeglass clip in this blog post:
https://josepheoff.github.io/posts/horizontal-thread-holder
Silver soldering is also mentioned in the project logs for my Hackaday.io project “Vintage sewing machines” (https://hackaday.io/project/183967-vintage-sewing-machines)
Log:
https://hackaday.io/project/183967-vintage-sewing-machines
Correct log address:
https://hackaday.io/project/183967-vintage-sewing-machines/log/231567-cross-wound-thread-and-vintage-sewing-machines
A good reminder to practice brazing, that’s been a very useful skill for me. Welding and soldering leave too much middle ground not to try out brazing
It’s ordinary Sn62Pb36Ag2 electronics solder. I didn’t dare heat it hot enough for brazing, and the surrounding plastic supports it quite well.
That’s considerably stronger that 60/40. Good stuff, been using it for years.
BTW, love your projects page. :-)
Sometimes a plastic gear is paired with a metal one so the wear concentrates in the easier part to replace. For example, in kitchen mixers the worm gear is integral to the motor shaft so the wheel is plastic.
I’m not sure it was done on purpose here, but now the planet gears will take some of the wear and it’s worth a thought.
Yeah, that is something I wondered about, especially with the 3 plastic gears remaining in the first stage. But time will tell, if it fails in a few years, I’ll need to figure out making external gears :)
What? A decade is a long time for a tool?
“The Black & Decker …”
Oh.. now I get it.
Really depends how much you use it and how hard, not just the age. All tools wear.
Also: excellent hack! Could be used to build custom planetary gear trains perhaps?
A decade is a long time for any battery operated tool, since you’re almost sure to have all your batteries dead and irreplaceable by then.
Makita’s LXT platform has been around for 19 years
Milwaukee’s M18 platform has been around for 12 years
Dewalt’s 20V MAX platform has been around for 13 years (they also sell an adapter to use their 20v batteries on their older 18V line, effectively extending them to over 2 decades)
Not sure why this myth about batteries changing every few years persists. Maybe if you’re buying store brand tools?
Ryobi’s 18v battery form has been around 28 years. I had a chat with a product designer from Ryobi who happened through my hackerspace’s open house once, and he said they’d like to replaced the battery for the bulkiness of the stem, as it would open up design possiblities some, but they decided as a company long ago that it would nuke their customer base and it’s easier to just get creative with tool design.
The 20V batteries are actually 18 volt
My Black & Decker line powered electic hand drill is 30 years old. Still runs just fine.
I don’t use it everyday, of course.
The Black & Decker cordless drill that I bought a couple of years later (would be 28 years ago) died a couple of years ago – it became more expensive to buy new batteries than to buy a new cordless drill. Mechanically, it was fine. The NiCad batteries just wouldn’t hold a charge anymore.
I used both tools about 20 years ago while building the house my wife and I still live in. Hundreds (if not thousands) of screws for the sheetrock ceilings.
Somewhere around 1963, I bought a cheap B&D 1/4″ drill; the back was plastic, the gearbox, metal. IIRC, I paid $7-8 for it.
It was cheap, and later when I had “better” drills, I used the B&D for “rough” jobs. I can’t remember how many times I used it with spade bits in hardwood or drilling metal, until it was too hot to hold on to. Later, I got a B&D 3″ belt sander attachment, and mated that drill to it permanently. Used it for years, eventually wearing out the bearings on the adapter.
When I was rebuilding that, I figured it was about time to check the drill’s brushes (by now it was somewhere around 2010 so the drill was nearly 50 years old). Popped the thing open and … the brushes were fine, only barely worn. Bearings and gears were fine too.
Poor thing finally perished when PG&E burned down the whole neighborhood in 2017.
In the meantime, I’ve had a few “newer” B&D drills that were pieces ‘o crap.
Proper gear teeth are not triangles. This design will wear faster. Evident.
If you read the blog the pressure angle is 30°. It may wear the planetary gears quicker as well, but the combined wear rate may exceed the original design.
I’m more worried about the seam, perhaps cutting the edges at an angle could help?
One trick often used for bending metal is to make the object a bit too long, then bend it, and cut off the ends that do not bend at all, or are difficult to bend in a precise radius. This would also allow for cutting the excess of under an angle, which can help with alignment.
If you would have 3d printed a replacement part, stop.
Your 3d printer license has just been revoked.
Pack up your gear and donate it to your local public library. You aren’t allowed to use it anymore.
Consumer 3d printing is for art and prototyping.
Full stop. End of statement. Do not pass go. Do not collect $200.
If you are using it to print things that carry a load, plastic boxes, or literally anything other than a temporary prototype or a piece of art, you are wrong and need to stop.
Haha… What a bunch of gate keeping bullshit! I’m doing all those things you’re telling us not to do and will keep doing them! 3D printers can do a lot more than your myopic view gives them credit for.
meh. i am a big fan of using it only for what it’s good at. it really depends what you need and what extras you’re willing to throw at it (metal bolts and plates or wood or what-have-you). but i have been pleasantly surprised every time i have put a load on 3d printed things, and i use it for a bunch of plastic boxes that, after all, i don’t stand on top of. i make intentionally under-engineered things because i think of them as prototypes and i don’t want to wait a long time for the printer to make a thick wall. and i anchor them to my backpack and fling them around every day for years. 1mm wall thickness with an integrated fastener that relies on dang layer adhesion, sees rain and sun and impact and lasted enormously longer than the injection molded part it replaced.
but i’ve got two parts right now serving in serious load-bearing capacity, obviously under compression instead of tension…each one just the first printing of the first design to cross my mind…basically prototypes but seeing regular use. one is just now a year old and the other is at least 5 years old and i slam a heavy door into it several times a day.
i’m not denying i have had some failures! common household objects that didn’t last a year, or that need replacing every 3 years or so on. but i don’t know a hard rule for things that absolutely won’t work. seems like mostly it comes down to design and material.
that said, a gear at the intersection between load-bearing and small sounds like a huge challenge. i probably wouldn’t even try to 3d print it. i’ve had only very limited success at putting PLA in the middle of driving a screw.
i’m not much of a machine shop guy so i’d probably go looking for a donor gear i can grind on or something. or i’d toss it.
Significant parts of my 3d printer itself are 3d printed. Be-gone troll!
$156,000 worth of sales this year alone of equipment for small scale agriculture that relies heavily on 3D printed parts printed on a small print farm of consumer grade 3D printers says you don’t know what you’re talking about. I’ve been able to adapt quickly to feedback from customers and introduce new equipment far faster just running my own print farm than I ever could when I was relying on external suppliers. The design has to be different, but I absolutely produce load bearing parts, and farmers are happy to pay for the loads of work that my equipment saves them.
The Black and Decker Dremel type tool from 15 years ago is better than anything Dremel ever made, and it was only $30. If it ever breaks, I would probably go to great lengths to fix it as well. Sad they don’t make them anymore.