The flow battery is one of the more interesting ideas for grid energy storage – after all, how many batteries combine electron current with fluid current? If you’re interested in trying your hand at building one of these, the scientists behind the Flow Battery Research Collective just released the design and build instructions for a small zinc-iodide flow battery.
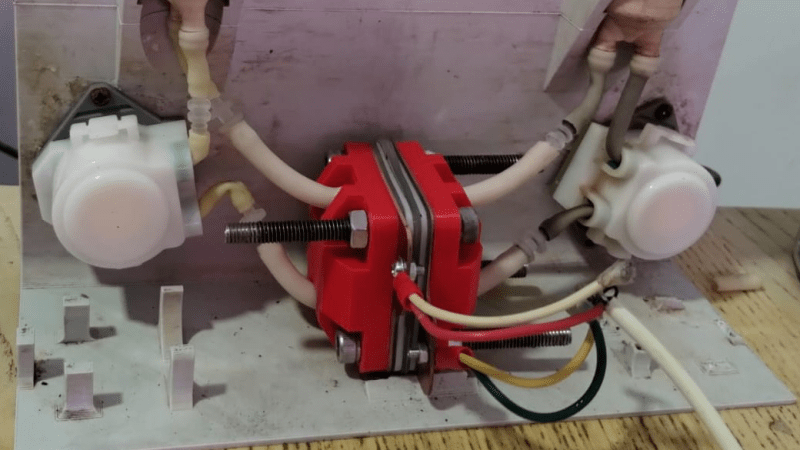
The battery consists of a central electrochemical cell, divided into two separated halves, with a reservoir and peristaltic pump on each side to push electrolyte through the cell. The cell uses brass-backed grafoil (compressed graphite sheets) as the current collectors, graphite felt as porous electrodes, and matte photo paper as the separator membrane between the electrolyte chambers. The cell frame itself and the reservoir tanks are 3D printed out of polypropylene for increased chemical resistance, while the supporting frame for the rest of the cell can be printed from any rigid filament.
The cell uses an open source potentiostat to control charge and discharge cycles, and an Arduino to control the peristaltic pumps. The electrolyte itself uses zinc chloride and potassium iodide as the main ingredients. During charge, zinc deposits on the cathode, while iodine and polyhalogen ions form in the anode compartment. During discharge, zinc redissolves in what is now the anode compartment, while the iodine and polyhalogen ions are reduced back to iodides and chlorides. Considering the stains that iodide ions can leave, the researchers do advise testing the cell for leaks with distilled water before filling it with electrolyte.
If you decide to try one of these builds, there’s a forum available to document your progress or ask for advice. This may have the clearest instructions, but it isn’t the only homemade flow cell out there. It’s also possible to make these with very high energy densities.


For people who haven’t done so before, really leak test any 3d prints designed to store liquids. Especially liquids that aren’t water. 3d prints often aren’t water right. There are tricks to make them water right, like adding wax and whatever else.
Cool project. The potentiostat itself is an accomplishment. Wish someone sold the boards near cost.
Which is why they explicitly state those parts need to be printed with 100% infill and 5 perimeters and then leak tested, I suppose.
brownie points if you can dunk it in a resin while in a vacuum chamber.
I suppose a light application of acetone would be enough to seal a ASA/ABS print?
Nope. it gums / dissolves the surface, that is no seal.
This is exactly what I do for my hydroponics (using ASA). Great success so far — nice, glossy finish and no leaks.
Hows about putting an inflatable bladder inside your reservoir tank to ensure it doesn’t leak?
It doesnt leak. Polypropylene prints water tight quite easily.
I am one of the creators of the project. We use polypropylene for the flow frames, which is one of the few 3D printed plastics that is relatively easy to make water tight if printed at 100% infill with high perimeters and some overflow.
Instead of 100% infill, maybe it’d be better to print so there is a continuous void that is then filled with wax.
This is a HazMat response just waiting to happen. Corrosive chemicals handled by amateurs going into things they 3D printed.
The volumes are very low (10mL total) with this kit and the materials in contact with the chemicals were selected to be chemically compatible with a wide range of active material choices (polypropylene, grafoil, etc). With that said, care should be taken whenever handling reactive chemical substances. Always read the msds of materials and wear the proper ppe. As with any activity, accidents can definitely happen if people are careless.
Also we are not amateurs, my colleague working on the project and I both have PhDs. His in chemical engineering and mine in chemistry.
Its not you I am worried about. You are not Amateurs however there are lots that will try to repeat your work thst are amateurs and will make a mess of it. And they will do it not in a lab but in their home.
We try to provide instructions that try to inform people well about the potential risks of doing this, but obviously it is up to anyone who wants to reproduce this to ensure their own safety. We do not advocate for anyone to reproduce this in an unsafe environment or under unsafe conditions. Thanks for your concern!
A forum member has some extra unpopulated boards for free in the EU, FYI! https://fbrc.nodebb.com/topic/37/mystat-pcbs-for-free
The tube on the left pump is pretty much pinched closed.
I took that picture. Lol, it was pinched when I took the picture but it obviously was not pinched when I was operating the battery.
“During charge, zinc redissolves…”
Shouldn’t this one be “During discharge, zinc redissolves…”?
Yes you are correct, when discharging zinc will dissolve. I hope they fix it on the article.
Thanks for pointing that out, I’ve corrected it.
Ok, so if this can be made on a bench top, what will it take to bump the model up to the homestead scale? Better yet, what would it take to move this from a really cool demonstrator to a kit?
I much prefer the idea of having an 8’x12′ shed dedicated to a flow battery than having a LiPo battery in my garage waiting for an excuse to burn my house down.
We are creating the first open source flow battery cell and stack right now, which will be the core of a larger scale application. However it will take a few years before we have this at a point where people can confidently just DIY a full battery stack in the kWh scale. You can follow our forum for information about our progress in this field.
We are also going to be producing the desktop setup in this article as a kit soon, we are putting these kits at University labs first, but we’ll also make them available for retail purchase in the EU before the end of the year.
I meant the first large area open source flow battery stack.
I am very excited by this project. I’ve been trying to get a local co-op utility grid scale flow battery bank going in my area. The price tag, LiPo fire concerns, and newness of it all has scared away all the investors.
I can show them all the metrics in the world on Energy Storage As A Service for grid balancing and load leveling but no one wants to talk to me since I’m not sitting on a trust fund.
So, screw them and the grid. Flow batteries for the masses.
I could not find any info on what this cell can do.
How much electrical power can this cell consume/provide? What capacity does this liquid provide (Wh/liter)? What does a typical system cost?
I suspect this is like a Farnsworth-Hirsch fusor (yay fusion, science fair) versus a Tokamak fusion reactor (making energy). I guess this design is more like an educational tool, rather than a suitable DIY method for building a few and storing a 10kW excess photovoltaic generation.
I don’t want to bad-mouth this. Even an educational open design of such a complex design is a great achievement.
This is an educational tool. It is meant to provide a tool for reproducible research of chemistries or education about the basics of flow battery systems. With the chemistry we tested the system stores around 250mWh of energy. This isnt even enough energy to run its pumps and arduino, but a meaningful scale to validate chemistries and materials. About cost, the cost of materials is around 500 EUR, including the potentiostat and pumps. It is definitely feasible to diy, we already have a few people successfully and indepedently reproducing the kit.
We are working on the first open source large scale stackable design to achieve the kWh scale and enable people who want to do developments on the engineering side. This will enable people to DIY larger scale systems – at their own risk – but ideally it would enable companies to produce ready-to-use retail systems at low cost.
Is the stackable version using the same basic structure and materials or is the design totally different?
It is a different design, because the requirements for a stack are quite different. The new design is also completely open source, you can find it here (https://fbrc.nodebb.com/topic/11/designing-the-large-format-cell/49)
The max capacity achieved with rhe Zn/I liquid electrolyte we tested was ~25 Wh/L (catholyte+anolyte volume)