Developing Android applications seems like it should be fairly straightforward if you believe the glossy marketing by Google and others. It’s certainly possible to just follow the well-trodden path, use existing templates and example code – or even use one of those WYSIWYG app generators – to create something passable that should work okay for a range of common applications. That’s a far cry from learning general Android development, of course.
The process has changed somewhat over the years, especially with the big move from the Eclipse-based IDE with the Android Development Tools (ADT) plugin, to today’s Jetbrains IntelliJ IDEA-based Android Studio. It’s fortunately still possible to download just the command-line tools to obtain the SDK components without needing the Google-blessed IDE. Using the CLI tools it’s not only possible to use your preferred code editor, but also integrate with IDEs that provide an alternate Android development path, such as Qt with its Qt Creator IDE.
Picking Poison
Both Qt Creator and ADT/Android Studio offer a WYSIWYG experience for GUI design, though the former’s design tools are incomparably better. Much of this appears to be due to how Qt Creator’s GUI design tools follow the standard desktop GUI paradigms, with standard elements and constraint patterns. After over a decade of having wrangled the – also XML-based – UI files and WYSIWYG design tools in ADT/Android Studio, it never ceases to amaze how simple things like placing UI elements and adding constraints love to explode on you.
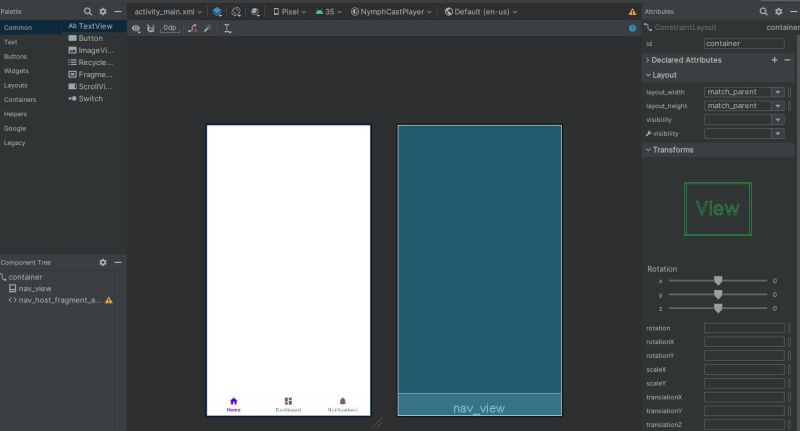
Somewhat recently the original Android API layouts also got ditched in favor of the ‘refactored’ AndroidX API layouts, with apparently now this Jetpack Compose being the (high-level) way to use. Over the years of me having developed for Android, many APIs and tools have been introduced, deprecated and removed at an increasingly rapid pace, to the point where having Android Studio or the CLI tools not freak out when confronted with a one year old project is a pleasant surprise.
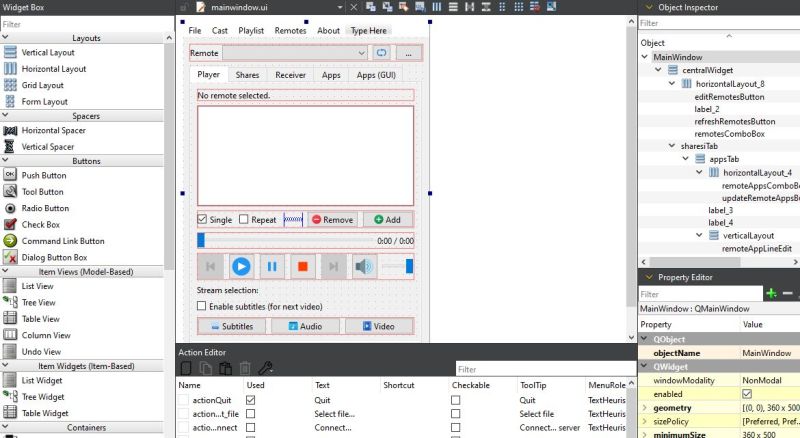
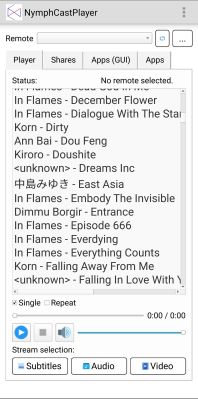
Although Qt isn’t the only alternative to the Android Studio experience, it serves to highlight the major differences encountered when approaching Android development. In fact, Qt for Android offers a few options, including building a desktop Qt application for Android, which can also use the Qt Quick elements, or including Qt Quick within your existing Android application. For Qt Quick you want to either create the UIs by hand, or using Qt Quick Designer, though I have so far mostly just stuck to using Qt Creator and liberally applied stylesheets to make the UI fit the target Android UI.
Whichever way you choose, it’s important to know your requirements and take some time to work through a few test projects before investing a lot of time in a single approach.
The Build System
No matter what approach you choose, the build system for Android is based on what is objectively one of the worst build automation tools conceivable, in the form of Gradle. Not only does it take ages to even start doing anything, it’s also agonizingly slow, insists on repeating tasks that should already have been completed previously, provides few ways to interact or get more information without getting absolutely swamped in useless verbosity, and loves to fail silently if you get just the wrong Gradle version installed in your Android project.
Did I mention yet that the entire Gradle tool is a permanent fixture of your Android project? Android Studio will want to upgrade it almost every time you open the project, and if you don’t use an IDE like it which automates Gradle upgrades, you better learn how to do it manually. Don’t forget to install the right Java Development Kit (JDK) either, or Android Studio, Gradle or both will get very upset.
If your IDE doesn’t pave over many of these inane issues, then getting familiar with the Gradle wrapper CLI commands is right on the top of your list, as you will need them. Fortunately sticking to an IDE here tends to avoid the biggest pitfalls, except for having enough time with each build session to fetch a coffee and go on a brisk walk before returning to address the next build failure.
There are no real solutions here, just a call for perseverance and documenting solutions that worked previously, because you will always encounter the same errors again some day.
Test, Debug And Deploy
Even if you have built that shiny APK or app bundle, there’s a very high likelihood that there will be issues while running it. Fortunately the one advantage of JVM-based environments is that you get blasted with details when something violently explodes. Of course, that is unless someone screwed up exception handling in the code and your backtrace explodes somewhere in thin air instead. For the same reason using a debugger is pretty easy too, especially if you are using an IDE like Android Studio or Qt Creator that provides easy debugger access.
Logging in Android tends to be rather verbose, with the LogCat functionality providing you with a veritable flood of logging messages, most of which you want to filter out. Using the filter function of your IDE of choice is basically essential here. Usually when I do Android application debugging, I am either already running Qt Creator where I can start up a debug session, or I can fire up Android Studio and do the same here as at its core it’s the same Gradle-based project.
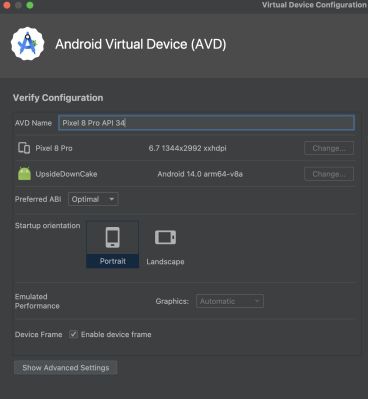
Of course, in order to have something catch on fire you first need to run the application, which is where you get two options: run on real hardware or use an emulator. Real hardware is easier in some ways, as unlike an emulated Android Virtual Device (AVD) your application can directly access the network and internet, whereas an AVD instance requires you to wrangle with network redirects each session.
On the other hand, using an AVD can be handy as it allows you to create devices with a wide range of screen resolutions, so it can be quite nifty to test applications that do not require you to connect to externally via the network. If you want to know for example how well your UI scales across screen sizes, and how it looks on something like a tablet, then using an AVD is a pretty good option.
Some hardware devices are also quite annoyingly locked-down, such as Xiaomi phones that at least for a while have refused to allow you to toggle on remote debugging via USB unless you install a SIM card. Fortunately this could be circumvented by clicking through an alternate path that the Xiaomi developers had not locked down, but these are just some of the obnoxious hurdles that you may encounter with real hardware.
With that out of the way, deploying to an AVD or real device is basically the same, either by using the ‘Start’ or similar function in your IDE of choice with the target device selected, or by doing so via the command-line, either with ADB, or via the Gradle wrapper with ./gradlew InstallDebug or equivalent.
This will of course be a debug build, with creating a release build also being an option, but this will not be signed by default. Signing an APK requires a whole other procedure, and is honestly something that’s best done via the friendly-ish dialogs in an IDE, rather than by burning a lot of time and sanity on the command-line. Whether you want to sign the APK or app bundle depends mostly on your needs/wants and what a potential app store demands.
Ever since Google began to demand that all developers – including Open Source hobbyists – send in a scan of their government ID and full address, I have resorted to just distributing the Android builds of my NymphCast player and server via GitHub, from where they can be sideloaded.
This NymphCast server is incidentally the topic of the next installment in this mini-series, in which we will be doing a deep dive into native Android development using the NDK.



Um.. I’m not sure what was the goal here. Using QtWidgets (the “classical”, non-Quick UI) makes little sense on a touch-based device. Yes, you can make apps, you can probably even make apps which will somewhat resemble other Android apps, but the experience would be painful – for the developer and likely the user as well.
QtQuick is way better in this regard, it provides nearly unlimited styling possibilities and a very nifty GPU-based rendering system. Various builtin widgets are designed to support touch interfaces natively.
For non-GPL apps there is also the problem of licenses. Qt expects you to buy the (very pricy, compared to alternatives) commercial license for Android/iOS development. LGPL-based Qt might be suitable for distribution in the Play Store, but it requires a lot of handwaving and crossing fingers.
The goal was mostly to touch upon some of the possible approaches here. Using Qt (native or QtQuick-based) is a popular way to develop for Android, also because it is one of the ways that you can quickly retarget the same project for iOS and desktop platforms. I should probably have clarified that. There are many other approaches too, using Flutter and countless others, but that’s worthy of an article series by itself.
For my own purposes I mostly ended up at using Qt without QtQuick as using stylesheets is rather versatile, allowing you to use the same UI layout across platforms. Is it the best way? Probably not. Does it work for my purposes? It does. It’s also GPU-accelerated to my knowledge.
I have found QtQuick to be rather limited as well, so that you have to make frequent trips back to non-QtQuick side of things, which somewhat defeats the purpose. Either way, it’s great if one approach works for you, the point here is mostly that there’s no clear-cut way to develop for Android.
Widgets is decidedly not GPU accelerated. It’s all dawn using the QPainter API, which is pixel-oriented. The underlying surface that gets displayed after the non-accelerated content is painted may be GPU accelerated, but the drawing of the interface itself is not.
However, for most user interfaces, especially like what is discussed here, widgets is perfectly fine! There’s no real need for the acceleration – the interface remains pretty static, and gets drawn quite infrequently. Even things like animated progress bars and such aren’t really that taxing, unless you’re running on really low end hardware. So, whatever works!
I personally prefer working with Qt Quick these days, and with Qt Quick Controls, you get some nice looking UIs with native-matching controls if you want, or you can design your own controls from basic elements yourself. The big benefit of Qt Quick is that you have a lot more freedom to design graphical elements in an easy way in declarative QML. That, and you get the graphics acceleration for free.
I don’t know about QtQuick. I would consider using 3rd party libraries such as Qt for as much as possible in Android just because if you write in pure Google Android code, then come back 6 months later they probably deprecated everything. No target should move THAT much!
Great article! I have dabbled with Android dev occasionally, mostly for personal projects in the form of small utility apps to do something trivial (like send a simple UDP broadcast packet or scan for BLE advert).
I have always used android studio for my UI needs, and like most people have found it difficult to get the hang of. I was just getting familiar with the XML based version when they introduced the “Compose” system, which I absolutely have no plan of learning.
I just need to make a small app once every 6 months, I’m not going to learn the ins and outs of Android. Conversely I am proficient with Qt5 for making small UIs on my computer so I’ll give Qt for Android a go. It SURELY cannot be worse than the vanilla experience
i haven’t had luck with the commandline-only installation in a long time. in fact, the big transition in my mind isn’t eclipse -> whatever, but rather ant -> eclipse, because ant was the last one that i successfully installed the commandline-only tools.
these days, i just install android studio and use it to create an empty project and then i don’t use android studio again until next time it needs to update. and fwiw it’s actually easy to sign an application from the commandline, though add it to the list of things that see pointless churn.
i really related to the frustrations in this article. this sentence is gold: “There are no real solutions here, just a call for perseverance and documenting solutions that worked previously, because you will always encounter the same errors again some day.” !!!!!!!!!!!!!!!!
i absolutely detest the mess they’ve made of the compatibility libraries. they had a pretty decent set of idioms for backwards compatibility a decade ago, but they completely abandoned it over and over again. compatibility methods is one of those things you really can’t reinvent without defeating the whole purpose! so these days, i don’t even know which API i’m supposed to target. and i know if i pick one, it will be broken soon. absolutely nothing that isn’t getting broken on the reg.
the “you won’t be able to sideload in 2027” fake news is nothing compared to the realities laid out in this article, if you want to know why android is moribund. android development today is as bad as windows ever was. and android is as ubiquitous and unavoidable as windows was 30 years ago. it’s really bad. google really is the new microsoft. and it’s a real bummer because, like i said, 10 years ago, android was looking pretty good.
This… is not how you write modern mobile apps. Ignore everything the author suggests. Maybe fine for a pet project, but not to be used in production under any circumstances.
Also Gradle is sorely misunderstood. Gradle is just a dependency engine, and a pretty good one at that. It’s all the quirky undocumented plugins that make working with gradle a nightmare.
haha well why don’t you make recommendations
A professional app dev would never be reading this article, we are indeed the target audience, the hobbyist.
A professional app dev would never bother with android dev specifically, they’d just use Flutter or whatever and use the same codebase for Android, iOS, web, etc etc. Probably also why apps are getting worse in general but I digress.
Haha, professional app developer here… I read this because I myself am using Visual Studio with .Net MAUI for a helper app (not the main product) and was wondering whether to switch to vanilla Android stuff. I never expected it to be as bad as MAUI: .Net MAUI somehow seems to hide these clashing dependencies (I suppose it has a compatible combination baked in), uses its own build system (that occasionally fails but doesn’t need much tinkering) and has – well, had – a UI designer that worked well, then stopped working completely but is now supposedly fixed once again. MAUI has other problems, the build is terribly slow, the debugger is quite limited and buggy (although improving) and running stuff on Google’s Android emulator requires frequent factory resets.
I am actually fascinated how they got it working at all, it somehow transpiles .Net bytecode into Java and to get a debugger working on top of that is a small miracle in itself. On the other hand, I would really like a development tool that doesn’t need miracles to work.
Where’s a better guide for amateurs to write Android apps please?
Check out Google’s own documentation. For example: https://developer.android.com/get-started/overview
I find getting started with Android Studio, Compose for UI and running the app in an emulator very straight forward, borderline easy. Just follow the tutorial(s) and fill in with AI if you encounter unexpected issues. Unlike the author I’ve never had to wrangle with network connection using the emulator. Create new emu, deploy, done. It has network connection out of the box. Maybe I missed something. :)
What it comes to cross platform projects (MAUI, Flutter, …) they are quite alright for small or smallish projects. Hobby projects especially! Although if the project is only for you, you’re most likely running it only on your own device at which point the multiplatform support is not really needed… so why not go native? :)
I thought there would be suggestions of an alternative for gradle. Sadly, seems everybody is still in the same ( sinking ) boat. All the rest ( Android Studio x IntelliJ x Qt ) could be learned easily. But dealing with gradle makes one question if it is worth it ( every time ) .
In flames we trust!
I took a couple courses in Android in college, just before Android Studio came out. Back then it was just a Google addon for Eclipse. Android Studio is a massive improvement but I still don’t like it.
For a third option, I’ve had some great success with .NET for Android. I started with Xamarin a few years back to build an app for the garage door opener I built my parents, and more recently I’ve been making small apps for things using MAUI. It lets me stay in VS Code and I can define GUIs in XAML which is more convenient for me than WYSIWYG editors anyway.
One of the worst IDEs ever created. Hope you stay there and let other coders get the job done instead of screwing around with that javascripted abomination.
I know there’s a way to use Maven for Android apps, but it’s so uncommon it’s hard to figure out how.
“After over a decade of having wrangled the – also XML-based – UI files and WYSIWYG design tools in ADT/Android Studio, it never ceases to amaze how simple things like placing UI elements and adding constraints love to explode on you.”
Sounds like when I play with things like KWGT and the like. Constraints can be something.
I have written several personal Apps for Android, and yet every time I come to tweek something I end up not being able to build the project all all, let alone deploy it and use it. The OS requires a new SDK/JDK version, the IDE wants to upgrade, the build system wants to upgrade, plugins, gradle etc etc. It’s an absolute nightmare. In fact if things fail to build and deploy within an hour, I normally start a new project from an example which is compatbile with all the modern cruft, and then import all my code back into it. I still find permissions might now be different, or widgets deprecated. The whole thing is a typical Google ditshow.
Why are there no drop in CI workflows for android development?
i won’t say the new microsoft but the new Symbian.
having a pile of obsolete android device in the drawer and being unable to exploit because the cost of dealing with android outweighs the time and price to do the same with an x86 platform.
i don’t get it.
The difference between a PC and an appliance, and that’s pretty much what cellphones are.
i disagree :)
i only used Symbian circa 2001 so i am out of date but generally i did not find its development environment to be unfriendly. my feeling is that it was actually easier to get the SDK set up than palmos was. though overall i think i preferred palmos.
i suppose it could have become less friendly over time? but as a minority entrant into the market, if it alienated developers, they simply left. i passed my tolerance for android about 5 years ago but i still use it every day, because of the hegemonic position of google. a near monopoly that forces me to use it even though i passionately hate it reminds me a lot more of microsoft in the 90s than symbian at any point. shrug
Great article! Makes me feel better to know that I’m not the only one struggling.
I tried to recompile a camera app that worked 2 years ago and after running in circles for a week, I only got it going again with the help of AI which pointed out the deprecated methods and new library alternatives.
Gradle is awful. I wish the building, compiling and dependency download and detection process was done in the language you programmed in (Java, kotlin or c for android) rather than the random gradle configuration text files.
Scar was a java project that tried this.
I have quite a good results with a quick and dirty android apps using gemini. Same applies to layout modifications. ok, I have to admit it sometimes takes 2 or 3 iterations.
Great overview, thanks for this and perfectly timed since I’m just about to write a little android app for something I need to do. I haven’t done any android dev since gingerbread!!! I guess it’s changed a bit. 🤣