
It’s fair to say that the average Hackaday reader enjoys putting together custom electronics. Some of those builds will be spaghetti on a breadboard, but at some point you’ll probably have a project that needs a permanent case. If you’re looking for a small case for your latest creation, check out [Julius Curt’s] modification of an IKEA Vårsyren lantern into a customizable enclosure!
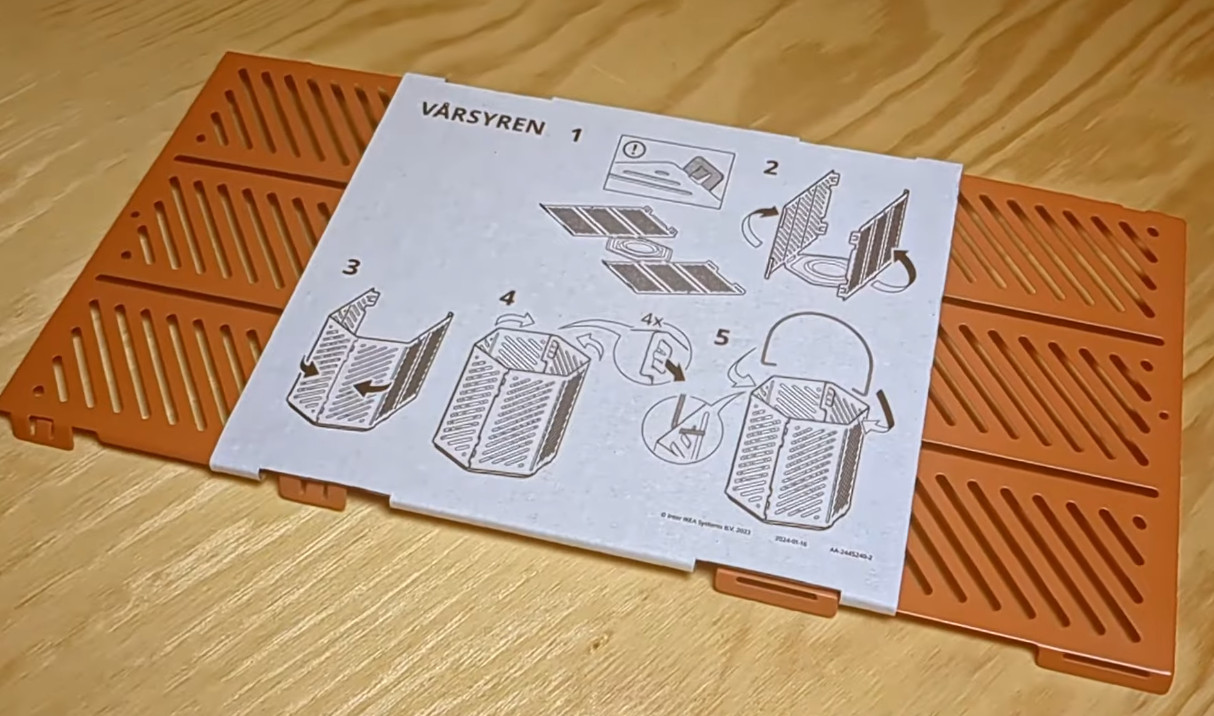
Like most things IKEA, the Vårsyren lantern is flat pack — but rather than coming as a collection of wooden components, the lantern is made of sheet metal. It’s hexagonal in shape with a pair of three sided panels, so [Curt] simply snaps one of them off to make three sides of the final case. The other three sides are 3D printed with the STEP files provided so the case can be made to fit anything around 60x60x114 mm in size.
If flat pack hacking is up your alley, make sure to check out this IKEA 3D printer enclosure next!
Thanks [Clint] for the tip!


Is a hack. Nice.
Actually, should submit it to ikeahackers.net
It’s already on the front page of ikeackaday.com
Am I the only one who thinks 3D printing is kinda expensive? Of course the alternative is a multi-thousand dollar die but…
I’m not good at designing stuff, and use an online service for ordering the parts to get printed. I can never figure out how thick to make the walls or how to chamfer everything to make parts look good, nor do I add ribs to add strength. I’m at the point where I enjoy designing stuff in FreeCAD but everything I design is some variation of a “box”. A cuboid box with screw holes and PCB standoffs
I really, really want to get better at this stuff.
Yeah, it still feels a bit out of reach for me, money wise.
Just got secondhand Ender3 v3 KE for $150 (it’s bit of investment, but still sweet, had to watch listing sites for couple months to get this price), and 1kg of PLA/PETG filament costs $12 in my country. That’s like $0.5 per enclosure… or something… Cannot really get cheaper than that…
Get your own printer, you can easily find used one now for cheap, sometimes for free, and start prototyping, don’t stop at the first iteration, play with it, change the shape, try something new, but also, look around, what other people do, no one was born with it, i felt the same too, now I can design interesting and useful stuff, you just need to get into the hang of it.
I would say it’s as cheap as it gets – you can buy a decent (better than SotA consumer printers from not so many years ago) FDM printer sub-$200, grab $10 roll of PLA filament, and the cost of rapid prototyping of small items is basically negligible – you can go through as many iterations as you need to perfect your design – in some cases your prototypes might even be partial or scaled down to reduce the plastic waste.
Designing for FDM is a skill that needs to be perfected through iterations, in most cases you will need to waste a several spools, but it’s the same in every craft – let it be woodworking or metalworking, which require way more expensive equipment and way more skill to begin with.
I don’t know if it should be called a skill or just basic design rules that depend on your machine.
If you just jump in and design whole parts, and then have them fail because you didn’t account for X, that’s just because you should have printed a test feature first. For example, for clearances and gaps, you print a small test piece with a hole or a slot and see if it matches your expectation. For overhangs, print a small overhang, etc. Then write it down and follow the rule – unless your machine is very variable, in which case you don’t have a rule and you just have to cross fingers every time.
Identify critical feature, print test piece, apply as rule.
You absolutely should get your own printer! The “feel” for 3D printing comes with time, if you have the chance to see what you’re doing. And when you make your first mistakes and when you try to find a better way to avoid this mistakes etc. pp. Do it now, they aren’t soooo expensive anymore. :-)
It’s definitely expensive if you’re using print services, but really not if you own a printer and you can pick up a useable, working second hand printer for under $100 which will allow you to iterate a design really quickly and learn what works.
If you’re teaching yourself find some YT tutorials for freecad or switch to something like the free version of fusion, where there are more than enough tutorial videos and they will have you modelling round things with fillets and chamfers in all the right places, in no time at all.
Mango Jelly Solutions on YT FTW
+1, this channel is something I found super useful. I still do things as boxy-boxes, but after Mango Jelly lessons I do same things faster and with no struggle. If someone is interested in FreeCAD this channel should be on the list for start.
Print services plus delivery definitely present 3d printing as something out of reach. Printing services have niche of small batch products, when you try something on own printer, cast is not in consideration if there is no need of millions pcs, but few hundreds – print farm will produce it fast and on somewhat reasonable price, without printing months on your own printers.
For me – I have 1 printer and now use it for everything to not buy standard mounts, reductions, project boxes, covers. (bought tronxy x5sa years ago, have taught hard way how bad closed firmware is, where even e-steps adjusted in config was not accepted, no pressure advance, so flow was adjusted all the time. But still got some skills on printing, then found VZ-bot conversion and Klipper, with all printed parts came from x5sa nozzle itself after change board to BTT with Klipper.) If someone starts 3D journey now it’s easier, cheaper and even mechanically far from perfect printers (which are less as half the price of x5sa then) can print acceptable quality with proper calibration and with speeds far higher than 50mm/s.
Well yeah if you order it, it’s going to be expensive.
I bought my first 3D printer in 2018 and this year got a new one. Initial investment can be rather large (*) but the filament is cheap.
I just bought another 10KG of filament for 89 euro’s. That’s 10 rolls of regular PLA. PETG can be bought even cheaper. You can do so much with one spool of filament and you can adjust so many settings to make it cheaper. Not everything needs super strenght. I’m currently printing a ton of gridfinity stuff and that is rather wasteful, but on the other hand, I’m not printing it out to throw away the day after. I see it as a tool. I’m working on organizing my workshop.
I got printed doorknobs in my home, a bunch of helmet hangers, hangers for my tools in the workshop, special hangers for hearing, lung and eye protection. So much stuff in and around my house is printed because it’s so cheap.
And I don’t even know how to use freecad. I’ve done everything in tinkercad, from desinging motorcycle dashboards to a pinball machine that’s in the pub.
3D printers can be bought cheap. Second hand for well under a hundred, brand new ones starting at 150 euro’s but if you look on the chinese sites, you would be amazed at what you can get.
like the other replies, i don’t find 3d printing to be expensive… i’ve been doing it for 11 years now, and i have 135 different projects, on average i probably print each one twice. and still, i’ve only used 5x 1kg rolls of filament (i’ve bought 9 rolls but some of those haven’t been used for one reason or another). i definitely fool around with thin walls with ribs vs thick walls etc, because i care about the mechanical qualities of my parts sometimes.
but it really depends on how you use it. i have a pretty narrow idea in my head of what sort of projects 3d printing is good at. i don’t like to print totally unattended, so i don’t want to print anything ‘big’ that is going to take more than about 3 or 4 hours. so that limits me to about 20 meters of filament per object, and i like things to be much smaller than that. i limit myself pretty early on in the design, like i never make a lever arm out of 3d printed stuff for mechanical reasons but also it just uses an absurd amount of filament. if i’m making something big, i might print corner brackets or alignment pieces but the strength and the bulk is going to be dowel rod or plywood or something like that.
there’s a lot of people with a very different philosophy than i have. last time i said anything like this, someone replied here to say i’m not a serious user of my 3d printer because i’ve barely used any filament. that’s an incorrect judgement about myself but also i think it reflects a way of using the printer that i don’t really admire. like, if you look at forums, you’ll see a ton of users complaining about repeating a 50 hour print job with a defect in it, using multiple rolls of filament for one project, that sort of thing. there’s definitely an expensive way to pursue this hobby!
the thing that gets me is that a lot of times they’re making unjustifiable mechanical choices. like, people will literally print in plastic something with the same dimensions as a 1inch x 1 inch x 1 foot piece of aluminum extrusion. it’s gonna be hard to print, use a lot of filament, and then have awful mechanical properties!!
so ymmv :)
Next project is a new shift key for your keyboard. :)
(I enjoy your comments)
I got a Bambu Lab A1 mini for $220 (plus shipping) on sale. Self bed leveling, it just works, I don’t have to tinker with the printer, I can focus on designing and printing. Basic filament is like $15-$20 on Amazon. I learned FreeCAD in about 10 hours using youtube tutorials and I can make some decent stuff.
It definitely depends heavily on your own skill and time tinkering with printing; it’s not an easy skill to teach from rote, especially since it’s dependent on your own use cases. For example, I’ve scanned parts of my own body, to custom fit VR hardware to it, so that I could wear comfortable shoes in VR. That required me to know how to 3D scan, how to clean that up, how to make water tight models in blender, how to cross-import model files, and how to plan a weirdly organic print to fit in the build plate and print reliably.
That’s like 5-ish different skills I had to have to hand, which all multiplied eachother.
The more you tinker, the more you make connections between different skills, and the more you do that, the more interesting and valuable tools like 3D printers are.
um, is it just me or do both the links in the article go to the same thing?
Seems like it’s here: https://hackaday.com/2023/08/29/ikeas-billy-bookshelf-is-a-useful-3d-printing-enclosure/
I usually just reuse takeout containers or cheap plastic food storage containers. Or, design a cardboard box that I can cut out and fold. Once I designed a box to be 3D printed and asked a friend with a 3D printer for advice. He told me essentially that I couldn’t put the louvers that I wanted on it (or that it would be insanely difficult), so I reused a dishwashing pod container and cut them out with an exacto knife. I would have bought a 3D printer if it would have been easy.
Anyway, this is a cool idea.
You had me… until the part where they 3d printed 3x FLAT RECTANGULAR SIDES.
This is something to be shamed, not lauded.
Do.
Not.
Print.
Flat.
Rectangles.
With.
Holes.
Printing privileges revoked.
I was thinking this too. They really missed the opportunity to do it up right with a bit of hardwood. Or even G10 sheet if they were concerned about it’s enclosure properties. Even if I just wanted white plastic, it would have been better to cut some HDPE.
Cut, with what? To what accuracy?
Who cares?
It is a DIY project box that someone might make a few of at most.
If you need high tolerance, or thermal stability, you shouldn’t be 3d printing anyway.
Laser cut it from a sheet of ABS?
Or a hacksaw?
Of course, you would be fabricating 3 of the 6 sides at this point, so why are you bothering with the Ikea parts? They look cool I guess.
The point is that the $2 Ikea item is only partially used.
They didn’t find a clever way to make a project box by reconfiguring the lamp parts.
They cut off a single part of the lamp and stuck it on an expensive 3d printed box.
I designed this lantern, cool hack!