
As computers like the venerable breadbox Commodore 64 age, their plastic doesn’t just turn increasing shades of yellow and brown, the ABS plastic also tends to get brittle. This is a problem that seems to plague many plastic cases and enclosures, but fortunately there are some ways to halt or even reverse the heavy toll of time, with the [More Fun Making It] YouTube channel exploring a number of methods, including UV-curable resin, PETG 3D-printed clips and silicone molds.
Aside from large-scale damage, screw posts tend to snap off a lot, either during shipping or when merely trying to open the case. The same is true for the clips around the edge of the C64 case, which rarely survive that long. Gluing a case clip back on with epoxy or such somewhat works, but is messy and not that durable.
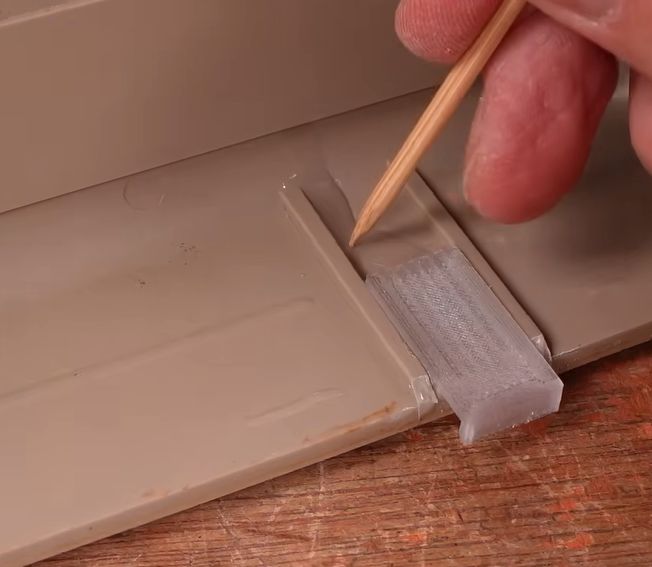
Instead UV resin is used, together with newly printed clips in translucent PETG. The remnants of the old clips are removed, followed by the application of the resin. The clips are actually a modified version of a VIC-20 case clip design by [Ken Mills]. With the UV resin as glue, curing is almost instant with a UV lamp unlike the tedious process with epoxy.
In the case of screw posts the alternative to just re-gluing was initially clear tape as a mold and UV resin, but this got improved with making a mold of an intact post from kitchen-style silicone and corn flour. This mold is placed around the busted post and resin poured in before curing. A new thread can then be created in a drilled-out hole with liquid resin around a screw, though we imagine that one could of course try running a tap through the cured resin as well.
A big challenge for the mold was to create an entire screw post from scratch, which required poring in many layers of resin and curing them, which is probably more tedious than 3D printing a new one. That said, it does seem to work, and it’s not that dissimilar from the resin used with SLA 3D printers, all of which are photopolymers. Without a clear idea of what exact photopolymer is inside the bottle, results may obviously vary.
Finally, resin was also used to try and glue part of the enclosure back together, and a viewer appears to have repaired a terminal whose case got shattered by the tender care of the parcel system using UV resin with good results. Of course, if your system’s case has been basically pulverized as in the case of [LGR]’s laptop, then printing a new case might be the more sensible option.
Thanks to [Petrik77] for the tip.


As I’ve been finding out, 3D printer resin does not reliably cure in thin layers. This is due to oxygen from the air poisoning the photoinitiator, not normally a problem in SLA because the curing happens at the bottom of a tank.
There being a shortage of fancy glues in these parts, I’ve been using “Top Coat” UV fingernail gel. Remarkably effective. I’ve been getting 30μm lines 2.5μm thick to cure solid, and left it in air over 6 hrs before successfully curing it.
Can you eloborate on the technique with top coat fingernail gel? I’m not sure I understand
Gel topcoat includes a little wax that floats to the top to prevent air from poisoning the reaction.
I thought it also resulted in poor adhesion without sanding, but given Vik’s reccomendation, I guess I gotta try now.
UV-cure adhesives are great as long as you can get the UV light to the adhesive (so it doesn’t work well in between two opaque pieces.) I have “Bondic” which is pretty good. Bondic is apparently based on dental UV-cure adhesives (if not the same stuff) and is non-toxic unlike 3D printer resin, but Bondic is also around 50 times more expensive than 3D printer resin.
Over the years I have fixed the cases of some family feature phones and other brittle-plastic devices (what my MiL called “losing their molecules” :-) using an air-setting rubberised resin called Sugru. There is also the special “All Plastics” version of Loctite’s SuperGlue (two-part with wand and resin). But this UV method looks much easier and less mess, thank you for posting it. Unfortunately Bondic is out on Amazon atm.
I recall a recipe for homemade Sugru made using pure silicone caulking and cornstarch. Not sure how well it works, though.
It wouldn’t be my first choice to use a resin material to act as a screw post, but hey… if it works it works.
I wonder how the resin responds to heat. Since the expoxy resin (as shown in the start of the video) will soften when heated. No I know not all resins are the same, but if the UV resis with soften with heat too then it might be possible to “drill” the hole with a modified soldering iron to get a pilot hole and then insert a red-hot heated screw into that hole, when it cools, remove the screw and replace it by a normal screw. Since the heated screw most likely doesn’t look very nice any more.
Just a thought, anyone got any experience on this one?
Seems like it would be better to use a drill and tap.
I use UV glue a lot for temporary fixation or to insulate electrical things. My experience is that it’s not that solid and it cures only where UV reaches it, so cavities and shadows will remain filled with unset resin.
Recently I bought some dental filling material from Ali, together with a fancy bright LED light. That glue is rock solid (ofcourse) and much better than the translucent UV glue. However, it’s expensive and all these resins don’t really stick to the other materials, so you need to make cuts or grooves to let the resin grab onto.
An epoxy-like resin that cures rock solid with UV, that would be something great but I haven’t found it yet.
Why didn’t they build these things out of that plastic that lasts 3 million years in a landfill instead of this stuff that breaks down in a few decades in the nearly ideal storage conditions of a climate controlled home?
They expected them to be obsolete in a few years.
I think it slightly more complicated. 8-bit consoles had gameplay that wasn’t ever going to be updated, and the cartridges seem solid enough to last many decades. The original PCs even had Intel Aboveboard 386 upgrades, so some expected organizations to hold on to their 8088 and 8086s for quite a while! Many were condemned to be word processors only. After 386, I think there was “planned obsolescence”, but for the “Golden Age of 8-bit micros”, I think cost reduction just counted for more, when they used the plastics they did.
They don’t say that the plastic remains in its original form, just that the material remains. Take a granite gravestone, it will probably also last 3 million years, but over that time it will increasingly change from being a block with crisp lines to a odd shaped stub of stone and grains that will get scattered around the cemetery. Technically the granite still exists, but not in the original form.
Cost. Same reason they didn’t make the cases out of aluminum.
The stuff in the landfill is more protected. Not much oxygen, and near-zero UV or ozone.
That’s a challenging (mechanically speaking) thing to fix, so I admire the author’s ingenuity.
Decades ago many el cheapo walkman headphones had their fix with paperclips and soldering iron : – ] Later on extended to few small things similarly mended – paperclips melted into the case from the inside. Obviously, a brutal and rather incomplete solution, but it did the trick for the time being. (ie, since the mechanical stress point wasn’t resolved, it would be a matter of time until the paperclip dislodges and the case cracks again in the same exact spot).
Baking soda (sodium bicarbonate) and cyanoacrylate glues work really well too. Even better, get glass “micro balloons” from your local craft outlet (or online, presumably) to achieve the same goal.
You can create little dams with foil, kapton and cardboard. Add your CA then your filler, stacking it up as much as you’re comfortable with. Bonds to itself really well, too, even post-cure. That means you can do a bit, let it cure, do some more… like a slow 3D printer.
Takes sanding and shaping very will (though PPE is mandatory… Breathing tiny glass beads in sucks, ask me how I know.) and handles filler, primer and paint if applicable. I have a few decade+ old repairs still hanging on after using that method. Learned about it through a hobby shop.. a greybeard used that method for fillets on model rocket fins/transitions.
Good luck!
A lot of older monitor cases remind me of buildings.
If I had money, I’d trash-bash cases into spacecraft, bases. Their brittle nature perfect for pyros.
Supermarket displays (Kent corp) have to survive being wet and are thus rugged.
Plus, some kiosks look like TARDIS time rotor stands or Romulan console towers
I’ve seen Adam Savage use UV glue so I bought 3 different brands. All came with their own LED UV flashlight. Never been so disappointed. Supposed to cure in seconds but no matter what I do, it just won’t cure entirely. It goes from a liquid to a sticky layer that’s soft and the holding power is pretty much non existent. I bought specifically to glue LED filament into a housing and cover the top with the glue as it’s supposed to stay transparent. Haven’t tried putting it outside because of the weather, but tried all 3 glues, all 3 flashlights, two different plant grow lights. Nothing seems to cure it. There is nothing over the glue. It’s exposed so it isn’t even below polycarbonate or something else that can block UV. Don’t know what I’m doing wrong. New UV lamp should come in today, hope that works.
This is a little ridiculous, but I’ve “Kintsugi’d” a Compaq Portable case, mixing gold mica with epoxy, because there wasn’t a neat and easy way to use epoxy, I had to build it up, let it overflow inplaces, making the repair obvious and clumsy, so why not make the repair itself an art? A lot of effort in the article and comments seems to be made to make the repair as invisible as possible, so stop doing that! In hindsight it’s an obvious solution. Real kintsugi involves ceramic and real gold and I don’t recommend that, but, some people spend hundreds putting their Macs and C64s in transparent acrylic cases, so I don’t think kintsugi is such a crazy idea.