Like many of you, I have a hard time getting rid of stuff. I’ve got boxes and boxes of weirdo bits and bobs, and piles of devices that I’ll eventually get around to stripping down into even more bits and bobs. Despite regular purges — I try to bring a car-load of crap treasure to local hackerspaces and meetups at least a couple times a year — the pile only continues to grow.
But the problem isn’t limited to hardware components. There’s all sorts of things that the logical part of me understands I’ll almost certainly never need, and yet I can’t bring myself to dispose of. One of those things just so happens to be documents. Anything printed is fair game. Could be the notes from my last appointment with the doctor, or fliers for events I attended years ago. Doesn’t matter, the stacks keep building up until I end up cramming it all into a box and start the whole process starts over again.
I’ve largely convinced myself that the perennial accumulation of electronic bric-à-brac is an occupational hazard, and have come to terms with it. But I think there’s a good chance of moving the needle on the document situation, and if that involves a bit of high-tech overengineering, even better. As such, I’ve spent the last couple of weeks investigating digitizing the documents that have information worth retaining so that the originals can be sent along to Valhalla in my fire pit.
The following represents some of my observations thus far, in the hopes that others going down a similar path may find them useful. But what I’m really interested in is hearing from the Hackaday community. Surely I’m not the only one trying to save some storage space by turn piles of papers into ones and zeros.
Take a Picture, It’ll Last Longer
 Obviously, the first step in digitizing physical documents is image capture. The most obvious way to accomplish this is to simply use a flatbed scanner, and in some cases, there’s a solid argument to be made that it’s the best approach. Indeed, many of the documents that I’ve already filed away digitally were created this way. But it’s a tedious enough process that you may want to consider alternative methods.
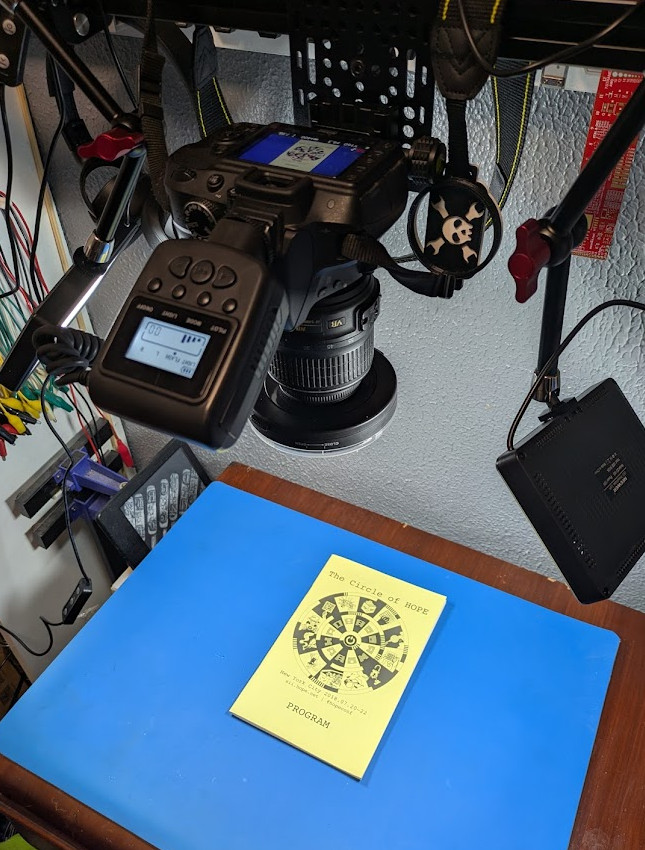
If you’ve got a decent camera, you can get a couple of lights and put together a nice overhead photography rig without spending too much money. Put your document down under the camera, snap a picture, and keep it moving.
Imaging doesn’t get any faster than taking a picture, and so long as you’re not using some point and shoot from the early 2000s, the resolution should be more than sufficient. This method is particularly appealing if you’re planning on digitizing books or anything else that can’t be laid perfectly flat on a scanner.
The major downside with this approach is the setup itself. It’s one thing if you’re digitizing documents and books on a daily basis, but for occasional use, putting something like this together is a big ask. A flatbed scanner certainly takes up a lot less room, and you don’t have to worry about getting the lighting right, mounting the camera, and so on.
Casting Some Magick
Whether you used a scanner or a camera, once you have the image of your document, you’ve technically digitized it. Congratulations, you’re now an amateur archivist.
If you’re looking to keep things simple, you could stop here. Stash the files someplace and be done with it. But depending on the type of content you’re working with and what your goals are, there’s a good chance you’ll want to touch up the images a bit. Luckily for us, the incredible ImageMagick project has many of the functions we need built-in, from cropping and resizing, all the way to image enhancement.
Consider the image below. It’s clear enough to read, but the text is rotated and the lighting isn’t consistent across the entire page.

We can fix both issues with a simple ImageMagick command via the convert tool:
convert input.png -deskew 30% -threshold 25% output.png
We won’t get too bogged down in the details, the ImageMagick documentation can break it all down better than I can. The short version is that we’re telling it to straighten out the image and convert it into pure black and white. The result looks like this:

The values can be tweaked a bit to refine the result, and as you might imagine there are many other ImageMagick functions that could potentially be brought in to clean up the result. Things do get more complicated if you’re working with something more complex than plain text, but you get the general idea.
This sort of post-processing is especially important if you plan on running the images through any sort of optical character recognition (OCR) to capture the actual text of the document. That first image might be perfectly legible to our human eyeballs. You might even prefer it over the stark look of the processed image, but tools like tesseract have a hell of a time picking the text out when the background isn’t uniform.
There’s an App For That
 The process described here certainly isn’t for everyone, and that’s fine. If you’re not looking to invest the sort of time and effort it would take to make this work, there’s fortunately a far more approachable solution available. In fact, it might already be in your pocket.
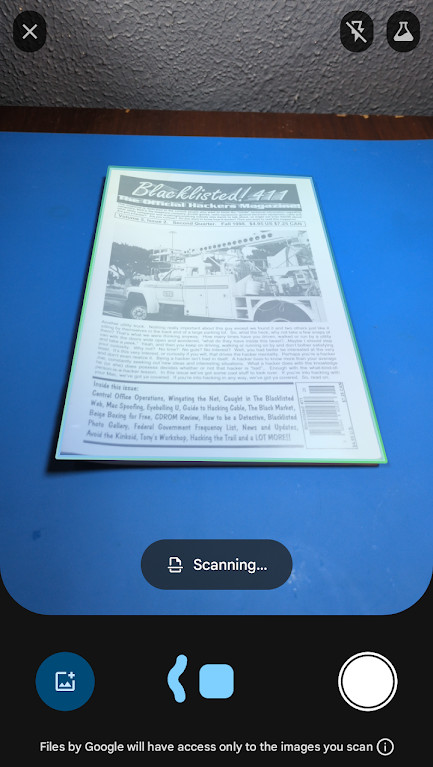
The Google Drive mobile application offers a very impressive document scanning mode that essentially automates everything above. If you give it access to your device’s camera, it will automagically detect documents in the field of view, find their edges, compensate for angle and rotation to straighten out the image, and even run it through filters to make the text pop. It’s fast, works reasonably well, and is exceptionally handy for cranking out multi-page PDFs.
The downside is that you’ve got relatively little control over the process, and being a product of Google, there’s the usual concerns over what they may be doing with the information that’s passing through the system. For these reasons it’s not something I would personally recommend for any private information, and its automatic nature the lack of fine-grained control means it may not be a great choice if your needs venture too far from the beaten path.
Still, the speed and ease of use it offers is admittedly very attractive.
Open to Suggestions
I’d love to hear the community’s thoughts on digitization, whether it’s hardware or software related. There’s surely some slick projects out there that aid in creating bespoke digital libraries, and there’s plenty of areas where real-world experience can help streamline and improve the overall process. For example, what’s your file naming convention look like?
Hackaday readers are rarely shy about sharing their opinions, so let’s hear them.


Paperless-ngx self hosted in a docker container. Great OCR and machine learning (not AI, but there is a plugin if you want) for auto tagging. 100% local so no data leaves the machine. Pair with a cheap document scanner and you’re set.
I looked at Paperless-ngx, but it’s a bit of a pain because it only supports Linux. You really need a dedicated VM or box for it, and then you have to deal with storage and backup… It’s okay if you already have a homelab or run Linux, but otherwise it’s not great.
It isn’t open source, but I find that Fujitsu’s ScanSnap Home gets the job done. It has OCR, you have to organize manually, but it works. Most importantly it is local only and runs on Windows, so integrates directly into your existing backups.
microfiche needs a come-back
There are people on here who don’t have any linux machines at all? Like you don’t have a pi lying around?
You can run paperless-ngx in wsl theres instructions out there. So its essentially windows too back through win10.
I just yesterday finished installing paperless in my docket swarm.
Some interesting hurdles were needed to jump as I’m using my Synology NAS for storage, but once the futzing was done it works fairly well.
Again,
It sure works be nice if I didn’t have to enter credentials at EVERY post…..
One thing I continuously struggle with is handwritten courses and documents. There’s some good information in most courses I have had that’s hard to come by anywhere else, oftentimes because the teacher was knowledgeable enough to gather it and synthetize it in the first place. However, I have noticed that the ink in some of these notebooks is already starting to fade, although they were written only seven years ago. They are still useful to me today, and will be in the future, so I need to archive them.
I have a very irregular handwritting and no automatic tool has been able to help me in the goal of digitizing them (amongst others, I’ve tried Kraken and a lot of OCR datasets). My only option so far is to type them by hand, but it’s incredibly time consuming.
OCR works really well on typed documents, recent or old, and Kraken is a great tool. But I am quite baffled at the complete lack of any way to digitize handwritten documents from the modern era – most datasets being fit only for 17th and 18th century in Europe (to digitize letters/communal records). Moreover, the fact that each person has their own way of writing each letter of each letter – and my way is rather erratic, although I can decipher myself ok – makes the application of OCR way more difficult. And last but not least… All of my notebooks are checkered in blue, and I use blue ink, which confuses OCR completely and only produces gibberish at best.
You might be better off reading the information aloud into transcription software, then manually cleaning up the output, unless there are a lot of diagrams and such. Or, if it’s very valuable, you could hire a transcriptionist.
That’s actually quite a smart way of doing it. I could convert all my courses to audio, then use whisper for accurate transcription. However, it’s still not as fast and effortless as OCR.
It is lao possible to train kraken on your handwriting
It might be worth the try if you have a lot of documents.
https://kraken.re/2.0.0/training.html
It is possible, but in that case, the overall effort necessary to produce something that will give true and accurate transcription from a personal dataset completely excedes the effort (already considerable) necessary to transcribe courses by hand.
“However, I have noticed that the ink in some of these notebooks is already starting to fade, although they were written only seven years ago.”
For preserving physical copies consider using archival pen and paper. Those are not that expensive.
I am late to the game, but here it is : -] Dismiss once read.
Years and years back (1984 to be exact) I was working at a summer job where I had rather limited access to documentation – I was given it to read and take notes for maybe hour or two a day, and then it was taken back, since it was part of the technological process, and I couldn’t hoard it (or bring home for the night to read through).
So what I did was trained myself to write in a neatest way possible, almost as if I am a printer, in a smallest font possible that’s still readable by anyone. Obviously, it came with pains of learning a new skill I never had, but once I’ve learned how to write all the letters in a uniform way, I’ve trained myself how to also write these as humanely fast as possible. That way, when I am given a technical documentation for like one hour, I can quickly skim through and take my notes in a speedily matter and end up with a readable thing I can refer to later.
I didn’t want to fallback into shorthand, nor I wanted to write in cursive, instead I invented by own way of writing. I still have one my university scrapbooks, and anyone opening it can read everything, since it is almost as if a tiny printer printed all the letters neatly, quite nicely lined up, etc. Drawings, too, and diagrams, btw, which is kind of a side effect, I could draw perfect top-bottom left-to-right lines with no squiggles (though, perfect circles were never mastered) in swift draw no problem.
Meaning, if there is no simple straightforward solution, sometimes one has to innovate. I did – and almost 40 years alter still can speedily hard-write in neat printed non-serif font type (I’d say it is close to the classics, Helvetica maybe).
I deliberately changed the way I write several letters to break old trained reflexes and improve legibility. I now use the typeset version of lowercase a, rather than a simple oval with a tail, and put a hook into the bottom of my t, among other alterations. I should try doing something similar with my cursive, which has degraded to the point where my signature trails off into a blur.
Consider searching for OCR models like DeepSeek-OCR or Chandra on huggingface and trying them out with your handwriting. They can be ran locally via llama.cpp (using –mmproj flag) and run on consumer GPUs. I haven’t tried it with handwriting, but the latter model advertises itself as having good handwriting detection, check the “examples” section of their github repository (datalab-to/chandra). You’d need a somewhat decent computer though.
Do we really need GPUs to decipher doctors notes? I don’t know, but it might be worth investigating. The interesting thing is that those models usually produce a Markdown/LaTeX soup (for formulas) which can easily be transformed into EPUB or other data types using pandoc, which makes those documents searchable and everything since EPUB is just a collection of xhtml pages and the occasional media file.
Other stuff I’ve read about is Azure OCR services, with one guy on Reddit claiming that it can detect even pretty bad handwriting, although then you’re in the “cloud” problem space again. I’d wager that these OCR models will become much quicker and more reliable in the next one to three years. Unlike other artificial “intelligence” technology it’s actually a worthwhile and useful endeavor…
As for digitizing/filing…I just usually take my smartphone (Samsung, has a “Scanner” function in the Camera for taking somewhat neat pictures) and save it on my computer. Although that is Android again…I don’t get the need for such a complicated camera setup if a smartphone and maybe a holder for that smartphone of some sort can produce similar high resolution results nowadays – unless you want a device that is completely offline.
I use a “hybrid” model for my hand written lab notebooks. Using one of those sequencing stamp machines, the blank books get page numbers added. I use a spreadsheet to create an index of the topics in my hand written notebooks. Every few months, I go through the new entries and put the topics into the spreadsheet, along with dates and page numbers. Adding 30 or 40 pages to the index takes an hour or two. The books are identified by the date range covered.
Using this allows me to find all the entries by searching the index. It works pretty well for me.
Train your own AI OCR. Provide it enough samples of both handwritten and then a typed digital result so it can learn to read your writing.
About the blue on blue: since the writing is visible, there’s a difference in color. So thresholding via imagemagick or libvips (up to #5555AA is white, after is black) might help.
I have a Canon DR-M160 I got for ten bucks. Rapid feed duplex document scanner. Feeds it straight into paperless-ngx. Look it up, its awesome, can pull docs from emails also.
Those things are good, but only if you can feed the sheets into them. For magazines and books… If they are stapled you can remove those and replace them later, but otherwise you have to cut the spine off.
Open book scanners! Likely, your nearest university library has one you can use.
Books and magazines have likely already been scanned. Check the magazine’s website, search the web at-large for them, check archive.org, etc. For example, World Radio History has every Popular Electronics issue ever printed.
Or if necessary hoist the Jolly Roger and visit the Bay or Anna’s place. Nvidia and closedAI did that, so OK for you too! /s
Worst case: Take Keil’s advice and check library, university, or hackerspaces.
Apropos, I bought a Brother ADS-1700W for $20 on craiglist last yar It’s a very, very good sheet scanner, very fast, auto deskew, and works perfectly in Linux.
OSS Document Scanner is a nice opensource app with reasonably-good offline tesseract OCR for printed text.
FairScan is another good option. Slightly snappier but sadly the ocr is not that great.
Digitizing is not archiving.
Digitizing is only part of the task. That’s just kicking the can a tiny bit down the road. You still have a pile of unfindable, unsearchable stuff.
So how to make that pile of unsorted, inscrutable bits and bytes useful?
Rather than simply digitizing, I think a more useful thing to know is what do do with the digitized output? How do you make it searchable? How do you make it useful?
Photo people have kind-of got a solution with manually-entered image tags. But there must be a better way, especially with OCR and machine recognition of images.
Anybody got suggestions or best practices on how to file, sort, and search the mess of files generated?
Some use AI (yes that).
its common practice to run the digitized documents through an OCR engine. the finest examples of digitized archiving can be seen on bitsavers (dot) org
As proposed one post higher up: paperless-ngx
Don’t use it myself at the moment, but I intend to, I heard good things from people using it.
That last question has been extensively studied by those in the fields of information science and library science.
Lookup ‘freewais’ to get a taste of how to do serious searching over a collection of documents. Also check out http://www.greenstone.org for a practical solution.
That’s literally what the end of the post asks about and is looking for input on.
This problem has been extensively studied. A good place to start looking is the set of links published by the Northeast Document Conservation Center. https://www.nedcc.org/free-resources/digital-preservation
Ah, neat. Lots of stuff there. Thanks.
Awesome link, thanks for the share
About 20 years ago I started writing a Python program that does the sorting for me.
It now has grown in complexity but does an excellent job at storing PDF files of the usual paper that I generate from day to day. I can pull up marketing material that I cared about 15 years ago. Random receipt for a pair of shoes from a few years ago (I had to do this in customs once). A list of restaurants I went to in Japan a decade ago. My flight, taxi, limo, uber, lyft, grab, etc. history. And more. All the backup that the IRS might want to see in case they question anything.
It also re-OCRs files that have poor contrast, and switches to various foreign language OCR’s in case it looks like they need it. And I also run a search program on the side that keeps track of all the OCR’d text for random searches. Everything is categorized in folders by company, date, and stored on a drive that’s shared in the cloud.
My ScanSnap scanner is my friend.
The underlying paper goes into boxes by date and gets shredded after 10 years. Wonderful.
It is archiving, just not the most useful kind. Its the most necessary kind of archiving, continuing the existance of the data. Making use of that data then becomes the job of whoever accesses it in the future. The person doing the archiving can try to make that easier by formatting, indexing, naming, tagging, filing, OCRing and cataloging. Some or all of those may be useless to the person in the future utilizing the data, so its not as necessary as saving it.
Like Matt, but built into the printer. Even has the feature of conversion and sending to a particular source. Hardest part is prepping the papers so it feeds cleanly with little problem.
On a related note: Has anybody got any experience to share about the reMarkable tablet https://remarkable.com/ ?
It looks really well thought out, with tight integration with filing and searching tools, but a bit out of the “impulse buy” range.
How is this related? Is this an ad?
I’ve had one of these for a number of years. I use this for:
Note taking
E-reader
The “convert notes to document” feature is a paid for feature and I find it hard to justify the monthly fee even though it is a small fee.
Documents can be transferred to you local machine, I normally do this through the free cloud storage.
It is a good e-reader for data sheets as you can read a page of A4 on the screen. It also works for SDK documentation such as the ESP IDF documentation.
You are right though, it is not an impulse buy as you really need a pen and a cover / folio and when added together it starts to become expensive.
I don’t regret buying it but it is costly.
Cool. Thanks for the report.
I think I’ll still leave it on my wishlist for now.
I use remarkable remember, which works just fine. It uses the myscript api which lets you do a lot of recognition for free.
MyDeepGuide YouTube channel is a good source of information regarding e-notes and e-readers.
Personally i have Boox Note Air, and in my opinion e-notes are a very good splurge. At first I was skeptic if i can justify the purchase, but for a few years i used it regularly and was glad i made that decision. All in all – as any tool it is a good tool only if you actually use it.
Paperless-NGX plus a Brother ADS-4300N
I use a portable Doxie scanner. It does a good job of OCR, but it’s a bit tedious to deal with many pages since it doesn’t have a feeder. For organizing, I just save the documents as PDFs and store them in folders organized loosely by content. I don’t have a tagging system, but it’s simple enough to do text searches in the folders most likely to have a particular document. For important documents, I’ll do “tagging” via file naming, but that’s too much trouble in general so I stick with the indexed file name that the scanner produces by default. I don’t have many handwritten documents to deal with. The few I do have just end up being stored as images within PDFs, so not searchable.
Beware the digital document trap: Nobody may be able to read your digital storage medium in the future.
I’m going through my late father’s papers. I found a lot if interesting stuff, including his notebook from the Navy during World War II. I also found a bunch of 5.25″ floppies that he wrote using WordPerfect.
I can read the papers, but the WordPerfect disks are basically worthless.
Remember: Paper is the ONLY medium that is guaranteed to be machine-readable in 50 years.
If they aren’t completely bit-rotted, there are plenty of ways to get the WP files off of those floppies and converted to newer file formats.
Paper wise, nobody will care either after we are gone. So personally, I file what needs to be filed (paper) for my use and don’t worry about the future. Filing it keeps it ‘neat’. Also what I want to save in the electronic world, I keep it spinning (with backups stored internal and external). That way the storage media is always up to date and you don’t have to worry about supporting 8″ floppies (for example) forever. And in 50 years, 100 years, … no one is going to care.
I seem to recall downloading from WordPerfect the suite which had a 30 day eval. Was able to read and then write to another format.
That and they have sales on it if one wants that authentic feel.
I’ve seen this argument plenty of times, but I don’t buy it. I promise you, there’s a way to read that data on a modern machine, even if it means emulating an old OS and running WP.
But even that is an edge case. The major file formats, like JPG/PNG/PDF aren’t going anywhere and I can still open 30 year old files as if they were created yesterday.
If anything, the lesson should be to not use proprietary formats that only exist because some company is propping it up.
There is a way, if you have access to a working 5.25″ floppy drive.
Those things are not going to be around forever, whereas the ‘MK-1 EYEBALL’ will be as long as the information matters to anyone.
man, i’m pretty confident i could reverse engineer word perfect by hand without any prior knowledge, at least well enough to extract the prose. i have gone down that road before, for much more obscure formats than wordperfect. i’m just saying, don’t give up. all else fails, there’s emulators for every classic PC or mac program from 1980 to today.
You can download WP7 for DOS at this link. (https://sfwriter.com/ws7.htm) There are DOS emulators included with the WP7 download and with a 5.25″ floppy drive you should be able to save his writings.
The last I tried, you could still install WordPerfect for Unix on modern Linux.
https://github.com/taviso/wpunix
It’s been a while since I’ve tried to read a 5 1/4″ (or even 3.5″) floppy though.
Not that we use stone tablets much but…
Installed paperwork and never thought about paper document management again.
https://gitlab.gnome.org/World/OpenPaperwork/paperwork
First, i think it’s important to recognize that a lot of things can be thrown out! And the things worth preserving are not really that voluminous. 90% of books i buy go into the donation pile after 1 read. And paper-ink does age pretty severely but even thermal copyright paper is usually (but not always) readable for decades without climate control in a humid inland continental climate. And the things i keep, anyways, are easy enough to index hierarchically. Like if i want to find my notes from a class i took in the 1900s, ~/text/university/1999-fall/C211 gets me there fine.
Overhead scanners are often available at libraries. The details will decide whether it actually works for you. They usually install software that will give aspect correction (like for the pages of a book that are curved towards the spine) and searchable PDF-style OCR. That software’s real magic feature is that the library staff member who tells you where it is probably can show you how to use it too.
And a note on imagemagick…real love/hate relationship. The biggest frustration is that for output PDFs, there is a really intractable relationship between different conceptualizations of # pixels, # inches, pixels per inch, and aspect ratio, which are all tracked separately for different formats. I spent many hours trying to get a bulletproof solution to that problem. What i found is: pdflatex with \usepackage{graphicx}. Absolutely everything about its \includegraphics works exactly how you’d expect. Just amazing.
“First, i think it’s important to recognize that a lot of things can be thrown out! And the things worth preserving are not really that voluminous.” Right on the button. As you get older you notice the things that get ‘used’ and those items or notes or books or … that haven’t been touched in 20 years. As an example, Just recently I noted we had shelves of magazines that I realized I’d never look at again (thought I would, but…) . Also a bunch of books that I would never re-read. College notes, books never opened or read again … all donated/deep six’ed. Interesting the things you ‘think’ you would need as references or re-read… and never look at again!
Then there are the things with actual archival utility. For instance, going through my dad’s bookshelf, we found a book of Apollo telemetry hardware schematics. (The rocket, not the workstation.) I shared a digital copy with the Apollo flight computer restorers, but the originals are sitting in my “archive” which is my imitation of the library.
Boxes and folders from Archival Methods. Behind a glass door case.
I have an old Fuji ScanSnap document scanner that a friend gave me when it got obsoleted by MacOS going 64 bit. I have an old Windows 10 laptop (airgapped of course) that I use with it, since it’s not compatible with Windows 11 either. It can auto feed 10 or so pages and you just push a button to scan.
Fortunately I squirreled away copies of the driver, since Fuji sold the IP to Ricoh who has memory-holed the drivers, taking “not supported” to a whole new level. It takes real effort to keep these perfectly working things out of the e-waste pile!
I have a ten year old old Fujitsu ScanSnap ix500. I just moved it over from my old 2013 Mac Pro to a much newer Apple Silicon Mac Mini. I also had trouble finding the right software, but in the end I just grabbed the latest ScanSnap software from Ricoh’s site. It recognizes it just fine and works perfectly.
For the rest of the equation, DevonThink has been my go to. Works great.
Yup, Fuji SnapScan. Amazing. Digitises to searchable PDFs.
And mine is working fine on an M3 MacBookpro with MacOS 26, connects overt WiFi, so there’s no drivers, just a client app. Works beautifully, and the auto-detection of overlapped pages is handy when scanning old paperwork. I’ve refused the software upgrade to their latest bloatware. The basic software works fine.
Also does a good enough job of photos at high quality.
I did set up a paperless ngx on a home server with remote backup. Works like a charm.
If you have an iPhone you can use the Files app. If has an option for scanning a document (including multiple page documents) and it will save the scan as a PDF on iCloud storage. You can then pull these down to local storage.
I do this with any important documents with non-critical documents being shredded following the next machine backup.
“How Do You Digitize Your Documents?” is the wrong question – it should be “How Do You Archive Your Documents?”
I retired into COVID so a lot of time on my hands and using a ScanSnap scanner, a Canon flatbed scanner, a DSLR on a (campus surplus) copy stand etc. I dealt with my and my late parents’/grandparents’ “stuff”.
Before I started I consulted our university archivists who make this kind of thing their passion. Their advice is that nearly every publisher/newspaper/document center uses .pdf and that will outlast any other format for a very long time (or some kind soul will create a translator), and .tif is the best guess for graphics content because it’s lossless.
1.) Many, many (many) boxes of family documents, framed photos going back to the tintype era etc. were scanned/photographed. Photos were done in .tif and documents in .pdf, with the .tif files being converted to .pdf as well.
The letters , snapshots etc. were segregated by decade (there were many thousands of them) and the very old photos got metadata with what little I knew about them.
2.) Old reference works / my past publications etc. that weren’t already in .PDF were scanned to that format.
3.) My few remaining old class notes etc. were scanned to .PDF just to remind myself that I could once write equations/free-body diagrams etc. neatly.
4.) Physical objects were photographed to .tif/and .pdf using various means. My garage was glad to be rid of a lot of it.
This then begs the question of where to keep it. HDD and online storage so far…we’ll see. The archivists acknowledged the problem of media rot (they deal with the aftermath) and suggested this.
If you’ve read this far, an anecdote: I have an acquaintance who worked for a city as an archival draftsperson recording pipe locations and other long-term utilities by drawing them with India ink on linen sheets since they knew they’d be looking for them decades later. It’s not a new problem in the least.
Ink on parchment seems to have lasted very well. Beware that new dangled papyrus stuff though, it can deteriorate over time.
If you’re serious about archiving stuff, nothing beats good old stone carving.
Hmm. Interesting. 45 years ago I was a gofer in an engineering department. One of my jobs was filing the draughtsmen’s drawings. Pre-AutoCAD, these were India ink on A0 and A1-size matte polyester (Mylar) sheets — these are the things that get contact-printed into blueprints on demand (which I also did). I wonder how well they survived. The building they were filed in hasn’t. The drawings included national railway infrastructure, so I’ll bet they outlived the building. Even money they were never digitized either.
As for more opensourcy apps maybe have a look at Fairscan, MakeACopy or OSS-DocumentScanner.
How do I do it? I have a Canon imageRUNNER Advance C5240. Duplexing automatic document feeder and a nice flatbed scanner underneath. Stick a stack of documents in the feeder, it scans front and back in high res color, turns it into a PDF, OCR’s it, and then drops it in an SMB folder on my network automatically.
The machine was free and it’s exceptionally good at this. Proper CCD so the focus range is excellent on the flatbed as well. Have had great success scanning PCI cards for example.
hopefully this pans out and will ease some long term storage issues for digital media archiving.
https://www.cerabyte.com/
I throw away old documents if they aren’t something I’m legally required to have (titles, deeds, etc.). Sure, some of them might be important, but they’re also making my house cluttered. I’ll happily cause my future self some trouble if it means my present self doesn’t have a mess on his hands. Keeps life simple.
I make sure to “scan” everything that’s not a throw-away. “Scan” means take a picture with a phone’s camera. The result is a big, 3000×4000 high-quality.jpg. For gobs of texty images (like books), ImageMagick’s mogrify:
mogrify -path OUTPUT_DIR/ -resize 30% -quality 75 INPUT_DIR/*.jpg
This brings images down from the phone’s 4 meg-ish to 2xx K and still easily readable.
Disk space is cheap enough to store everything from the beginning of time in redundant, off-site, backup form. Price-optimal storage (currently, USB hard disk) gets bigger faster than these sorts of images accumulate. JPEG will not go away in our lifetimes. And, converting from JPEG to some, more modern loss-less form will be easy if the time ever comes.
I digitized all my slides using ScanCafe. Highly recommended. Fascinating and pleasurable to see old photos on screen saver.
I remember when DjVu was the thing.
I have to admit, it is sometimes tempting to get a proper paper cutter, trim the bindings off my pile of magazines, and run them through my duplex sheet-feed scanner just so I can get rid of the physical archives without feeling I’m giving up anything. (Even if it has been a decade since I have looked at some of these.)
Then again, many of the magazines offer purchasable scanned archives, and the price is probably less than the effort involved in converting them all myself. Those may or may not be better indexed then my conversion would be.
Yet another decision/project on the deep stack waiting for the round tuit to drop.
Some might be collectables like early Byte.
That’s exactly what I’ve done, it works well.
Also worth checking the Internet Archive for pdf’s of back issues, they have a lot of stuff especially “dead” publications so they might save you some time.
My Samsung phone will do that Google lens thing, but all in-phone using the standard camera app.
A 2nd hand Fuji duplex sheet-feed scanner and a 2nd hand printer’s guillotine is how I’ve been dealing with my magazine back catalogue. Linux Mint’s built-in document scanner makes a PDF for you with zero effort or intervention. Total cost about £100.
Data storage is cheap and as long as I’m at least naming the files something findable (Name & date / issue number) that’s as much indexing as the job really warrants.
Sure I could spend ages creating tools to OCR them and all that but I already have too many projects as well as too much paper, and there’s a law of diminishing returns here – perfect is the enemy of good and all that.
Also – the internet archive has a lot of magazines so sometimes you can just download your own archive and cut out the scanner part altogether.
Digitizing isn’t difficult. It’s archiving. I need to get that part up and running. I got a ton of documents so I need a scanner and a bunch of time so I can start with paperless.
Paperless-ngx is my choice. The whole pipeline looks like this: paperless-ngx is running on a server (well, anywhere you can start a docker container would do, it doesn’t have to run 24/7, but it’s a nice plus if it does), watching a folder that’s shared via SMB to my network all-in-one device, where I scan the documents and save them as PDFs/JPEGs/ and save them to that network folder. And that’s all!
Then paperless automatically does all the magic with preprocessing, OCRs them with tesseract (out of the box Docker Image supports couple of languages, but you can build your own with whatever languages you need) and provides a Web UI / Mobile Apps to search/view/download. If you want to go deeper, it can classify documents and even have machine learning for classification, like if you get invoices from your doctor, it can automatically set a document type and tag them the way you want.
What I do next, I just put all the scanned documents in a plastic folder, label in that folder are documents, say Nov. 1, 2025 till Jan. 1 2026, put the folder in a storage box and hope to never need to search these – but I can, as paperless knows when the document was scanned. Over the years I had to do this kind of search twice and it worked like a charm.
I’ve been scanning documents for the last 10 years and I’m absolutely happy with the tool and approach.
I appreciate the article, and the intent as I’ve always struggled with this very thing – ugh.
The App I use is “Turboscan Pro”. I believe it’s originally free, yet years ago I purchased it, I think it was less than $5.00, by far, It’s one of my most used apps.
Simply take a photo of your document; or whatever; and you can add additional pages then save. Afterward, you can send it as a .pdf, .jpeg etc. and choose how you want to send it.
It’s very robust and has saved me in a pinch when needing to sign something and email it.
It’s a lot easier when you’re single.
They say Information can’t be destroyed…
So I resorted to burn everything and store the ash in a small glass breaker – problem solved !
JK
Well, technically you haven’t destroyed it, just reduced it to carbon. But you have made it useless. Now clean that up.
Well my first thought was a scanner.
I only have my passport on paper, and nothing else, no paper, no photos, no physical archive at all. Being a minimalist I often moved to a new home with only driving once with a full stationcar.
I digitised everything throughout the years, including love-letters and photo’s of dear posessions, after I did a trial whether a good photo would also arouse the same emotions in me as the physical thing (which it did).
Used scanners, dia-capturers, digital cameras and nowadays just my smartphone. Most images are maximum 1920×1080 resolution (good enough for most things). Images used to be .jpg 80% but most are .avif 55% now (5 to 10 times smaller with zero noticable artifacts).
Low quality videos (Zoom) are x265 vbr25 and high quality (Lord of the rings etc) are x265 vbr20. Wav’s became aac 320kb or (studio recordings) flac24.
I have 3 identical harddisks, two in the Netherlands and one in Germany, updated yearly.
I saved up and purchased my first scanner in high school (about 1995). Since then I’ve gone totally paperless. I have one notebook in my office desk and one in my workshop for quick sketches etc, otherwise I’m 100% paper free.
I use a flatbed scanner for everything. For books I cut the binding and use the document feeder on my laser printer. The biggest thing is consistency in spending time to scan receipts and other bits and bobs. I keep a stack on my desk and once every couple weeks I watch a movie won my computer and scan away. I use a program called FileCenter as it offers easy pdf editing.
The second important thing is your file/folder management. Simple rule, each subject gets a folder, every group of 10 or more documents gets a folder. Filenames do not contain folder names, each file has the date as a prefix (2026-02-01). The goal is to ensure the ability to find any document within 10-15 seconds. If you can’t, then you named the file/folder wrong. I have thousands of files now and everything from receipts to school notes is saved and accessible on all my devices.
For notes and information that is more dynamic, I use Microsoft OneNote. Now when say I see a new doctor and he asks for my family medical history, bank here it is. If I want to know my prescription, there it is. I even go so far to document my pant and shoe size do no guessing when I’m shopping. Looking to buy a game, yep have that list as well.
One of the biggest benifits is I also keep digital copies of all the manuals for every tool, device, and gizmo I have ever purchased. A lot of manuals etc you only get a paper copy and it’s not found online.
Now I can look back at the time spent and can whole heartily say it was worth every minute.
I do that with ofgicial documents stuff. But for personal information stuff, i’ve moved to just keep the information/media part, conversion is fine. For simple blogs, articles, a markdown is fine (Typora is great for copy&paste). More compkex stuff gets a .odt.
If all the ebooks I’ve accumulated over the decades were all the dead tree variety, I’d need (at least) another place to live in…
If possible always try to get a digital copy of the source document, if this is a report then ask the author to provide a digital copy. I have still yet to conquer hand written documents, somebody has previously mentioned Microsoft Onenote, so might give this a try. Some documents can be quite long and full of technical words that might not be understood by OCR or possibly AI. I did work in a government organisation and attempted to make various processes go digital or paperless, however there was a well entrenched anathema amongst senior management towards going digital or paperless and there was several various other stubborn factors relating to process management that also made making any meaningful progress difficult.
The quality of the equipment used, various different outdated multi function printers that had no common settings that related to the quality of output, also gave no help at all. There were also information that was being kept in various different digital formats to have to work with as well as there was no common standards in place that related to as how information should be kept.
The advice that I would give to anybody attempting to go digital or paperless is that there is no one perfect solution and that often a combination of various different methods might have to be used in order to achieve a reasonable outcome.