You’ve likely at least heard of Marion Stokes, the woman who constantly recorded television for over 30 years. She comes up on reddit and other places every so often as a hero archivist who fought against disinformation and disappearing history. But who was Marion Stokes, and why did she undertake this project? And more importantly, what happened to all of those tapes? Let’s take a look.
Marion the Librarian
Marion was born November 25, 1929 in Germantown, Philadelphia, Pennsylvania. Noted for her left-wing beliefs as a young woman, she became quite politically active, and was even courted by the Communist Party USA to potentially become a leader. Marion was also involved in the civil rights movement.
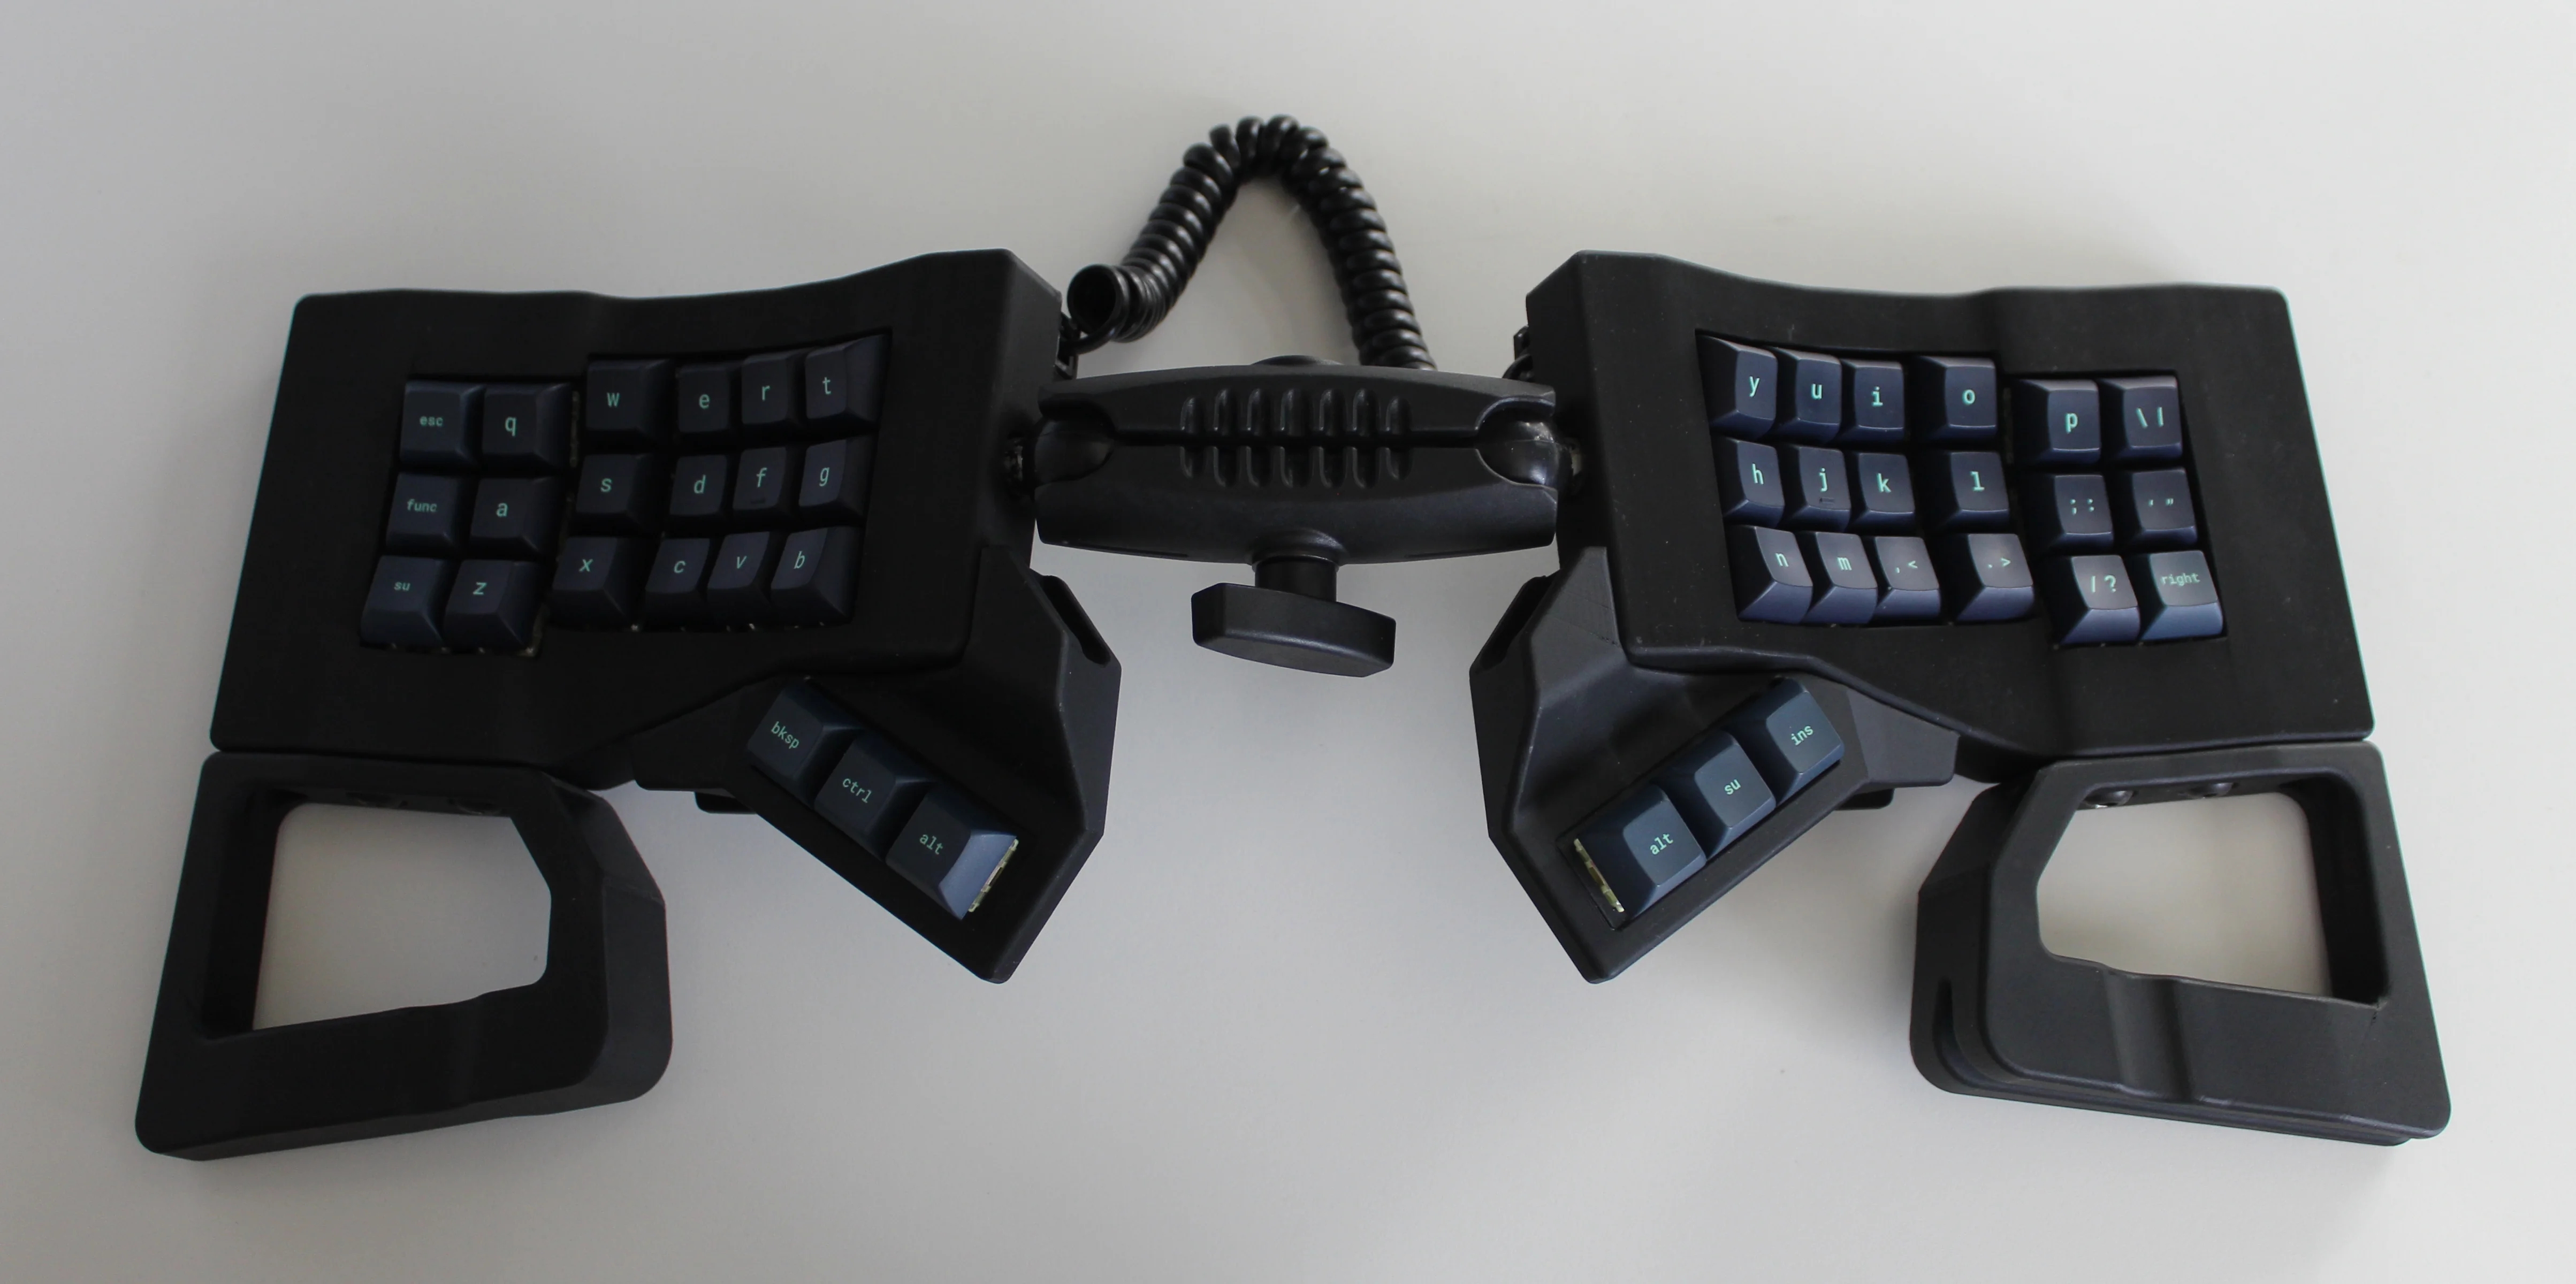
Get a handle on this bad boy! Okay, so those voids are really more for airing out your palms, I’d imagine, because palm sweat sure is real — you should see the pads of my Kinesis. This kind of looks like two sawed-off machine guns kissing, and I mean that in the best possible and non-violent way.
Image by [ntc490] via redditSo, [ntc490] has been on Team Special Keyboard for eight years now and decided it was time to design one. The goal was to make something semi-portable, super ergo, and as easy/cheap to build as possible, which, honestly, that sounds like one of those pick-two situations.
And yet, pricing (oh yeah, this is gonna be A Thing You Can Buy) will be around $115-155, depending upon whether you want the base kit, or the add-ons, too, minus switches and key caps.
So let’s get into the particulars here. As you can see, there are key wells and thumb clusters, inspired by other keyboards including your bog standard Maltrons, Kinesis Advantages and more modern, open-source takes like the Dactyl. [ntc490] loves the key well-thumb cluster combination, and I do, too (hello from the Glove80). And miraculously, the keys are hot-swappable via sockets.
Image by [ntc490] via redditThat novel tenting mechanism is adjustable, rugged, and portable. You can tent it near-vertical, lay it flat, or take it apart if you wish. The thing is modular for future expansion options such as wrist rests and displays.
So please do go visit the thread if this keyboard appeals to you at this price point. I love it, but I would need more rows of keys, personally. The top reddit comment mentions this as well, and [ntc490] says that because the thing is modular, it can easily accommodate more keys in both the wells and the thumb clusters. I seriously want one of these. Just with a few more keys.
All right, I’ll cut to the chase: Cheap03xD is mainly so cheap because the PCB falls within a 10 x 10 cm footprint. The point was to make a very affordable keyboard — all the parts come to ~40 Euro (~$47). So it would seem that [Lander03xD_] succeeded.
Image by [Lander03xD_] via redditCheap03xD is all the things — 36-key, split, column-staggered, wireless, hot-swappable, and uses ZMK. The batteries are easily replaceable, and no they don’t get in the way.
Those are MMD Princess silent switches, which I wouldn’t choose, but [Lander03xD_] is taking this board to the office, so I get it. They sure are a nice shade of pink, anyway, and they go really well with the pastels of the DSA keycaps and the bezel.
One cool thing to note is that the PCBs are reversible, like the ErgoDox. This isn’t [Lander03xD_]’s first board, and it won’t be the last.
Now, let’s talk batteries. [Saixos] pointed out that the design doesn’t appear to include a protection circuit. In case you can’t tell from where you’re sitting, those are nice!nano clones that [Lander03xD_] is using, and they expect a protection circuit.
[Lander03xD_] is going to look through the docs and see what’s what. The goal is not to have any daughter boards, so this may take some rethinking.
This week, Hackaday’s Elliot Williams and Kristina Panos met up over coffee to bring you the latest news, mystery sound results show, and of course, a big bunch of hacks from the previous seven days or so.
On What’s That Sound, Kristina had no idea what was going on, but [Flippin’ Heck] knew it was a flip dot display, and won a Hackaday Podcast t-shirt! Congratulations!
After that, it’s on to the hacks and such, with not one but two ways of seeing sound. We also take a look at benchmarking various Windows releases against each other on 12-year-old hardware.
We also talk about painting on floppies and glitching out jpegs in a binary text editor. Finally, we discuss the history and safety of autopilot, and take a look at the humble time clock.
Check out the links below if you want to follow along, and as always, tell us what you think about this episode in the comments!
Download in DRM-free MP3 and savor at your leisure.
No matter the item on my list of childhood occupational dreams, one constant ran throughout: I saw myself using an old-fashioned punch clock with the longish time cards and everything. I now realize that I have some trouble with the daily transitions of life. In my childish wisdom, I somehow knew that doing this one thing would be enough to signify the beginning and end of work for the day, effectively putting me in the mood, and then pulling me back out of it.
But that day never came. Well, it sort of did this year. I realized a slightly newer dream of working at a thrift store, and they use something that I feel like I see everywhere now that I’ve left the place — a system called UKG that uses mag-stripe cards to handle punches. No it was not the same as a real punch clock, not that I have experience with a one. And now I just want to use one even more, to track my Hackaday work and other projects. At the moment, I’m torn between wanting to make one that uses mag-stripe cards or something, and just buying an old punch clock from eBay.
I keep calling it a ‘punch clock’, but it has a proper name, and that is the Bundy clock. I soon began to wonder how these things could both keep exact time mechanically, but also create a literal inked stamp of said time and date. I pictured a giant date stamper, not giant in all proportions, but generally larger than your average handheld one because of all the mechanisms that surely must be inside the Bundy clock. So, how do these things work? Let’s find out.
The astute among you may remember an earlier version of this Russian beauty, the Lapa, which I featured last year around this time. Creator [lemosbor] claims that the worry was less about visual beauty and more about ergonomics. Way more. Well then, let this serve rather nicely as a textbook definition of that old form-follows-function principle.
The lovely Lapa.
See, [lemosbor] believes that the keyboard must adapt to the hands and not the other way around. The main goals were to minimize hand and finger movement as well as the visual attention required of the keyboard itself. No, there were never going to be any screens or RGB, and there likely never will be.
But I refuse to sidestep the obvious beauty in this keyboard, which from the side resembles a stylish and expensive pair of slightly-heeled shoes that were tailored to the contours of the human hand. And let’s not forget those handmade, oval keycaps, which again are a product of form-follows-function.
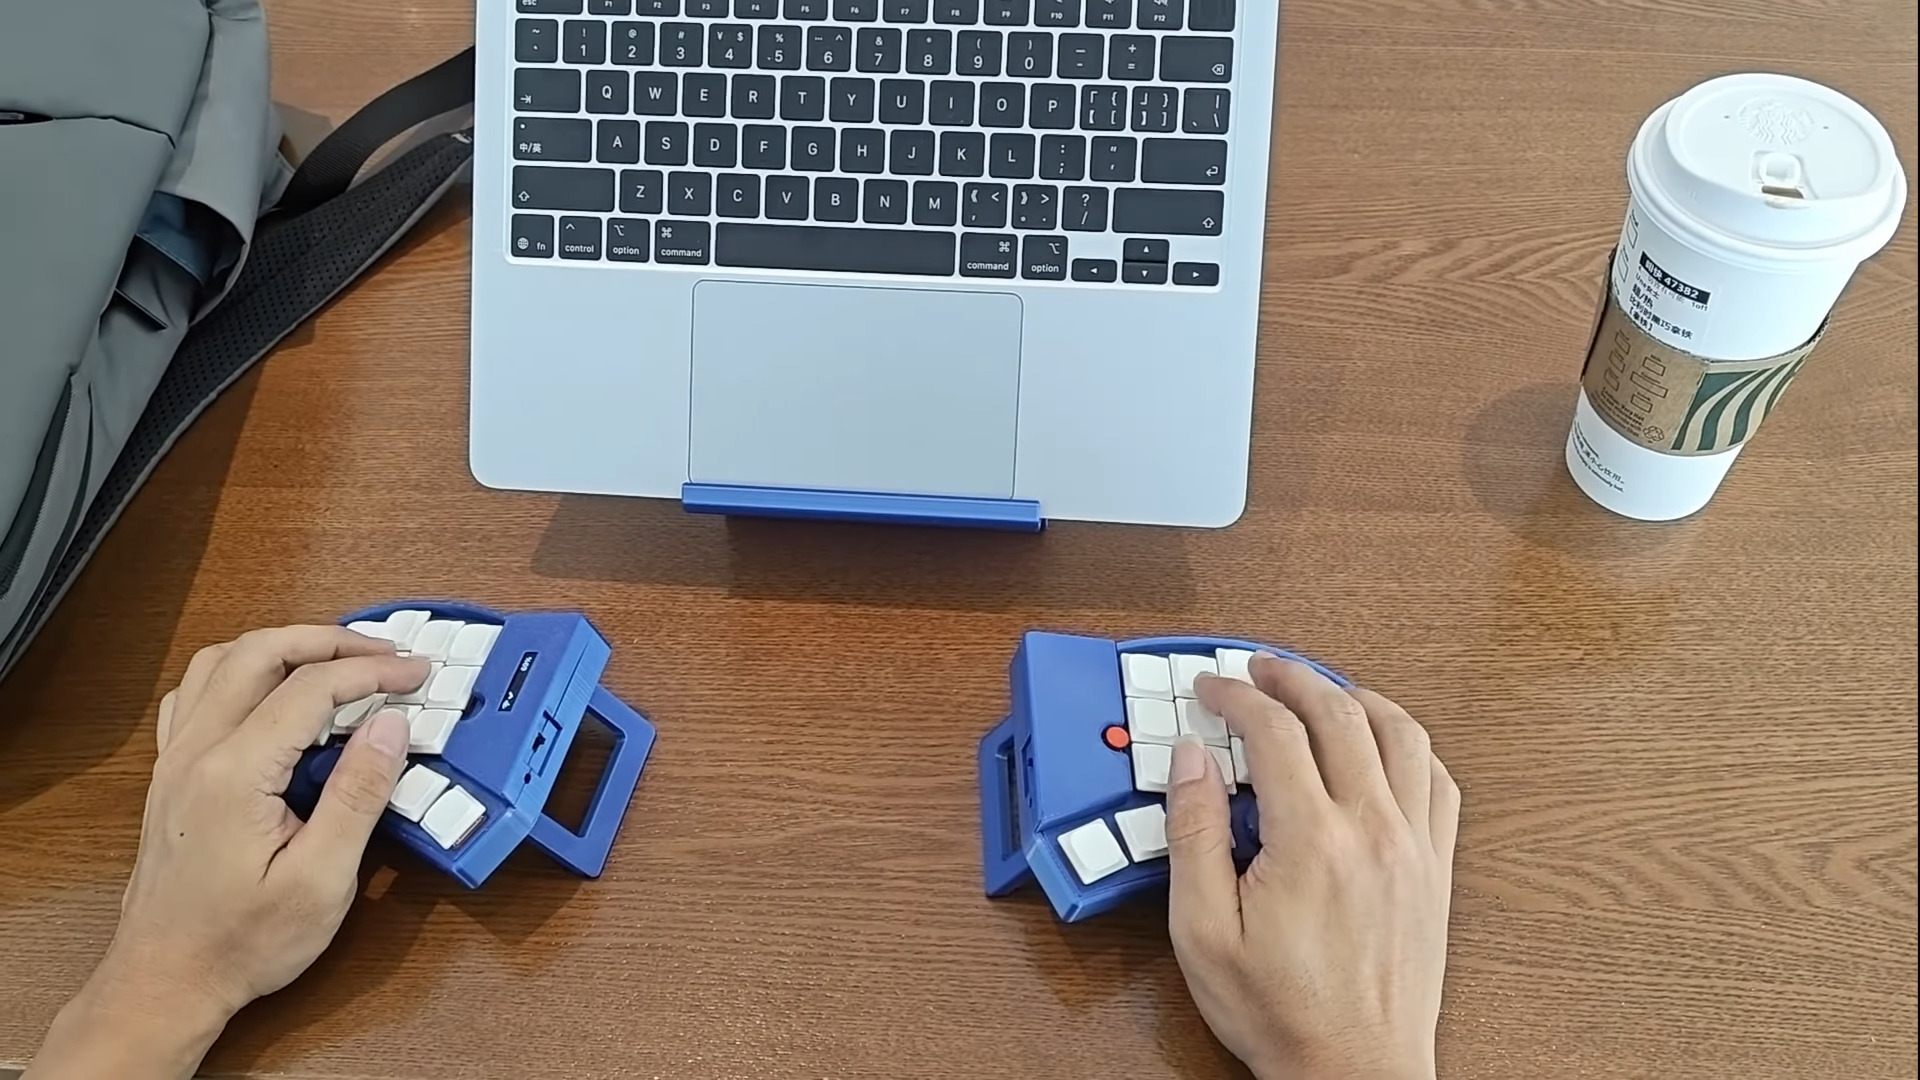
What do you look for in a travel keyboard? For me, it has to be split, though this condition most immediately demands a carrying solution of some kind. Wirelessness I can take or leave, so it’s nice to have both options available. And of course, bonus points if it looks so good that people interrupt me to ask questions.
Image by [kleshwong] via YouTubeDepending on your own personal answers to this burning question, the PSKEEB 5 just may be your endgame. And, lucky for you, [kleshwong] plans to open source it soon. All he asks for is your support by watching the video below and doing the usual YouTube-related things.
You’ll see a couple of really neat features, like swing-out tenting feet, a trackpoint, rotary encoders, and the best part of all — a carrying case that doubles as a laptop stand. Sweet!
Eight years in the making, this is the fifth in a series, thus the name: the P stands for Portability; the S for Split. [kleshwong] believes that 36 keys is just right, as long as you have what you need on various layers.
So, do what you can in the like/share/subscribe realm so we can all see the GitHub come to pass, would you? Here’s the spot to watch, and you can enjoy looking through the previous versions while you wait with your forks and stars.