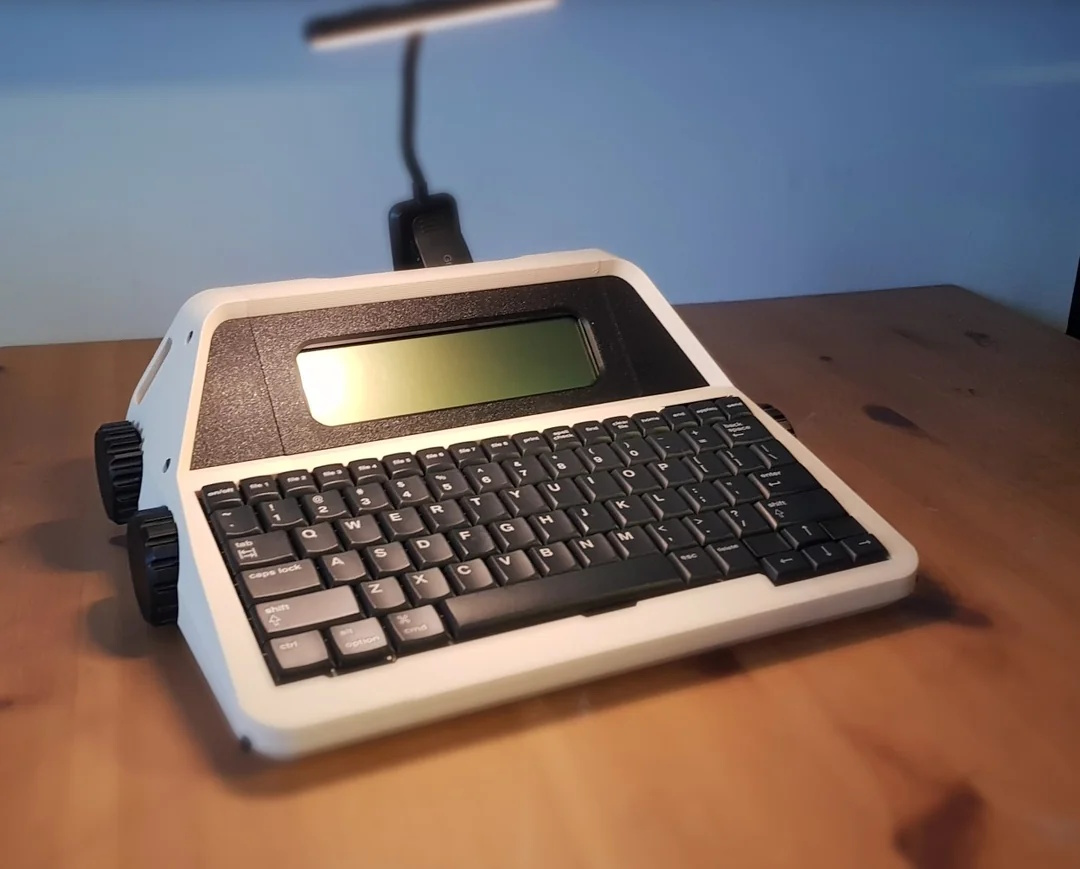
Magnetic Power Cable Makes Mobility Scooter Much Better

Sometimes, you have to wonder what major manufacturers of assistive tech are thinking when they design their products. [Niklas Frost]’s father has MS and uses an electric mobility scooter to get around. It’s a good solution to a terrible problem, except it stops short of the most important part — the charging scheme. Because of the aforementioned mobility issues, [Niklas]’s father can’t plug and unplug it without assistance. So much for independence.

And so [Niklas] gave it some thought and came up with an incredibly easy way that Dad can charge his scooter. It’s even non-intrusive — all it took was a handful of off-the-shelf components and some 3D printed parts to make what’s essentially an extension cord between the charger and the scooter. Really, there’s nothing more to it than three 10 A magnetic connectors, an XLR female port, an XLR male connector, and some very helpful plastic.

Something interesting to note: [Niklas] spent a year or so tinkering with a robot that could drive the plug over to the charger and plug it in. A book on the subject made him destroy that robot, however, when he realized that he was being driven more by cool technologies than solving the problem at hand. Within a few days of changing course, [Niklas]’ dad was charging his own scooter.

Now, if [Niklas] wants to see about making the scooter move a whole lot faster, we have just the thing.

five 100% recycled keycaps, spaced out

These Keycaps Are 100% Recycled Plastic

Artisan keycaps are generally meant to replace your Escape key, though they can be used anywhere you like (as long as they fit, of course). Keycap maker [tellybelly] of jankycaps has been experimenting with making keycaps out of 100% recycled plastic, and offers an interesting post detailing their development and production process.

Animation of injection molding flow into a set of four keycaps.What do you do when normal injection molding tooling is out of your budget, and silicone molds simply won’t do? You turn to 3D printing if you can. In this case, [tellybelly] and company found a resin designed to withstand high temperatures.

[tellybelly] was able to design the mold using a plethora of online resources, and even verified the flow using a special program. Although the first two versions worked, they had some flaws. Third time’s the charm, though, and then it was time to sort plastic and fire up the shredder.

After heating up the shreds to 200 °C or so, it was time to start the injecting. This part isn’t exactly a cakewalk — mixing different plastics together can vary the workable temperature range that doesn’t degrade the plastic. Although it sounds like the end, [tellybelly] reports that they spent just as much time here as they did at the drawing board, experimenting with pressure on the mold, various cool-down methods, and how long to wait before opening the mold.

Via reddit

an analog CO2 gauge with a cute face

Cute CO2 Gauge Tells You When To Crack A Window

[Cyrill] has a good home automation scheme going: there are a number of physical switches set around the place that control the essential functions. The only problem is that in the winter time, this results in a great deal of phone checking as [Cyrill] tries to monitor the CO2 level. Tired of all this screen time, [Cyrill] set about to create an incredibly cute (and useful) Co2 monitor that plainly shows the current level and how bad it is, relatively speaking.

A large servo and an ESP32-S2 make up the guts of an analog CO2 sensor.

Behind that adorable face is a DS3225 servo being driven by a Wemos S2 mini, both of which [Cyrill] happened to have handy. Although the 25 Kg servo may be complete overkill for the situation, [Cyrill] reports that it is quieter than your average AliExpress alternatives, which makes it well worth it in our book. Then it was on to Inkscape to make the gauge itself. [Cyrill] says they’re an Inkscape noob, but that face could have fooled us.

Finally, it was time to integrate it into Home Assistant to get readings from the CO2 sensors. This was easier said than done, but [Cyrill] does a nice job of explaining how to get the ESP32-S2 up and working.

If you’re out there monitoring CO levels in your home, beware of fake sensors that cropped up during the height of the pandemic and are likely still at large.

2024 Home Sweet Home Automation: A Piano-Controlled Smart Home

There’s a scene in Willy Wonka and the Chocolate Factory where a little flap in the wall flips down to reveal a small organ embedded there. Gene Wilder plays a bit of Rachmaninoff on the organ, and the giant door to the chocolate room slowly creaks open.

Once [Nathan Orick] got this into his head, he couldn’t get it out, and had to give it a go in his own home. Regrettably there’s no chocolate rooms in the house, so he’s using various chords and melodies to do things like control the lights and the TV, as you’ll see in the video after the break. Although this one may have started as a joke of a home automation scheme, [Nathan] thinks it turned out pretty solid, and so do we.

He already had the piano and a Raspberry Pi Zero lying around, so getting this up and running was mostly about connections and code. Speaking of connections, [Nathan] was hard-pressed to find a micro-USB to USB-B cord, so he ended up splicing one together. Simple enough. The harder part was getting Linux to recognize the keyboard, but all it took was touching all the pins with a multimeter, evidently. What’s a project without a little magic?

And not only did it show up, Linux went to the trouble of registering it as a MIDI device all on its own. Once [Nathan] obtained the port number, he had data printing to the console every time he played a note. Then it was mostly a matter of writing code to interact with MIDI data and track the notes as they’re played, and put it all together with Home Assistant. Be sure to check out the brief demo after the break.

Continue reading “2024 Home Sweet Home Automation: A Piano-Controlled Smart Home”

A DIY handheld PONG game

DIY Pocket PONG Breaks The Mobile Spell

[Minikk], aka [Athul] is about to enter 10th grade and reports that they and their contemporaries are eschewing boring mobile games for 90s stuff and old games like PONG. Well, we already knew the 90s were back, but it’s nice to see that even older stuff is coming along with it. The kids are alright.

Whether you want to play alone or with a friend, it’s a classic to have in your pocket for sure. The brains behind this 70s-era operation is a Seeed Xiao ESP32-C3, which takes input from the two potentiometers and outputs the game on a 128 x 64 OLED. There’s also a small buzzer for when the ball hits the paddle, or you or your friend slips one past the goalie.

Our favorite part of this build has to be the DIY rivets that hold the OLED in place. [Athul] built posts into the enclosure that get heat-smashed into place with a soldering iron. Pretty neat, huh?

PONG is a specific thrill, certainly. How can it be more thrilling? Maybe with LEDs instead of a screen? Just a thought.

Illustrated Kristina with an IBM Model M keyboard floating between her hands.

Keebin’ With Kristina: The One With The Offset-Stem Keycaps

Image by [Leo_keeb] via reddit
Love it or hate it, I think this is a really cool idea. [Leo_keeb] has designed a new set of keycaps for the Happy Hacking Keyboard (HHKB). The keycaps’ stems are offset to the left or right in order to turn this once-staggered keyboard into an ortholinear object.

So, how do they feel? There is a slight wobble to them, according to [Leo_keeb] — it’s a bit like pressing the left or right side of Tab. But the actuation is smooth, they say.

As you can see, these resin keycaps weren’t designed with the typical Cherry MX profile in mind, they are made for the Topre capacitive key switches of the HHKB. (No, those aren’t weird rubber domes.)

When I asked about sharing the STLs, [Leo_keeb] advised me that they might be willing to release STLs for  Cherry MX switches in the US layout if there is enough interest.

Continue reading “Keebin’ With Kristina: The One With The Offset-Stem Keycaps”

Goldilocks Beverage Coaster Tells You When It’s Just Right

If you ask us, morning is the only excuse we need for a hot caffeinated beverage — weather be damned. Wherever [gokux] is, they may be experiencing actual winter this year, given that they are out there getting cozy with a hot cup of what-have-you. But how do they know it’s at the right temperature for drinking? Enter the temperature-monitoring smart coaster.

At the heart of this build is a GY-906 infrared temperature sensor, which senses the warmth (or lack thereof) and displays the degrees on a small OLED screen thanks to a Seeed Xiao SAMD21. To make things simple, there is also an ideogram that corresponds to the current temperature — snowflake for too cold, danger sign for too hot, and thumbs up for that just-right range. Although this coaster is mostly 3D-printed, the mug sits on a slotted piece of aluminium that is removable for easy cleaning. This would be a good-looking and useful addition to any desk.

This is isn’t the first temperature-indicating beverage coaster we’ve seen. The most recent one ultimately used a probe, which is likely about as accurate (and messy) as you can get with these things.