Manage Your Rechargeables At A Glance

If you enjoy photography, radio controlled vehicles, or any other activity that requires you to keep multiple sets of rechargeable batteries on hand you know how much of a pain it can be if you get a dead battery mixed in with your charged batteries. This easy approach to managing your batteries while on location does not require fancy electronics, meters or anything else that might pop into mind, but rather simple stickers and storage.

The first set of labels get stuck on the battery, offering a green and red color code along with a number so its easy to keep track of which group of batteries go where and to catalog date / life. The second set of labels gets attached to your storage compartment, when a battery is charged, place it in the box so the positive end is facing the green on the storage label, and when its dead just flip it around.

While this mainly focuses on AA batteries (and even shows you how to make a simple but effective holder out of some elastic band and staples) this idea can be used with just about any type of battery for a quick glance to see where you stand on juice.

Whistle To Make The Art Flow

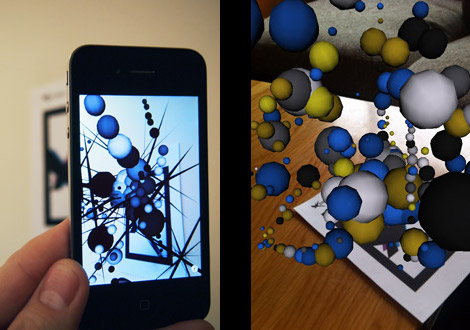
A new project from [James] targets the iPhone with this wild generative art in an Augmented Reality environment (free) app for 3GS and 4 running running iOS 4+. Powered by the String augmented reality library, and written in C + OpenGL the combo present a power AR platform offering over 100,000 polygons on screen with no noticeable dip in frame rate.

The artistic part is influenced by noise the app is picking up through the microphone. Speaking, whistling or blowing at the device creates 3D generative art, which you are then free to explore in 3 dimensions. It would be interesting to see what it comes up with in a naturally noisy environment. Features also include variety of 3D shapes, color palettes, and settings that can be mixed to create “endless” combinations along with a good to have save snapshot feature.

Join us after the break for a quick video, and be sure to check out some of [James] other work, like  the Augmented reality business card

Continue reading “Whistle To Make The Art Flow”

Thanks For Ruining A Good Thing, Or TRYING To!

It seems that there has been some shenanigans happening with the OSHW logo voting page as some are using scripts to game the system for their favorite design. Why? Who knows…  How? Well one of the advocates of OSHW [Bill Porter] set about figuring that out, and things should be patched up now, though that still leaves 3,122 faulty votes to weed out on the final day (April 5th).

While it is hard to imagine how someone would be so attached to a logo to write a script just to game votes,  its not that surprising considering that we can be a pretty outgoing bunch when it comes to certain topics. Organizers are asking if you’re one of the listed IP addresses, and had good intentions to fess up, and tell which logo(s) you voted for to make the process easier. If not, well, “this is not going to stop everyone’s good efforts.”

If you’re just now getting wind of the OSHW logo voting check out our previous article highlighting this event, and to get more details.

Propeller Lamp

Wanting to replace a power hungry halogen lamp in the living room, [Jason Dorie] went out to design a Remote Controlled, Dimmable Led Lamp (pictures). The body of the lamp is a pretty interesting idea, sporting a couple waste baskets with a translucent HDPE skin as the lampshade and a PVC column for structure.

The column is wrapped in a spiral of 16 foot long led strips , and are wired so they can be controlled in groups. Light output is (estimated) at about the same as a 100-150 watt incandescent while only consuming 24 watts.

The lamp is controlled via a universal remote and features a TLC5940 driven by a Propeller, all sitting on a CNC machined PCB. With that much horsepower under a lamp you can expect that it will not just simply dim in and out, so join us after the break for a video to see how to turn on a lamp with style.

Continue reading “Propeller Lamp”

SNES To PC

The Nintendo Entertainment System is by far the most popular 8 bit post crash video game system. Therefore, the NES gets all sorts of mods and hacks done with it, but there is not a whole bunch of noise for its bigger badder 16 bit brother the Super Nintendo. Have no fear though [Vigo the Carpathian] (I did not know it was the season of evil!) helps to correct that in his first Instructable, turning a SNES into an all in one classic video game player.

Using the shell of a Super Nintendo the bottom half includes ZOTAC IONITX-C-U mini ITX motherboard, and a dual SNES controller port to USB that fits in the original openings to use the real deal controllers. A USB port is also mounted for some wireless dual shock action.

On the top half, the eject button, and cartridge slot flaps have been removed and speaker grill cloth was added to provide venting. Near the back of the unit, SD-card to SATA adapter provides storage, which we think is a good idea for cheap SSD storage. Micro switches are also rigged up so that the original power and reset buttons control the same computer functions.

Clean looks, small form factor, join us after the break for a quick video.

Continue reading “SNES To PC”

CFL Breakdown

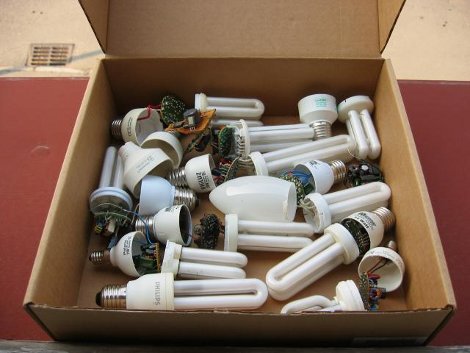
Reader [Jay] was inspired by one of our earlier articles and started digging around the web for some more information, and found a handy web page with tear downs and schematics of popular compact florescent lamps.

Schematics are provided to 15 fairly common models including bigluz, isotronic, luxtek, maway, maxilux, polaris, brownie, Phillips, Ikea, Osram, and eurolight. Also, just in case you were ever interested in these little packages but did not want to open them due to sharp glass, mercury vapor, or phosphorus powders, photos are provided as well.

So if you need a few hundred extra volts to pack a little spark in your next project, need a 63rd way to cook your goose you should check this page out.

How A HP VFD Module Was Reverse Engineered

We all love getting a good deal on sweet parts, but not all of them are documented. Some of us have trained our eyes and brains to spot “timesinks”, having been burned before. The rest sit down with whatever pile of stuff they have on hand, and figure out how to talk to that HP Media Center VFD.

[Jayeson] found some good deals on some Vacuum Fluorescent Displays from a HP Media Center computer as “new”, from some (unmentioned) shady dealers. Once receiving his B stock displays he needed to figure out a way to make them work.

Fun and excitement includes: figuring out the pins, first attempts of communication, getting the data sheet for a house brand chip… that still has the Atmel stamp on it, sniffing traffic with a logic analyzer, and deciphering that data. All that while being a pretty interesting read, good showing of willpower, and resulting in a couple Arduino Libraries as a bonus.