ADC For Raspi Without Using An ADC

Schematic of ACD for a raspi

With all the amazing and wonderful things a Raspberry Pi can do, it is sorely lacking a dedicated ADC chip. Sure, you can wire up an ADC via SPI or even I2C with a little work, but still. It would be nice to have access to an Analog to Digital converter without having to go through the trouble. Fortunately, [Hussam] has figured out a way to do just this.

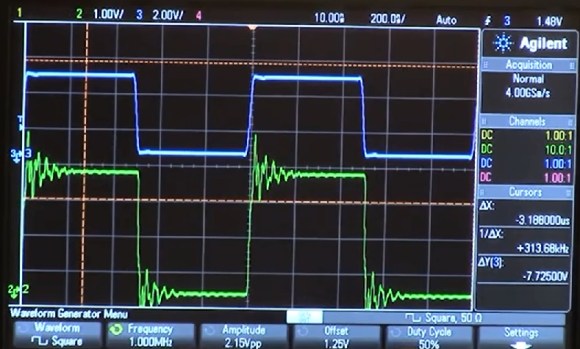
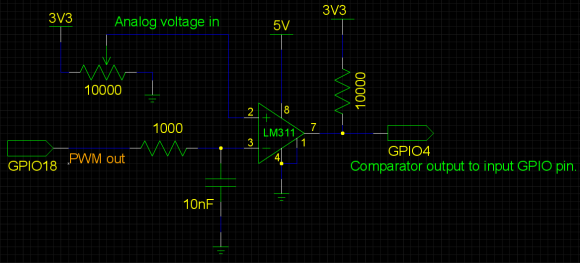
Using a comparator, two resistors, a single capacitor and a few lines of code, [Hussam] managed to get an active ADC working on his Raspberry Pi. He’s using the PWM1 and a passive RC filter to make a DAC. He then uses the comparator along with a ‘ successive approximation algorithm’ to complete the ADC.

[Hussam] mentions that the hack is not new, and this technique has been used before for microcrotrollers that lack a built-in ADC. But we are still impressed with his attention to detail in describing how to do this on a Raspi. Be sure to check out the link for full details, code, and an awesome description on how his algorithm works.

Vintage Radio Rocks With Modern Technology

old soviet transistor radio

[Madis] had an old Soviet Russian Neywa 402 transistor radio sitting on the shelf. It looked cool, but unfortunately that’s about all it did. Built in the 70’s one can only wonder about the past life of the radio. And one can only wonder what the past owner thought about the future of it, if they thought about it at all? Would they have thought that several decades in the future, a hardware hacker would introduce some strange and mysterious technology to breath new life into it? Probably not. But that’s exactly what happened.

[Madis] picked up a Bluetooth speaker from Ebay for a whopping $10. And like any good hacker, he immediately took it apart and ditched the original speaker. Wired up to the vintage radio, the Bluetooth receiver can be charged via a USB cable, which neatly tucks away in the back of the case. And with a few taps of his smart phone, he can stream audio to his new vintage Bluetooth speaker.

Though a simple hack, [Madis] does a great job at breathing new life into an antique electronic device. Check out the video after the break for a demonstration.

Continue reading “Vintage Radio Rocks With Modern Technology”

global transmission logo with earth in the background

Ask Hackaday: Global Energy Transmission – Can It Work?

Atop a small mountain in Colorado Springs sat the small, makeshift laboratory of Nikola Tesla. He chose this location because the air was thinner, and therefor more conductive. Tesla had come to believe that he could use the Earth as a conductor, and use it to send electrical power without the need for wires. Though some facts are forever lost, it is said that on a clear, moonless night, Tesla flipped the switch that fed millions of volts into a large coil that towered high into the air. He cackled maniacally as an eerie blue corona formed around the crackling instruments, while some 200 florescent bulbs began to glow over 25 miles away.

A magnificent feat took place in the hills of Colorado that night. A feat that surely would change the world in how it harnessed electricity. A feat that if brought to its full potential, could provide wireless power to every point on the globe. A feat that took place almost one hundred and twenty years ago…


Continue reading “Ask Hackaday: Global Energy Transmission – Can It Work?”

HammerPong Game Takes Pong To New Heights

large scoreboard with lots of flashy lights

[Jason] is back at it again with another new twist on the technically sophisticated and advanced game of Pong. Fashioned in a ‘Chuck E. Cheese’ style platform, the two players stand side by side each other with large foam hammers. A wack sends the 32 bit ARM powered dot skyward and then back down to the other player, where another wack will send the dot back whence it came. A brightly lit scoreboard keeps track of how many dots slip by.

[Jason] is a veteran of pong inspired games, but putting the HammerPong game together brought with it some new challenges. After being unable to squeeze a few MDF panels into his car, and fighting off flies, yard debris and pet dander that were trying to attach themselves to his freshly painted artwork, [Jason] managed to get his project completed.

The HammerPong is powered by an Arduino Due that controls six WS2812 LED strips and runs the background code. Various latches, shift registers and power transistors control the lights and scoreboard. Be sure to check out the linked project for more detail, and take a look at the video demonstration after the break.

Continue reading “HammerPong Game Takes Pong To New Heights”

Brighten Your Day With Studio Strobe Power Hack

large capacitor bank for flash circuit

[OiD] picked up a couple of cheap studio strobes off eBay and was not happy with the power control. So he rewired it. These lights are like supercharged flashes for professional photographers, and contain some very large capacitor banks. His first hack didn’t work out too well, and he wound up welding the innards of a switch together. He was successful however, in his second attempt to tame the large voltages.

He’s using two 1N5408 diodes, which are rated at 3 amps, for charging the capacitor bank. A massive 60EPS08 diode, rated at 60 amps with a Frankenstein worthy surge rating of 950 amps is used to separate the charge between the two capacitor banks, and allows one to discharge into the flash tube.

Consisting of just a handful of components, [OiD]’s hack greatly improves the performance of the strobe’s power adjustment settings. He does an excellent job at documenting the hack for all to see. Be sure to check out his bog for full details.

Simple Touch Controller Frees Up USB Port

touch screen demonstration using text

[typ.o] was working on a Raspberry Pi project and found himself running short on USB ports. The project required a touch screen interface, which takes up one of the ports. Since he was only using the screen in text mode, he decided to ditch the original USB controller and make his own.

The ever popular Attiny85 is deployed to handle the task, and is interfaced between the resistive touch panel and the Raspberry pi, using only three pins from the GPIO port. The Attiny85 runs off the 3 volt supply from the raspi, so no level shifter is needed, helping to keep his board super simple.

The calibration and calculation of the touched character location is done by a Python script running on the raspi. [typ.o] is a fan of the KISS principle, and it shows. Be sure to check out his site for all source code, schematics and a video demonstrating this simple but effective solution.

Delving Deep Into High Speed Digital Design

scope capture showing ringing affect in a high speed digital signal

In high speed digital circuits, fast doesn’t necessarily mean “high clock rate”. [Jack Ganssle]  does an excellent job at explaining how the transition time of signals in high speed digital circuits is just as important as the speed of the signal itself. When the transition time is large, around 20 nanoseconds, everything is fine. But when you cut it down to just a few nanoseconds, things change. Often you will get a ringing effect caused by impedance mismatch.

As the signal travels down the trace from the driver and hits the receiver, some of the signal will get reflected back toward the driver if the impedance, which is just resistance with a frequency component, does not exactly match. The reflected signal then heads back to the driver where the impedance mismatch will cause another reflection. It goes back and forth, creating the ‘ringing’ you see on the scope.

[Jack Ganssle] goes on to explain how a simple resistor network can help to match the impedance and how these should be used in circuits with fast transition times, especially where you will be taking readings with a scope. As the scope probe itself can introduce impedance and cause the ringing.

In case you didn’t pick up on it, [Jack Ganssle] also happens to be one of the judges for The Hackaday Prize.

Continue reading “Delving Deep Into High Speed Digital Design”