Open Source Glucose Monitoring On The Front Lines Of Innovation

Cloud-based CGM

[John] is the parent of a diabetic child, and his efforts to expand the communication options for his son’s CGM (continuous glucose monitor) have grown into a larger movement: #wearenotwaiting.

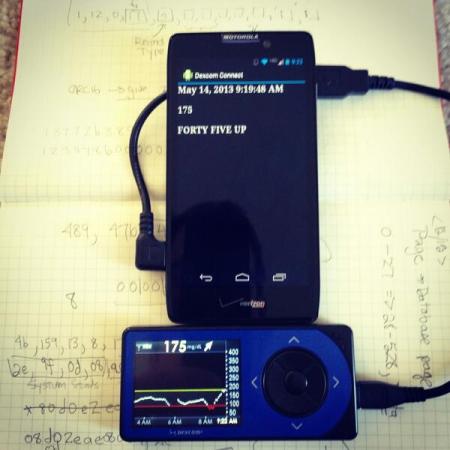
After receiving a new monitor—a Dexcom G4—[John] set about decoding its communication protocols. The first steps were relatively simple, using a laptop to snag the data from the CGM and storing it on a Google doc which he could access as the day went along. The next step involved connecting the monitor and a cellphone for around-the-clock data gathering. [John] managed to develop an Android app to accomplish just that, and shortly after people began to take notice. Both [Howard Look], the CEO of Tidepool, and [Lane Desborough], engineer and father of a child with diabetes, have thrown in their support, leading to further developments such as Nightscout, an open source solution for storing CGM data in the cloud.

This project is a victory not only for those with diabetes, but also for the open source community. [John] admits his initial hesitation for developing for the medical device platform: litigation from a corporation could cause devastation for him and his family despite his intentions to merely improve his son’s and others’ quality of life. Those fears have mostly subsided, however, because the project now belongs to both no one and to everyone. It’s community-owned through an open source repository. Check out the overview of [John’s] work for more pictures and links to different parts of the #wearenotwaiting community.

Lego Drawing Machine Draws Block Shapes Best

Lego-drawing machine

Loving to draw but deathly afraid of pen ink, [Marcel] came up with a little drawing machine made out of Lego that will do it for him. It’s not a very complicated build but it does have several different components arranged such to complete a task, and that in itself is cool. Oh yeah, just kidding about the “afraid of pen ink” thing.

RC Car Servos are used to drive the pen in the X and Y directions. These servos only have a 180 degree range of motion which is not enough to move the pen very far. To increase the pen’s travel distance, [Marcel] attached a large gear to the servo which rotates a much smaller gear that rides on a rack gear attached to the bed. A Lego hinge takes the place of a Z axis and is used to set the height of the pen that is strapped to the machine via rubber band.

In order to make the machine draw, the user moves an analog joystick. The changing resistance values of the joystick’s potentiometers are measured by an Arduino. The Arduino then moves each servo to the appropriate position using PWM. If you’d like to know how to do this, check out the Knob Tutorial.

If you’re not ready to l’eggo your Lego drawing machines, check out this super complicated creation or this arm emulator that draws the Mona Lisa.


Hackaday Links: July 13, 2014

hackaday-links-chain

Don’t like sunglasses? Deal with it. They’re the pixeley, retro sunglasses from your favorite animated .GIFs, made real in laser cut acrylic. Points of interest include heat-bent frames made out of a single piece of acrylic.

Remember this really small FPGA board? The kickstarter is ending really soon and they’re upgrading it (for an additional $30) with a much better FPGA.

Sparkfun is now hosting the Internet of Things. They’re giving people a tiny bit of space to push data to, and you can also deploy your own server. That’s interesting, and you can expect us doing a full post on this soon.

Need waveforms? [Datanoise] is building a wavetable synthesizer, and he’s put all his waveforms online. Now if we could just get a look at the synth…

If you only have $20 to spend on a board, you’ll want to pick up at Teensy 3.1. [Karl] wrote some bare metal libraries for this awesome board, and while it’s not as extensive as the standard Arduino libs, it’s more than enough to get most projects off the ground. Included are UARTs, string manipulation tools, support for the periodic interval timers on the chip, and FAT and SD card support.

ADC For Raspi Without Using An ADC

Schematic of ACD for a raspi

With all the amazing and wonderful things a Raspberry Pi can do, it is sorely lacking a dedicated ADC chip. Sure, you can wire up an ADC via SPI or even I2C with a little work, but still. It would be nice to have access to an Analog to Digital converter without having to go through the trouble. Fortunately, [Hussam] has figured out a way to do just this.

Using a comparator, two resistors, a single capacitor and a few lines of code, [Hussam] managed to get an active ADC working on his Raspberry Pi. He’s using the PWM1 and a passive RC filter to make a DAC. He then uses the comparator along with a ‘ successive approximation algorithm’ to complete the ADC.

[Hussam] mentions that the hack is not new, and this technique has been used before for microcrotrollers that lack a built-in ADC. But we are still impressed with his attention to detail in describing how to do this on a Raspi. Be sure to check out the link for full details, code, and an awesome description on how his algorithm works.

Introducing The Raspberry Pi B+

It looks like Element 14 screwed up a single shipment, because some lucky soul just received an unreleased model of Raspberry Pi. If you can believe the silkscreen, it’s called the Raspberry Pi Model B+, and while we have no idea what the chipset is, the layout and peripherals look pretty cool.

From the looks of it, this new board features four USB ports, a new, 40-pin GPIO header, and more screw holes that will allow you to secure this to anything. The analog video out is gone, and the SD card connector – a weak point of the original design – might be replaced with a microSD connector. Oh, every Raspi case that has ever been made? They won’t work.

Without booting this Raspi B+ there’s no way of knowing what the chipset is on this new board. The smart money is on the entire SOC being the same: basically, what you’re looking at is the same as a Raspberry Pi Model B, only with a few more ports.

There is no clue when these improved Raspis will be available, but the word “soon™” will probably appear on the Raspberry Pi blog shortly.

Thanks [John] for the tip.

EDIT: [feuerrot] is smarter than me and mirrored all the images in an imgur album.


Proper Debugging For Energia Sketches

Moving a sketch from Energia to Code Composer Studio

Energia is a tool that brings the Arduino and Wiring framework to Texas Instruments’ MSP430 microcontrollers and the MSP430 Launchpad development board. This allows for easy development in an Arduino-like environment while targeting a different microcontroller family.

One problem with Energia and Arduino is the difficulty of debugging. Usually, we’re stuck putting a Serial.println(); and watching the serial port to trace what our program is doing. Other options include blinking LEDs, or using external displays.

Code Composer Studio, TI’s official development tool, allows for line-by-line debugging of applications. You can set breakpoints, watch the value of variables, and step through an application one instruction at a time.

The good news is that the latest version of Code Composer Studio supports importing Energia sketches. Once imported, you can step through the code and easily debug your application. This is a huge help to people developing more complex software using Energia, such as libraries.

TI gives us an overview of the new feature in a video after the break.

[Thanks to Adrian for the tip!]

Continue reading “Proper Debugging For Energia Sketches”

A Fully Mechanical 3D Printer Is Mind Blowing

mechanical 3d printer

It’s been a while since we’ve been seriously impressed with a project like this one. [Daniël de Bruin], a student at the Art Academy in Utrecht has just put the final touches on his mechanical 3D printer.

That’s right. Mechanical.

No computers, no motors, just the power of gravity. It could have been built 100 years ago.

The machine uses a 15kg weight to power the mechanism — it does need to be reset during the print, but that’s a small price to pay for this kind of mechanical automation.

He uses a type of clay in a paste extruder that slowly deposits the material on the build platform. To program the machine, there is a small guiding mechanism that follows the contour of a bent aluminum wire. This allows you to make any number of symmetrical and circular objects.

[Daniël] says he was inspired to build this machine because he loves 3D printing — but at the same time, he feels like it’s kind of like cheating. Beyond pressing the print button, there’s no real human interaction.

I love technology but how can I reclaim ownership of my work? Perhaps by building the machine that produces the work. Perhaps by physically powering the machine, which I built, that produces the work. in hopes of rediscovering the sense of having created something, I create.

Continue reading “A Fully Mechanical 3D Printer Is Mind Blowing”